Quantcast
Channel: The Crazy Programmer
Viewing all 761 articles
Browse latest View live

Difference between HTML and HTML5

$
0
0

In this article you will learn about difference between HTML and HTML5.

Introduction to Markup Languages

The term markup language may not ring the bell for an individual who has never been a part of the web designing universe but for the professionals, it is no less than the gravitational force that keeps the world wide web organized and accessible. The markup languages are basically used to process, embed, manage and manipulate text in style files and tags by making them easier for computers to understand and control. The markup languages laid the foundation of World Wide Web years ago and all that you see in organized format is due to the perfect combination of design (CSS), text (markup) and their interaction with the help of front end scripts.

HTML

HTML (Hyper Text Markup Language) was the first out and out markup language for web development purposes and all the web pages that we see in an organized and interactive format with engaging multi media, styled texts, and many more things are due to some form of variation of the latest HTML language version. The language allows developers to organize text, hyperlinks, and multimedia in the form of interactive and engaging content in web browsers. The text structures are defined by various tags and these tags are defined by < and > characters. World Wide Web Consortium is responsible for regulating the HTML standards and its developing guidelines and works ethics since 1997. The language has evolved greatly from its primary days of complicated style and content tags principle in one single go to use of style sheets and content defining tags separately.

HTML5

The HTML markup language has very much evolved with time and HTML5 is the latest version that comes with a plethora of new features and efficiency in the web development galaxy. The latest version is a better integration of CSS, Java and HTML components that are focused to make it easy for developers to create better apps and make the whole technology better accessible for the mobile devices.

Difference between HTML and HTML5

Difference between HTML and HTML5

HTML HTML5  
Allows the JavaScript to run only in the browser interface but not originally in the browser background. The JavaScript can actually run in the background of the browser itself through JS web worker API.
Does not allow audio <audio> and video <video> tags. Does allow audio and video controls and the tags.
One cannot draw various shapes (circles, triangles, rectangles, and others) in older HTML versions. HTML5 allows one to draw various shapes (circles, triangles, rectangles, and others).
 Older HTML versions are less mobile-friendly. HTML5 language is more mobile-friendly.
Supports vector graphics only with the help of programs like Flash, Silver-light, and VML. HTML 5 allows the use of virtual vector graphics without the help of programs like Flash, Silver-light, and VML.
Doctype declaration is too long and complicated in HTML. Doctype declaration is quite simple and easy in HTML 5.
Character encoding is long and complicated in HTML. Character encoding is pretty simple and easy in HTML 5.
It uses cookies to store temporary data. It uses SQL databases and application cache to store offline data.
Tracking the GeoLocation of a user browsing any website through HTML is almost impossible. One can track the GeoLocation of a user easily in HTML 5 by using  JS GeoLocation API.
Old elements still exist in older HTML. strike, frame, frameset, font, center, tt, big, dir, acronym, basefont, noframes, applet, isindex and various other deprecated elements are dropped completely in HTML 5.
Attributes like charset, async and ping are absent in HTML. Attributes of charset, async and ping are a part of HTML 5.
Parsing rules are less efficient and overall compatibility across various platforms is obsolete. HTML 5 possesses better parsing rules and compatibility across various platforms.
It does not allow drag and drop effects. HTML5 allows drag and drop effects.

IT technology is susceptible to changes and upgrades over the time and the fact that changes are inevitable holds true even in terms of markup languages. The HTML5 language has provided more benefits to developers in terms of better audio and video support with the help of incorporating the use of third party plug-ins which was not possible with the earlier versions. The various other differences between the two markup languages are:

  • The latest version of HTML (HTML5) boasts off more API’s than its predecessor. For example, HTML did not allow Java Script to run within the web browser but the latest version does support Java Script to run in background by using JS web worker API.
  • HTML5 supports the Vector graphics without colligation of programs like Flash, Silver-light, and VML.
  • The mathematical notations are better presented in HTML5 than its previous versions through the use of MathML.
  • The latest version of the markup language allows better drag and drop effects that were not possible with the previous versions.
  • HTML5 provides better compatibility across all platforms due to the much-improved parsing rules that it possesses over other versions.
  • HTML5 allows SQL databases and application cache to store temporary (offline) data while in the previous versions; only browser cache was available for serving the cause.
  • The HTML5 allows better input attributes and form controls than its predecessors like email, date and time, URL, range, tel, search, number and much
  • The deprecated elements like strike, frame, frameset, font, center, tt, big, dir, acronym, basefont, noframes, applet, isindex are dropped completely in the latest version of markup language.
  • The new and improved HTML5 consists of various new elements like; nav, audio, figcaption, progress, command, time, datalist, video, figure, meter, data, section, time, aside, canvas, summary, rp, rt, details, wbr, header, footer, keygen, embed, article, hgroup, bdi, mark, output, source, track, section, ruby and many more.
  • HTML5 also possesses the attributes like charset, async and ping, which were not present in the earlier versions of the web designing language.
  • Tabindex, id and repeat can be applied for all the elements in the latest version of markup language.

Conclusion:

Change is the rule of nature and information technology is no exception to this rule. The fickle technology aspect is consistently improving by leaving behind old technology and embracing the new. The markup languages are focused on providing a better web experience for developers and end users alike and also to make World Wide Web more accessible to the people living in even the world’s remotest corners and only better technology and attributes can help in that process.

The advanced HTML 5 is always a better prospect than the older versions due to the simple fact of more audio and video controls available with the interface. The developers who want to stay relevant with the latest technology and practices should never shy away from the latest version of the markup language. The future roll outs of the language are expected to provide better privacy tools and other core applications foundations along with digital rights management tools as stated by the World Wide Web Consortium.

The HTML horizon will expand more in upcoming years and in order to combat the needs of modern day users and to provide a better web browsing experience to them will definitely require the present developers to unravel new ways and use better technology to cater the needs of social media and mobile interface that are constantly changing the face of the digital media industry. It is very important that the web developing professionals embrace the latest version of markup language to not only stay relevant with the present demands of the industry but also to use the latest technology to overcome the challenges posed in terms of mobile technology, more responsive designs and better compatibility of the overall web applications.

Comment below if you have queries or found any information incorrect in above article for difference between HTML and HTML5.

The post Difference between HTML and HTML5 appeared first on The Crazy Programmer.


C++ STL Set Container – std::set

$
0
0

In this tutorial you will learn about STL Set container in C++ i.e. std::set and all functions applicable on it.

Set is a associative container. We know that in associative containers each element is unique. So sets are also containers that stores unique elements following in a specific order. The word associative means each value associated with a key value. For any kind of operation key will be more preferred than actual value. Here sets are special type of associative containers where value itself is key value.

Some more facts about set are, elements in set are constant. It means that we are unable to modify once we insert the element. If we want to update element then we should delete that element and again insert with updated element. The elements in the set are always sorted.

C++ STL Set

Let see some functions associated with sets:

Before working with functions let see iterators that can apply on list to manipulate the data in list.

begin(): returns iterator to the beginning

end(): returns iterator to the end of the list

rbegin(): returns reverse iterator to reverse beginning

rend(): returns reverse iterator to reverse end.

These iterators we can use in our programs.

First thing we need to include is set header file. Which is #include<set>

Inserting element into set:

There are different ways we can insert elements into set.

Note: In any method below when we insert an element into set it automatically inserted at proper position based on ascending sorted order.

Method 1: Insert directly by passing element.  setName.insert(element);

Method 2: Using iterator. This returns iterator at inserted position. setName.insert (iterator,value)

Method 3: Copying from another container.

Example program for inserting into set:

#include<iostream>
#include<set>

using namespace std;

int main(){
	set<int> s1; // declaring a set
	set<int> :: iterator it; // iterator for set
	
	for(int i=0;i<5;i++){
		s1.insert(i*10); // inserting using Method1
	}
	
	it= s1.begin();
	s1.insert(it,99); // inserting using Method2
	
	int ary[]= { 23, 34, 45, 56};
	s1.insert(ary, ary+4); // inserting using Method3
	
	//checking by printing
	for(it= s1.begin(); it!=s1.end(); it++)
		cout << *it << " ";
	
	// We can observe that output will be print in sorted order. That is the property of set
	
	return 0;
}

Output

0 10 20 23 30 34 40 45 56 99

Some more functions applicable on set are:

erase(): We can erase an element by specifying value or pointing to iterator.

swap(): swaps elements of set1 to set2 and set2 to set1.

clear(): removes all elements in the list. It results list of size 0.

Example program to show usage of above functions:

#include<iostream>
#include<set>

using namespace std;

int main(){
	set<int> s1;
	set<int> :: iterator it;
	
	for(int i=0; i<5; i++)
		s1.insert(i+10);
	
	s1.erase(12); // deleting element 12
	cout << "deleting  element 12 --> ";
	
	for(it= s1.begin(); it!=s1.end(); it++)
		cout << *it << " ";
	
	cout << endl;
	
	set<int> s2;
	for(int i=0;i<4;i++)
		s2.insert(i);
	
	cout << "set1 elements before swapping --> ";
	for(it= s1.begin(); it!= s1.end(); it++)
		cout<< *it << " ";
	
	cout << endl;
	
	cout << "set2 elements before swapping --> ";
	for(it= s2.begin(); it!= s2.end(); it++)
		cout<< *it << " ";
	
	cout << endl;
	
	s1.swap(s2); // swapping operation

	cout << "set1 elements after swapping --> ";
	for(it= s1.begin(); it!= s1.end(); it++)
		cout<< *it << " ";
	
	cout << endl;
	
	cout << "set2 elements after swapping --> ";
	for(it= s2.begin(); it!= s2.end(); it++)
		cout<< *it << " ";
	
	cout << endl;

	s1.clear(); // clearing list1
	s1.empty() ? cout <<"list is empty" << endl: cout << "list is not empty" << endl;
	// ternary operation which resutls list is empty or not

	return 0;
}

Output

deleting element 12 –> 10 11 13 14
set1 elements before swapping –> 10 11 13 14
set2 elements before swapping –> 0 1 2 3
set1 elements after swapping –> 0 1 2 3
set2 elements after swapping –> 10 11 13 14
list is empty 

Some more functions are:

empty(): returns a Boolean value whether set is empty or not.

size(): returns the size of the list.

max_size(): returns the maximum size a set can have.

find(): It returns iterator to the element.

count(x):  Returns how many times elements “x” present in set.

Example program to show usage of above functions:

#include<iostream>
#include<set>

using namespace std;

int main(){
	set<int> s1;
	set<int> :: iterator it;
	
	for(int i=0; i<5; i++)
		s1.insert(i+10);
	
	s1.empty() ? cout <<"list is empty" << endl: cout << "list is not empty" << endl;
	cout << "size of the list is " << s1.size() << endl;
	cout << "maximum size of the list is " << s1.max_size() << endl;
	cout << "finding elemnt 12 in list" << endl;
	it= s1.find(12);
	cout << *it << endl;
	
	s1.insert(12);
	if(s1.count(22))
		cout << "number 22 is in the list " << endl;
	else
		cout << "22 is not in the list";
		
	return 0;
}

Output

list is not empty
size of the list is 5
maximum size of the list is 461168601842738790
finding elemnt 12 in list
12
22 is not in the list

Comment below if you have any queries or found any information incorrect in above tutorial for STL Set container in C++.

The post C++ STL Set Container – std::set appeared first on The Crazy Programmer.

C++ STL Map Container – std::map

$
0
0

In this tutorial you will learn about STL Map container in C++ i.e., std::map and all functions applicable on it.

Map is an associative container. Map satisfies the word “associative”. That means every value in map is associated with a key. All keys are unique. No two mapped values can have same key. The type of key and stored values may differ. All elements follow a strict order. When we insert element automatically stored in its correct position.

C++ STL Map

Iterators that can be applicable on map:

begin(): returns iterator to the beginning.

end(): returns iterator to the end of the map.

rbegin(): returns reverse iterator to reverse beginning.

rend(): returns reverse iterator to reverse end.

cbegin(): Returns constant iterator to the beginning.

cend(): Returns constant iterator to the end.

These iterators we can use in our programs.

First thing we need to include map header file. Which is #include<map>

Let see some functions associated with map:

Inserting element into map:

Whenever an element inserted into map, size of the map increases. Since map contains unique keys when we try to insert an element into map, it always checks whether any element already inserted or not with this same key value.

There are different ways we can insert elements into map.

Method 1: Insert directly by passing element and its corresponding key.

mapName.insert (pair <keydataType, value dataType> ( key, value ));

Method 2: Using iterator. This returns iterator at inserted position.

mapName.insert (iterator,  pair < keyDatatype, value datatype > (key value, data value));

Example program for inserting into map:

#include <iostream>
#include <map>
#include <iterator>

using namespace std;

int main(){
	map < int, int> mp1; // declaring map
	map < int, int> :: iterator it;
	
	// Inserting method 1:
	for (int i=0; i<5; i++) {
		mp1.insert (pair < int, int> (i, i*10));
	} 
	// Caution: If you give any constant in place of first argument in insert. Only the first value will be inserted. Remaining will be pushed out as duplicates.
	
	// inserting method 2:
	it= mp1.begin();
	mp1.insert(it, pair < int, int> (99, 99));
	// Even this was inserted at starting position, due to porperty of ordering of associative containers it sorted according to its key value and inserted at last position.
	
	it= mp1.end();
	mp1.insert(it, pair < int, int> (10, 10));
	
	// printing 
	for ( it= mp1.begin(); it!=mp1.end(); it++) {
		cout << it -> first; 
		cout << '\t';
		cout << it -> second;
		cout << endl;
	}
	
	return 0;
}

Output

0 0
1 10
2 20
3 30
4 40
10 10
99 99

Other modification functions on map:

erase(): We can remove single element or a range of elements. The effect on map is whenever a value deleted from map, its size get reduced.

swap(): swaps elements of map1 to map2 and map2 to map1. Here both map1 and map2 are need not be of same size.

clear(): removes all elements in the map. It results map of size 0.

Example program to show above function:

#include <iostream>
#include <map>
#include <iterator>

using namespace std;

int main(){
	map < int, int > mp1;
	map < int, int > mp2;
	map <int, int> :: iterator it;
	
	for (int i=0; i<5; i++){
	// inserting elements into map
		mp1.insert (pair <int, int> (i,i+10));
	}
	
	// deleting element pointed by iterator
	it = mp1.begin();
	mp1.erase(it); // key 0 deleted
	
	cout << "printing remaining elements after one erase operation" << endl;
	for ( it= mp1.begin(); it!=mp1.end(); it++) {
		cout << it -> first; 
		cout << '\t';
		cout << it -> second;
		cout << endl;
	}
	
	// erasing range of values
	it= mp1.begin();
	mp1.erase(it,mp1.end());
	// this will erase all map
	
	cout << "checking map empty or not" << endl;
	int chk= mp1.empty();
	if (chk==1 )
		cout << "map is empty" << endl;
	else
		cout << "map is not empty" << endl;
	
	for (int i=0; i<5; i++){
	// inserting elements into map1
		mp1.insert (pair <int, int> (i,i+10));
	} 
	
	for (int i=0; i<5; i++){
	// inserting elements into map2
		mp2.insert (pair <int, int> (i,i*10));
	}
	
	cout << "map1 elements before swap" << endl;
	for ( it= mp1.begin(); it!=mp1.end(); it++) {
		cout << it -> first; 
		cout << '\t';
		cout << it -> second;
		cout << endl;
	}
	
	cout << "map2 elements before swap" << endl;
	for ( it= mp2.begin(); it!=mp2.end(); it++) {
		cout << it -> first; 
		cout << '\t';
		cout << it -> second;
		cout << endl;
	}
	
	// doing swaping operation
	mp1.swap(mp2);
	cout << "map1 elements after swap" << endl;
	
	for ( it= mp1.begin(); it!=mp1.end(); it++) {
		cout << it -> first; 
		cout << '\t';
		cout << it -> second;
		cout << endl;
	}
	
	cout << "map2 elements after swap" << endl;
	for ( it= mp2.begin(); it!=mp2.end(); it++) {
		cout << it -> first; 
		cout << '\t';
		cout << it -> second;
		cout << endl;
	}
	
	cout << "applying clear operation" << endl;
	mp1.clear(); mp2.clear();
	chk= mp1.empty();
	
	if (chk == 1)
		cout << "map is empty by clear operation" << endl;
	else
		cout << "map is not empty";
	
	return 0;
}

Output

printing remaining elements after one erase operation
1 11
2 12
3 13
4 14
checking map empty or not
map is empty
map1 elements before swap
0 10
1 11
2 12
3 13
4 14
map2 elements before swap
0 0
1 10
2 20
3 30
4 40
map1 elements after swap
0 0
1 10
2 20
3 30
4 40
map2 elements after swap
0 10
1 11
2 12
3 13
4 14
applying clear operation
map is empty by clear operation

Functions related to capacity:

empty(): returns a Boolean value whether map is empty or not.

size(): returns the size of the map.

max_size(): returns the maximum size a map can have.

Example program to show above functions:

#include <iostream>
#include <map>
#include <iterator>

using namespace std;

int main(){
	map < int, int> mp1;
	map < int, int> :: iterator it;
	
	for(int i=0; i<5; i++) {
		mp1.insert (pair <int, int> (i, i*10 ));
	}
	
	int chk = mp1.empty();
	if (chk == 1)
		cout << " map is empty" << endl;
	else
		cout << "map contains some elements" << endl;
	
	cout << "size of the map is " ;
	cout << mp1.size() << endl;
	
	cout << "maximum size of the map is " ;
	cout << mp1.max_size() << endl; 
	
	return 0;
}

Output

map contains some elements
size of the map is 5
maximum size of the map is 461168601842738790

Comment below if you have queries or found any information incorrect in above tutorial for C++ STL Map container i.e. std::map.

The post C++ STL Map Container – std::map appeared first on The Crazy Programmer.

Pl/SQL Program for Palindrome Number

$
0
0

Here you will get pl/sql program for palindrome number.

A number is called palindrome number if its reverse is equal to itself. For example 12321 is palindrome while 123 is not palindrome.

Pl/SQL Program for Palindrome Number

declare
    n number;
    m number;
    rev number:=0;
    r number;
 
begin
    n:=12321;
    m:=n;
	
    while n>0
    loop
        r:=mod(n,10);
        rev:=(rev*10)+r;
        n:=trunc(n/10);
    end loop;
    
    if m=rev
    then
        dbms_output.put_line('number is palindrome');
    else
        dbms_output.put_line('number is not palindrome');
    end if;
end;
/

Output

number is palindrome

Comment below if you have any queries regarding above palindrome program in pl sql.

The post Pl/SQL Program for Palindrome Number appeared first on The Crazy Programmer.

PL/SQL Program to Swap two Numbers

$
0
0

Here you will get pl/sql program to swap two numbers with and without using temporary variable.

Method 1: Using Temporary Variable

declare
    a number;
    b number;
    temp number;

begin
    a:=5;
    b:=10;
    
    dbms_output.put_line('before swapping:');
    dbms_output.put_line('a='||a||' b='||b);
    
    temp:=a;
    a:=b;
    b:=temp;
    
    dbms_output.put_line('after swapping:');
    dbms_output.put_line('a='||a||' b='||b);
    
end;
/

Output

before swapping:
a=5 b=10
after swapping:
a=10 b=5

Method 2: Without Using Temporary Variable

declare
    a number;
    b number;

begin
    a:=5;
    b:=10;
    
    dbms_output.put_line('before swapping:');
    dbms_output.put_line('a='||a||' b='||b);
    
    a:=a+b;
    b:=a-b;
    a:=a-b;
    
    dbms_output.put_line('after swapping:');
    dbms_output.put_line('a='||a||' b='||b);
    
end;
/

The post PL/SQL Program to Swap two Numbers appeared first on The Crazy Programmer.

PL/SQL Program for Armstrong Number

$
0
0

Here you will get pl/sql program for armstrong number.

A number is said to be an armstrong number if sum of its digits raised to the power n is equal to number itself, where n is total digits in number.

For example 407 is armstrong number as 4+ 03 + 7= 64 + 0 + 343 = 407.

PL/SQL Program for Armstrong Number

declare
    n number:=407;
    s number:=0;
    r number;
    len number;
    m number;
 
begin
    m:=n;

    len:=length(to_char(n));
    
    while n>0
    loop
        r:=mod(n,10);
        s:=s+power(r,len);
        n:=trunc(n/10);
    end loop;
    
    if m=s
    then
        dbms_output.put_line('armstrong number');
    else
        dbms_output.put_line('not armstrong number');
    end if;
    
end;
/

Output

armstrong number

The post PL/SQL Program for Armstrong Number appeared first on The Crazy Programmer.

PL/SQL Online Compiler – Run Oracle PL/SQL Programs Online

$
0
0

In this tutorial you will learn about pl/sql online compiler that will let you run pl/sql programs online.

Few days back I was writing plsql programs to share on this blog. There was no compiler installed on my system to test these programs. So I thought to run them quickly using online compiler. I found only one plsql online compiler that was on Oracle official website. You can’t run the programs directly on it. You have to create account and configure workspace (its one time process only) before using the compiler. As the process was not so easy so I thought to share so that it will be easier for you.

How to Run Oracle PL/SQL Programs Online?

1. Go to https://apex.oracle.com/Click on Get Started button.

Apex Oracle 1

2. Click on Free Workspace option.

Apex Oracle 2

3. Choose Application Development option and click Next.

Apex Oracle 3

4. Give first name, last name, email and any workspace name. After that click Next button.

Apex Oracle 4

5. Give some schema name and choose space allocation. After that click Next.

Apex Oracle 5

6. You will get a little survey, just choose No options and click Next button.Apex Oracle 6

7. Now accept the terms and click Next.

Apex Oracle 7

8. Click Submit Request button.

Apex Oracle 8

9. Click on Continue to Sign In Screen button. This will open a sign in screen.

Apex Oracle 9

10. Open your email account, you got an email from Oracle. There click on Create Workspace button. This will open a screen where you have to setup password.

Apex Oracle 10


11. Now login using the workspace name, email and the password that you have just created. Remember these details because you will need it whenever you want to use online compiler.

Apex Oracle 14

12. After login you will see dashboard as given below. Click on SQL Workshop option.

Apex Oracle 11

13. Click on SQL Commands option.

Apex Oracle 12

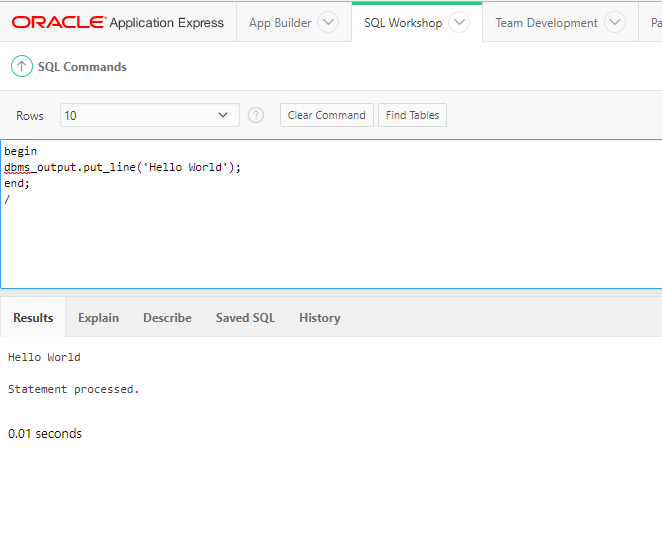
14. This will bring you to editor that allows to write and run plsql programs online.

Apex Oracle 13

Setting up of workspace is one time process only. Now you just have to login to use pl/sql online compiler.

Comment below if you have any doubts regarding above tutorial.

The post PL/SQL Online Compiler – Run Oracle PL/SQL Programs Online appeared first on The Crazy Programmer.

Vigenere Cipher in C and C++

$
0
0

In this tutorial you will learn about vigenere cipher in C and C++ for encryption and decryption.

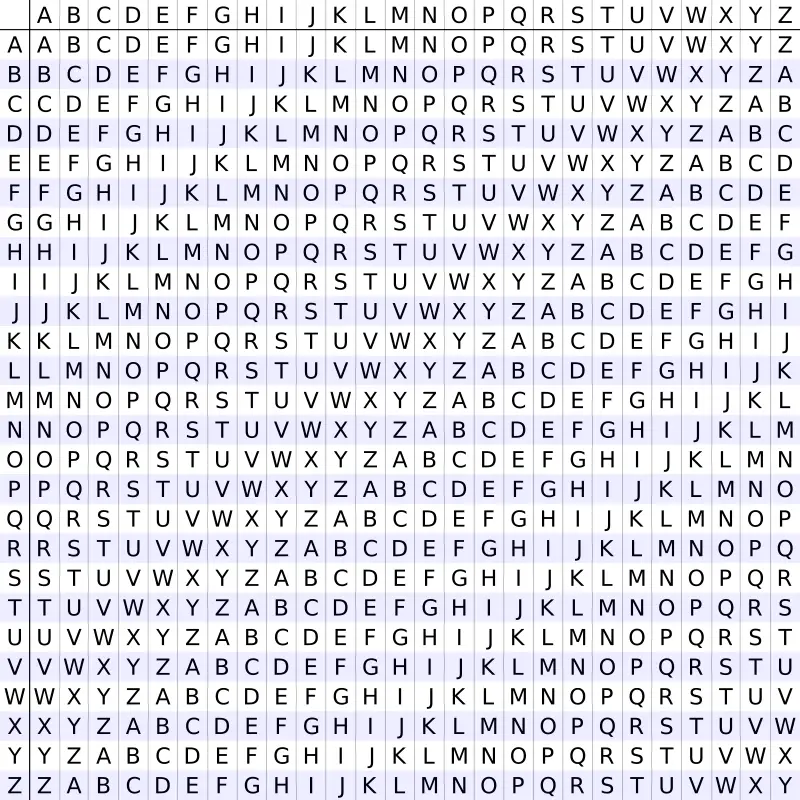
Vigenere Cipher is kind of polyalphabetic substitution method. It is used for encryption of alphabetic text. For encryption and decryption Vigenere Cipher Table is used in which alphabets from A to Z are written in 26 rows.

Vigenere Cipher Table

Also Read: Caesar Cipher in C and C++ [Encryption & Decryption]

Also Read: Hill Cipher in C and C++ (Encryption and Decryption)

Vigenere Cipher Encryption

Message Text: THECRAZYPROGRAMMER

Key: HELLO

Here we have to obtain a new key by repeating the given key till its length become equal to original message length.

New Generated Key: HELLOHELLOHELLOHEL

For encryption take first letter of message and new key i.e. T and H. Take the alphabet in Vigenere Cipher Table where T row and H column coincides i.e. A.

Repeat the same process for all remaining alphabets in message text. Finally the encrypted message text is:

Encrypted Message: ALPNFHDJAFVKCLATIC

The algorithm can be expressed in algebraic form as given below. The cipher text can be generated by below equation.

E= (P+ Ki) mod 26

Here P is plain text and K is key.

Vigenere Cipher Decryption

Encrypted Message: ALPNFHDJAFVKCLATIC

Key: HELLO

New Generated Key: HELLOHELLOHELLOHEL

Take first alphabet of encrypted message and generated key i.e. A and H. Analyze Vigenere Cipher Table, look for alphabet A in column H, the corresponding row will be the first alphabet of original message i.e. T.

Repeat the same process for all the alphabets in encrypted message.

Original Message: THECRAZYPROGRAMMER

Above process can be represented in algebraic form by following equation.

Pi = (E– Ki + 26) mod 26

We will use above algebraic equations in the program.

Program for Vigenere Cipher in C

#include<stdio.h>
#include<string.h>

int main(){
    char msg[] = "THECRAZYPROGRAMMER";
    char key[] = "HELLO";
    int msgLen = strlen(msg), keyLen = strlen(key), i, j;

    char newKey[msgLen], encryptedMsg[msgLen], decryptedMsg[msgLen];

    //generating new key
    for(i = 0, j = 0; i < msgLen; ++i, ++j){
        if(j == keyLen)
            j = 0;

        newKey[i] = key[j];
    }

    newKey[i] = '\0';

    //encryption
    for(i = 0; i < msgLen; ++i)
        encryptedMsg[i] = ((msg[i] + newKey[i]) % 26) + 'A';

    encryptedMsg[i] = '\0';

    //decryption
    for(i = 0; i < msgLen; ++i)
        decryptedMsg[i] = (((encryptedMsg[i] - newKey[i]) + 26) % 26) + 'A';

    decryptedMsg[i] = '\0';

    printf("Original Message: %s", msg);
    printf("\nKey: %s", key);
    printf("\nNew Generated Key: %s", newKey);
    printf("\nEncrypted Message: %s", encryptedMsg);
    printf("\nDecrypted Message: %s", decryptedMsg);

	return 0;
}

Output

Original Message: THECRAZYPROGRAMMER
Key: HELLO
New Generated Key: HELLOHELLOHELLOHEL
Encrypted Message: ALPNFHDJAFVKCLATIC
Decrypted Message: THECRAZYPROGRAMMER

Program for Vigenere Cipher in C++

#include<iostream>
#include<string.h>

using namespace std;

int main(){
    char msg[] = "THECRAZYPROGRAMMER";
    char key[] = "HELLO";
    int msgLen = strlen(msg), keyLen = strlen(key), i, j;

    char newKey[msgLen], encryptedMsg[msgLen], decryptedMsg[msgLen];

    //generating new key
    for(i = 0, j = 0; i < msgLen; ++i, ++j){
        if(j == keyLen)
            j = 0;

        newKey[i] = key[j];
    }

    newKey[i] = '\0';

    //encryption
    for(i = 0; i < msgLen; ++i)
        encryptedMsg[i] = ((msg[i] + newKey[i]) % 26) + 'A';

    encryptedMsg[i] = '\0';

    //decryption
    for(i = 0; i < msgLen; ++i)
        decryptedMsg[i] = (((encryptedMsg[i] - newKey[i]) + 26) % 26) + 'A';

    decryptedMsg[i] = '\0';

    cout<<"Original Message: "<<msg;
    cout<<"\nKey: "<<key;
    cout<<"\nNew Generated Key: "<<newKey;
    cout<<"\nEncrypted Message: "<<encryptedMsg;
    cout<<"\nDecrypted Message: "<<decryptedMsg;

	return 0;
}

Comment below if you have queries or found anything incorrect in above tutorial for vigenere cipher in C and C++.

The post Vigenere Cipher in C and C++ appeared first on The Crazy Programmer.


Difference between HTML and HTML5

$
0
0

In this article you will learn about difference between HTML and HTML5.

Introduction to Markup Languages

The term markup language may not ring the bell for an individual who has never been a part of the web designing universe but for the professionals, it is no less than the gravitational force that keeps the world wide web organized and accessible. The markup languages are basically used to process, embed, manage and manipulate text in style files and tags by making them easier for computers to understand and control. The markup languages laid the foundation of World Wide Web years ago and all that you see in organized format is due to the perfect combination of design (CSS), text (markup) and their interaction with the help of front end scripts.

HTML

HTML (Hyper Text Markup Language) was the first out and out markup language for web development purposes and all the web pages that we see in an organized and interactive format with engaging multi media, styled texts, and many more things are due to some form of variation of the latest HTML language version. The language allows developers to organize text, hyperlinks, and multimedia in the form of interactive and engaging content in web browsers. The text structures are defined by various tags and these tags are defined by < and > characters. World Wide Web Consortium is responsible for regulating the HTML standards and its developing guidelines and works ethics since 1997. The language has evolved greatly from its primary days of complicated style and content tags principle in one single go to use of style sheets and content defining tags separately.

HTML5

The HTML markup language has very much evolved with time and HTML5 is the latest version that comes with a plethora of new features and efficiency in the web development galaxy. The latest version is a better integration of CSS, Java and HTML components that are focused to make it easy for developers to create better apps and make the whole technology better accessible for the mobile devices.

Difference between HTML and HTML5

Difference between HTML and HTML5

HTML HTML5  
Allows the JavaScript to run only in the browser interface but not originally in the browser background. The JavaScript can actually run in the background of the browser itself through JS web worker API.
Does not allow audio <audio> and video <video> tags. Does allow audio and video controls and the tags.
One cannot draw various shapes (circles, triangles, rectangles, and others) in older HTML versions. HTML5 allows one to draw various shapes (circles, triangles, rectangles, and others).
 Older HTML versions are less mobile-friendly. HTML5 language is more mobile-friendly.
Supports vector graphics only with the help of programs like Flash, Silver-light, and VML. HTML 5 allows the use of virtual vector graphics without the help of programs like Flash, Silver-light, and VML.
Doctype declaration is too long and complicated in HTML. Doctype declaration is quite simple and easy in HTML 5.
Character encoding is long and complicated in HTML. Character encoding is pretty simple and easy in HTML 5.
It uses cookies to store temporary data. It uses SQL databases and application cache to store offline data.
Tracking the GeoLocation of a user browsing any website through HTML is almost impossible. One can track the GeoLocation of a user easily in HTML 5 by using  JS GeoLocation API.
Old elements still exist in older HTML. strike, frame, frameset, font, center, tt, big, dir, acronym, basefont, noframes, applet, isindex and various other deprecated elements are dropped completely in HTML 5.
Attributes like charset, async and ping are absent in HTML. Attributes of charset, async and ping are a part of HTML 5.
Parsing rules are less efficient and overall compatibility across various platforms is obsolete. HTML 5 possesses better parsing rules and compatibility across various platforms.
It does not allow drag and drop effects. HTML5 allows drag and drop effects.

IT technology is susceptible to changes and upgrades over the time and the fact that changes are inevitable holds true even in terms of markup languages. The HTML5 language has provided more benefits to developers in terms of better audio and video support with the help of incorporating the use of third party plug-ins which was not possible with the earlier versions. The various other differences between the two markup languages are:

  • The latest version of HTML (HTML5) boasts off more API’s than its predecessor. For example, HTML did not allow Java Script to run within the web browser but the latest version does support Java Script to run in background by using JS web worker API.
  • HTML5 supports the Vector graphics without colligation of programs like Flash, Silver-light, and VML.
  • The mathematical notations are better presented in HTML5 than its previous versions through the use of MathML.
  • The latest version of the markup language allows better drag and drop effects that were not possible with the previous versions.
  • HTML5 provides better compatibility across all platforms due to the much-improved parsing rules that it possesses over other versions.
  • HTML5 allows SQL databases and application cache to store temporary (offline) data while in the previous versions; only browser cache was available for serving the cause.
  • The HTML5 allows better input attributes and form controls than its predecessors like email, date and time, URL, range, tel, search, number and much
  • The deprecated elements like strike, frame, frameset, font, center, tt, big, dir, acronym, basefont, noframes, applet, isindex are dropped completely in the latest version of markup language.
  • The new and improved HTML5 consists of various new elements like; nav, audio, figcaption, progress, command, time, datalist, video, figure, meter, data, section, time, aside, canvas, summary, rp, rt, details, wbr, header, footer, keygen, embed, article, hgroup, bdi, mark, output, source, track, section, ruby and many more.
  • HTML5 also possesses the attributes like charset, async and ping, which were not present in the earlier versions of the web designing language.
  • Tabindex, id and repeat can be applied for all the elements in the latest version of markup language.

Conclusion:

Change is the rule of nature and information technology is no exception to this rule. The fickle technology aspect is consistently improving by leaving behind old technology and embracing the new. The markup languages are focused on providing a better web experience for developers and end users alike and also to make World Wide Web more accessible to the people living in even the world’s remotest corners and only better technology and attributes can help in that process.

The advanced HTML 5 is always a better prospect than the older versions due to the simple fact of more audio and video controls available with the interface. The developers who want to stay relevant with the latest technology and practices should never shy away from the latest version of the markup language. The future roll outs of the language are expected to provide better privacy tools and other core applications foundations along with digital rights management tools as stated by the World Wide Web Consortium.

The HTML horizon will expand more in upcoming years and in order to combat the needs of modern day users and to provide a better web browsing experience to them will definitely require the present developers to unravel new ways and use better technology to cater the needs of social media and mobile interface that are constantly changing the face of the digital media industry. It is very important that the web developing professionals embrace the latest version of markup language to not only stay relevant with the present demands of the industry but also to use the latest technology to overcome the challenges posed in terms of mobile technology, more responsive designs and better compatibility of the overall web applications.

Comment below if you have queries or found any information incorrect in above article for difference between HTML and HTML5.

The post Difference between HTML and HTML5 appeared first on The Crazy Programmer.

C++ STL Set Container – std::set

$
0
0

In this tutorial you will learn about STL Set container in C++ i.e. std::set and all functions applicable on it.

Set is a associative container. We know that in associative containers each element is unique. So sets are also containers that stores unique elements following in a specific order. The word associative means each value associated with a key value. For any kind of operation key will be more preferred than actual value. Here sets are special type of associative containers where value itself is key value.

Some more facts about set are, elements in set are constant. It means that we are unable to modify once we insert the element. If we want to update element then we should delete that element and again insert with updated element. The elements in the set are always sorted.

C++ STL Set

Let see some functions associated with sets:

Before working with functions let see iterators that can apply on list to manipulate the data in list.

begin(): returns iterator to the beginning

end(): returns iterator to the end of the list

rbegin(): returns reverse iterator to reverse beginning

rend(): returns reverse iterator to reverse end.

These iterators we can use in our programs.

First thing we need to include is set header file. Which is #include<set>

Inserting element into set:

There are different ways we can insert elements into set.

Note: In any method below when we insert an element into set it automatically inserted at proper position based on ascending sorted order.

Method 1: Insert directly by passing element.  setName.insert(element);

Method 2: Using iterator. This returns iterator at inserted position. setName.insert (iterator,value)

Method 3: Copying from another container.

Example program for inserting into set:

#include<iostream>
#include<set>

using namespace std;

int main(){
	set<int> s1; // declaring a set
	set<int> :: iterator it; // iterator for set

	for(int i=0;i<5;i++){
		s1.insert(i*10); // inserting using Method1
	}

	it= s1.begin();
	s1.insert(it,99); // inserting using Method2

	int ary[]= { 23, 34, 45, 56};
	s1.insert(ary, ary+4); // inserting using Method3

	//checking by printing
	for(it= s1.begin(); it!=s1.end(); it++)
		cout << *it << " ";

	// We can observe that output will be print in sorted order. That is the property of set

	return 0;
}

Output

0 10 20 23 30 34 40 45 56 99

Some more functions applicable on set are:

erase(): We can erase an element by specifying value or pointing to iterator.

swap(): swaps elements of set1 to set2 and set2 to set1.

clear(): removes all elements in the list. It results list of size 0.

Example program to show usage of above functions:

#include<iostream>
#include<set>

using namespace std;

int main(){
	set<int> s1;
	set<int> :: iterator it;

	for(int i=0; i<5; i++)
		s1.insert(i+10);

	s1.erase(12); // deleting element 12
	cout << "deleting  element 12 --> ";

	for(it= s1.begin(); it!=s1.end(); it++)
		cout << *it << " ";

	cout << endl;

	set<int> s2;
	for(int i=0;i<4;i++)
		s2.insert(i);

	cout << "set1 elements before swapping --> ";
	for(it= s1.begin(); it!= s1.end(); it++)
		cout<< *it << " ";

	cout << endl;

	cout << "set2 elements before swapping --> ";
	for(it= s2.begin(); it!= s2.end(); it++)
		cout<< *it << " ";

	cout << endl;

	s1.swap(s2); // swapping operation

	cout << "set1 elements after swapping --> ";
	for(it= s1.begin(); it!= s1.end(); it++)
		cout<< *it << " ";

	cout << endl;

	cout << "set2 elements after swapping --> ";
	for(it= s2.begin(); it!= s2.end(); it++)
		cout<< *it << " ";

	cout << endl;

	s1.clear(); // clearing list1
	s1.empty() ? cout <<"list is empty" << endl: cout << "list is not empty" << endl;
	// ternary operation which resutls list is empty or not

	return 0;
}

Output

deleting element 12 –> 10 11 13 14
set1 elements before swapping –> 10 11 13 14
set2 elements before swapping –> 0 1 2 3
set1 elements after swapping –> 0 1 2 3
set2 elements after swapping –> 10 11 13 14
list is empty 

Some more functions are:

empty(): returns a Boolean value whether set is empty or not.

size(): returns the size of the list.

max_size(): returns the maximum size a set can have.

find(): It returns iterator to the element.

count(x):  Returns how many times elements “x” present in set.

Example program to show usage of above functions:

#include<iostream>
#include<set>

using namespace std;

int main(){
	set<int> s1;
	set<int> :: iterator it;

	for(int i=0; i<5; i++)
		s1.insert(i+10);

	s1.empty() ? cout <<"list is empty" << endl: cout << "list is not empty" << endl;
	cout << "size of the list is " << s1.size() << endl;
	cout << "maximum size of the list is " << s1.max_size() << endl;
	cout << "finding elemnt 12 in list" << endl;
	it= s1.find(12);
	cout << *it << endl;

	s1.insert(12);
	if(s1.count(22))
		cout << "number 22 is in the list " << endl;
	else
		cout << "22 is not in the list";

	return 0;
}

Output

list is not empty
size of the list is 5
maximum size of the list is 461168601842738790
finding elemnt 12 in list
12
22 is not in the list

Comment below if you have any queries or found any information incorrect in above tutorial for STL Set container in C++.

The post C++ STL Set Container – std::set appeared first on The Crazy Programmer.

C++ STL Map Container – std::map

$
0
0

In this tutorial you will learn about STL Map container in C++ i.e., std::map and all functions applicable on it.

Map is an associative container. Map satisfies the word “associative”. That means every value in map is associated with a key. All keys are unique. No two mapped values can have same key. The type of key and stored values may differ. All elements follow a strict order. When we insert element automatically stored in its correct position.

C++ STL Map

Iterators that can be applicable on map:

begin(): returns iterator to the beginning.

end(): returns iterator to the end of the map.

rbegin(): returns reverse iterator to reverse beginning.

rend(): returns reverse iterator to reverse end.

cbegin(): Returns constant iterator to the beginning.

cend(): Returns constant iterator to the end.

These iterators we can use in our programs.

First thing we need to include map header file. Which is #include<map>

Let see some functions associated with map:

Inserting element into map:

Whenever an element inserted into map, size of the map increases. Since map contains unique keys when we try to insert an element into map, it always checks whether any element already inserted or not with this same key value.

There are different ways we can insert elements into map.

Method 1: Insert directly by passing element and its corresponding key.

mapName.insert (pair <keydataType, value dataType> ( key, value ));

Method 2: Using iterator. This returns iterator at inserted position.

mapName.insert (iterator,  pair < keyDatatype, value datatype > (key value, data value));

Example program for inserting into map:

#include <iostream>
#include <map>
#include <iterator>

using namespace std;

int main(){
	map < int, int> mp1; // declaring map
	map < int, int> :: iterator it;

	// Inserting method 1:
	for (int i=0; i<5; i++) {
		mp1.insert (pair < int, int> (i, i*10));
	}
	// Caution: If you give any constant in place of first argument in insert. Only the first value will be inserted. Remaining will be pushed out as duplicates.

	// inserting method 2:
	it= mp1.begin();
	mp1.insert(it, pair < int, int> (99, 99));
	// Even this was inserted at starting position, due to porperty of ordering of associative containers it sorted according to its key value and inserted at last position.

	it= mp1.end();
	mp1.insert(it, pair < int, int> (10, 10));

	// printing
	for ( it= mp1.begin(); it!=mp1.end(); it++) {
		cout << it -> first;
		cout << '\t';
		cout << it -> second;
		cout << endl;
	}

	return 0;
}

Output

0 0
1 10
2 20
3 30
4 40
10 10
99 99

Other modification functions on map:

erase(): We can remove single element or a range of elements. The effect on map is whenever a value deleted from map, its size get reduced.

swap(): swaps elements of map1 to map2 and map2 to map1. Here both map1 and map2 are need not be of same size.

clear(): removes all elements in the map. It results map of size 0.

Example program to show above function:

#include <iostream>
#include <map>
#include <iterator>

using namespace std;

int main(){
	map < int, int > mp1;
	map < int, int > mp2;
	map <int, int> :: iterator it;

	for (int i=0; i<5; i++){
	// inserting elements into map
		mp1.insert (pair <int, int> (i,i+10));
	}

	// deleting element pointed by iterator
	it = mp1.begin();
	mp1.erase(it); // key 0 deleted

	cout << "printing remaining elements after one erase operation" << endl;
	for ( it= mp1.begin(); it!=mp1.end(); it++) {
		cout << it -> first;
		cout << '\t';
		cout << it -> second;
		cout << endl;
	}

	// erasing range of values
	it= mp1.begin();
	mp1.erase(it,mp1.end());
	// this will erase all map

	cout << "checking map empty or not" << endl;
	int chk= mp1.empty();
	if (chk==1 )
		cout << "map is empty" << endl;
	else
		cout << "map is not empty" << endl;

	for (int i=0; i<5; i++){
	// inserting elements into map1
		mp1.insert (pair <int, int> (i,i+10));
	}

	for (int i=0; i<5; i++){
	// inserting elements into map2
		mp2.insert (pair <int, int> (i,i*10));
	}

	cout << "map1 elements before swap" << endl;
	for ( it= mp1.begin(); it!=mp1.end(); it++) {
		cout << it -> first;
		cout << '\t';
		cout << it -> second;
		cout << endl;
	}

	cout << "map2 elements before swap" << endl;
	for ( it= mp2.begin(); it!=mp2.end(); it++) {
		cout << it -> first;
		cout << '\t';
		cout << it -> second;
		cout << endl;
	}

	// doing swaping operation
	mp1.swap(mp2);
	cout << "map1 elements after swap" << endl;

	for ( it= mp1.begin(); it!=mp1.end(); it++) {
		cout << it -> first;
		cout << '\t';
		cout << it -> second;
		cout << endl;
	}

	cout << "map2 elements after swap" << endl;
	for ( it= mp2.begin(); it!=mp2.end(); it++) {
		cout << it -> first;
		cout << '\t';
		cout << it -> second;
		cout << endl;
	}

	cout << "applying clear operation" << endl;
	mp1.clear(); mp2.clear();
	chk= mp1.empty();

	if (chk == 1)
		cout << "map is empty by clear operation" << endl;
	else
		cout << "map is not empty";

	return 0;
}

Output

printing remaining elements after one erase operation
1 11
2 12
3 13
4 14
checking map empty or not
map is empty
map1 elements before swap
0 10
1 11
2 12
3 13
4 14
map2 elements before swap
0 0
1 10
2 20
3 30
4 40
map1 elements after swap
0 0
1 10
2 20
3 30
4 40
map2 elements after swap
0 10
1 11
2 12
3 13
4 14
applying clear operation
map is empty by clear operation

Functions related to capacity:

empty(): returns a Boolean value whether map is empty or not.

size(): returns the size of the map.

max_size(): returns the maximum size a map can have.

Example program to show above functions:

#include <iostream>
#include <map>
#include <iterator>

using namespace std;

int main(){
	map < int, int> mp1;
	map < int, int> :: iterator it;

	for(int i=0; i<5; i++) {
		mp1.insert (pair <int, int> (i, i*10 ));
	}

	int chk = mp1.empty();
	if (chk == 1)
		cout << " map is empty" << endl;
	else
		cout << "map contains some elements" << endl;

	cout << "size of the map is " ;
	cout << mp1.size() << endl;

	cout << "maximum size of the map is " ;
	cout << mp1.max_size() << endl;

	return 0;
}

Output

map contains some elements
size of the map is 5
maximum size of the map is 461168601842738790

Comment below if you have queries or found any information incorrect in above tutorial for C++ STL Map container i.e. std::map.

The post C++ STL Map Container – std::map appeared first on The Crazy Programmer.

Pl/SQL Program for Palindrome Number

$
0
0

Here you will get pl/sql program for palindrome number.

A number is called palindrome number if its reverse is equal to itself. For example 12321 is palindrome while 123 is not palindrome.

Pl/SQL Program for Palindrome Number

declare
    n number;
    m number;
    rev number:=0;
    r number;

begin
    n:=12321;
    m:=n;

    while n>0
    loop
        r:=mod(n,10);
        rev:=(rev*10)+r;
        n:=trunc(n/10);
    end loop;

    if m=rev
    then
        dbms_output.put_line('number is palindrome');
    else
        dbms_output.put_line('number is not palindrome');
    end if;
end;
/

Output

number is palindrome

Comment below if you have any queries regarding above palindrome program in pl sql.

The post Pl/SQL Program for Palindrome Number appeared first on The Crazy Programmer.

PL/SQL Program to Swap two Numbers

$
0
0

Here you will get pl/sql program to swap two numbers with and without using temporary variable.

Method 1: Using Temporary Variable

declare
    a number;
    b number;
    temp number;

begin
    a:=5;
    b:=10;

    dbms_output.put_line('before swapping:');
    dbms_output.put_line('a='||a||' b='||b);

    temp:=a;
    a:=b;
    b:=temp;

    dbms_output.put_line('after swapping:');
    dbms_output.put_line('a='||a||' b='||b);

end;
/

Output

before swapping:
a=5 b=10
after swapping:
a=10 b=5

Method 2: Without Using Temporary Variable

declare
    a number;
    b number;

begin
    a:=5;
    b:=10;

    dbms_output.put_line('before swapping:');
    dbms_output.put_line('a='||a||' b='||b);

    a:=a+b;
    b:=a-b;
    a:=a-b;

    dbms_output.put_line('after swapping:');
    dbms_output.put_line('a='||a||' b='||b);

end;
/

The post PL/SQL Program to Swap two Numbers appeared first on The Crazy Programmer.

PL/SQL Program for Armstrong Number

$
0
0

Here you will get pl/sql program for armstrong number.

A number is said to be an armstrong number if sum of its digits raised to the power n is equal to number itself, where n is total digits in number.

For example 407 is armstrong number as 4+ 03 + 7= 64 + 0 + 343 = 407.

PL/SQL Program for Armstrong Number

declare
    n number:=407;
    s number:=0;
    r number;
    len number;
    m number;

begin
    m:=n;

    len:=length(to_char(n));

    while n>0
    loop
        r:=mod(n,10);
        s:=s+power(r,len);
        n:=trunc(n/10);
    end loop;

    if m=s
    then
        dbms_output.put_line('armstrong number');
    else
        dbms_output.put_line('not armstrong number');
    end if;

end;
/

Output

armstrong number

The post PL/SQL Program for Armstrong Number appeared first on The Crazy Programmer.

PL/SQL Online Compiler – Run Oracle PL/SQL Programs Online

$
0
0

In this tutorial you will learn about pl/sql online compiler that will let you run pl/sql programs online.

Few days back I was writing plsql programs to share on this blog. There was no compiler installed on my system to test these programs. So I thought to run them quickly using online compiler. I found only one plsql online compiler that was on Oracle official website. You can’t run the programs directly on it. You have to create account and configure workspace (its one time process only) before using the compiler. As the process was not so easy so I thought to share so that it will be easier for you.

How to Run Oracle PL/SQL Programs Online?

1. Go to https://apex.oracle.com/Click on Get Started button.

Apex Oracle 1

2. Click on Free Workspace option.

Apex Oracle 2

3. Choose Application Development option and click Next.

Apex Oracle 3

4. Give first name, last name, email and any workspace name. After that click Next button.

Apex Oracle 4

5. Give some schema name and choose space allocation. After that click Next.

Apex Oracle 5

6. You will get a little survey, just choose No options and click Next button.Apex Oracle 6

7. Now accept the terms and click Next.

Apex Oracle 7

8. Click Submit Request button.

Apex Oracle 8

9. Click on Continue to Sign In Screen button. This will open a sign in screen.

Apex Oracle 9

10. Open your email account, you got an email from Oracle. There click on Create Workspace button. This will open a screen where you have to setup password.

Apex Oracle 10


11. Now login using the workspace name, email and the password that you have just created. Remember these details because you will need it whenever you want to use online compiler.

Apex Oracle 14

12. After login you will see dashboard as given below. Click on SQL Workshop option.

Apex Oracle 11

13. Click on SQL Commands option.

Apex Oracle 12

14. This will bring you to editor that allows to write and run plsql programs online.

Apex Oracle 13

Setting up of workspace is one time process only. Now you just have to login to use pl/sql online compiler.

Comment below if you have any doubts regarding above tutorial.

The post PL/SQL Online Compiler – Run Oracle PL/SQL Programs Online appeared first on The Crazy Programmer.


Rail Fence Cipher Program in C and C++[Encryption & Decryption]

$
0
0

Here you will get rail fence cipher program in C and C++ for encryption and decryption.

It is a kind of transposition cipher which is also known as zigzag cipher. Below is an example.

Rail Fence Cipher Example

Here Key = 3. For encryption we write the message diagonally in zigzag form in a matrix having total rows = key and total columns = message length. Then read the matrix row wise horizontally to get encrypted message.

Rail Fence Cipher Program in C

#include<stdio.h>
#include<string.h>

void encryptMsg(char msg[], int key){
    int msgLen = strlen(msg), i, j, k = -1, row = 0, col = 0;
    char railMatrix[key][msgLen];

    for(i = 0; i < key; ++i)
        for(j = 0; j < msgLen; ++j)
            railMatrix[i][j] = '\n';

    for(i = 0; i < msgLen; ++i){
        railMatrix[row][col++] = msg[i];

        if(row == 0 || row == key-1)
            k= k * (-1);

        row = row + k;
    }

    printf("\nEncrypted Message: ");

    for(i = 0; i < key; ++i)
        for(j = 0; j < msgLen; ++j)
            if(railMatrix[i][j] != '\n')
                printf("%c", railMatrix[i][j]);
}

void decryptMsg(char enMsg[], int key){
    int msgLen = strlen(enMsg), i, j, k = -1, row = 0, col = 0, m = 0;
    char railMatrix[key][msgLen];

    for(i = 0; i < key; ++i)
        for(j = 0; j < msgLen; ++j)
            railMatrix[i][j] = '\n';

    for(i = 0; i < msgLen; ++i){
        railMatrix[row][col++] = '*';

        if(row == 0 || row == key-1)
            k= k * (-1);

        row = row + k;
    }

    for(i = 0; i < key; ++i)
        for(j = 0; j < msgLen; ++j)
            if(railMatrix[i][j] == '*')
                railMatrix[i][j] = enMsg[m++];

    row = col = 0;
    k = -1;

    printf("\nDecrypted Message: ");

    for(i = 0; i < msgLen; ++i){
        printf("%c", railMatrix[row][col++]);

        if(row == 0 || row == key-1)
            k= k * (-1);

        row = row + k;
    }
}

int main(){
    char msg[] = "Hello World";
    char enMsg[] = "Horel ollWd";
    int key = 3;

    printf("Original Message: %s", msg);

    encryptMsg(msg, key);
    decryptMsg(enMsg, key);

    return 0;
}

Output

Original Message: Hello World
Encrypted Message: Horel ollWd
Decrypted Message: Hello World

Rail Fence Cipher Program in C++

#include<iostream>
#include<string.h>

using namespace std;

void encryptMsg(char msg[], int key){
    int msgLen = strlen(msg), i, j, k = -1, row = 0, col = 0;
    char railMatrix[key][msgLen];

    for(i = 0; i < key; ++i)
        for(j = 0; j < msgLen; ++j)
            railMatrix[i][j] = '\n';

    for(i = 0; i < msgLen; ++i){
        railMatrix[row][col++] = msg[i];

        if(row == 0 || row == key-1)
            k= k * (-1);

        row = row + k;
    }

    cout<<"\nEncrypted Message: ";

    for(i = 0; i < key; ++i)
        for(j = 0; j < msgLen; ++j)
            if(railMatrix[i][j] != '\n')
                cout<<railMatrix[i][j];
}

void decryptMsg(char enMsg[], int key){
    int msgLen = strlen(enMsg), i, j, k = -1, row = 0, col = 0, m = 0;
    char railMatrix[key][msgLen];

    for(i = 0; i < key; ++i)
        for(j = 0; j < msgLen; ++j)
            railMatrix[i][j] = '\n';

    for(i = 0; i < msgLen; ++i){
        railMatrix[row][col++] = '*';

        if(row == 0 || row == key-1)
            k= k * (-1);

        row = row + k;
    }

    for(i = 0; i < key; ++i)
        for(j = 0; j < msgLen; ++j)
            if(railMatrix[i][j] == '*')
                railMatrix[i][j] = enMsg[m++];

    row = col = 0;
    k = -1;

    cout<<"\nDecrypted Message: ";

    for(i = 0; i < msgLen; ++i){
        cout<<railMatrix[row][col++];

        if(row == 0 || row == key-1)
            k= k * (-1);

        row = row + k;
    }
}

int main(){
    char msg[] = "Hello World";
    char enMsg[] = "Horel ollWd";
    int key = 3;

    cout<<"Original Message: "<<msg;

    encryptMsg(msg, key);
    decryptMsg(enMsg, key);

    return 0;
}

Comment below if you have queries related to above rail fence cipher program in C and C++.

The post Rail Fence Cipher Program in C and C++[Encryption & Decryption] appeared first on The Crazy Programmer.

Fresco Android Tutorial

$
0
0

In this tutorial you will learn how to use fresco android image library.

Fresco is an image library created by Facebook developers that can be used to display image from internet or local storage. Many popular android apps like facebook, twitter, wikipedia, 9gag, etc uses this library. If you want to create an app that loads lot of image from internet then this library is the best choice. It is great alternative of other android image libraries Picasso and Glide.

It manages memory so efficiently that app works faster and causes less crashes. Using this you can display jpg, png, gif and WebPs. Below I have shown usage of this library using one simple example.

Fresco Android Tutorial

Fresco Android Tutorial

Create an android studio project with package name com.frescoandroid.

Add following dependency in app level build.gradle file under dependencies section then sync the project.

compile 'com.facebook.fresco:fresco:1.5.0'

Note: If you want to display gif or WebPs then you need to include some more dependencies. To learn about them visit this link.

Create java class with name MyApplication that extend Application class. Before using Fresco in our project we have to initialize it, this class is used for initialization purpose. In this way we have to initialize it once and then we can use the library throughout the project.

MyApplication.java

package com.frescoandroid;

import android.app.Application;

import com.facebook.drawee.backends.pipeline.Fresco;

public class MyApplication extends Application {
    @Override
    public void onCreate() {
        super.onCreate();
        Fresco.initialize(this);
    }
}

Put this class entry in AndroidManifest.xml file. For that add android:name=”.MyApplication” attribute inside <application> tag.

As I will load image from internet so add internet access permission in AndroidManifest.xml.

<uses-permission android:name="android.permission.INTERNET" />

activity_main.xml

<?xml version="1.0" encoding="utf-8"?>
<RelativeLayout xmlns:android="http://schemas.android.com/apk/res/android"
    xmlns:app="http://schemas.android.com/apk/res-auto"
    xmlns:tools="http://schemas.android.com/tools"
    xmlns:fresco="http://schemas.android.com/apk/res-auto"
    android:layout_width="match_parent"
    android:layout_height="match_parent"
    tools:context="com.frescoandroid.MainActivity">\

    <com.facebook.drawee.view.SimpleDraweeView
        android:layout_width="150dp"
        android:layout_height="150dp"
        android:id="@+id/image"
        fresco:placeholderImage="@drawable/loading"
        />

</RelativeLayout>

For displaying the image we use <com.facebook.drawee.view.SimpleDraweeView> element in layout file. Also mention custom namespace in top level element by adding xmlns:fresco=”http://schemas.android.com/apk/res-auto” attribute.

Here I have also used placeholder image, that will be displayed until image is downloaded from internet. Make sure to place a placeholder image in drawable folder.

MainActivity.java

package com.frescoandroid;

import android.net.Uri;
import android.support.v7.app.AppCompatActivity;
import android.os.Bundle;

import com.facebook.drawee.view.SimpleDraweeView;

public class MainActivity extends AppCompatActivity {
    SimpleDraweeView image;
    String url ="https://upload.wikimedia.org/wikipedia/en/thumb/8/80/Wikipedia-logo-v2.svg/1200px-Wikipedia-logo-v2.svg.png";

    @Override
    protected void onCreate(Bundle savedInstanceState) {
        super.onCreate(savedInstanceState);
        setContentView(R.layout.activity_main);

        image = (SimpleDraweeView)findViewById(R.id.image);

        //loading image from url
        Uri uri = Uri.parse(url);
        image.setImageURI(uri);
    }
}

To show the image you just have to set the image in SimpleDraweeView ui element using setImageURI() method. Rest of the code is self explanatory. Finally save and run the project.

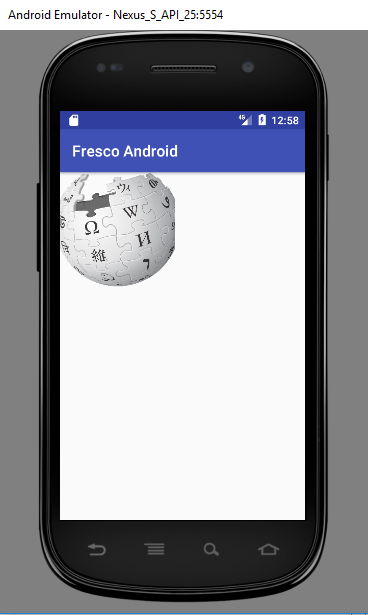
Screenshot

Fresco Android Tutorial Screenshot

To learn more functionalities of fresco library visit its official website http://frescolib.org/.

Comment below if you have doubts related to above fresco android tutorial.

The post Fresco Android Tutorial appeared first on The Crazy Programmer.

How to Get Started with Virtual Reality (VR) Development?

$
0
0

Here, you’ll get to know about Virtual Reality and how you should step by step start developing a VR Application and keep your first foot in the VR Development aura.

What is Virtual Reality?

The term virtual reality is a combination of Virtual: ‘Near’, Reality: ‘That we experience daily’. This states that Virtual Reality takes you near reality, i.e. close to the reality via various means.

For instance, the game launched recently named ‘Pokemon Go’, it took a gamer close to the reality by demanding the player to search for various pokemons in real, but the existence of the Pokemons were virtual (on the screens of the phones).

How to Get Started with Virtual Reality (VR) Development

Another example is the VR Set that enlarges the experience of gaming, music, movies or other entertainment options by providing a three-dimensional experience.

According to Yariv Levski the CEO of AppReal-VR- a virtual reality development agency, the VR gaming will increase its business everywhere, the survey’s result depict that from AR & VR gaming, Virtual Reality will dominate the market.

Virtual reality is presently the most demanding technology as it is being used in military, healthcare, education and architecture.

How to Get Started with Virtual Reality (VR) Development?

Firstly you need to choose the appropriate engines that are available to provide platform to create VR Apps.

There are two specific engines that provide the environment to build a platform for VR app development namely: Unity and Unreal.

One has to learn either C# or C++ as this will help in speeding up the creation process. If you have the knowledge of both the technologies, it’s great!

Starting up with an Online Course/Workshop

Initially you can take some Virtual Reality Workshops that will help you in smooth product designing, 3D modeling, video game design and animation. You can also engage yourself in various studies or projects or video tutorials related to Virtual Reality Development, you must have apt knowledge so that a strong knowledge foundation is constructed.

Time to Choose the Suitable Engine

As mentioned above there are two engines to choose from:

Unity: if you’re efficient at coding in C#, you can choose this engine, as this require more coding than the other engine.

Unreal: Whereas, Unreal engine requires less coding, therefore if you’re new to the coding world, you must choose Unreal engine.

VR Development 2

Image Source

If we compare both the engines, you get an advantage with Unity engine as you can customize your workspace, therefore the application will be created with you having the main control over creative aspects.

Even if you choose Unreal engine, at least basic knowledge of coding is required to develop any VR applications.

The Former Game Developers have Advantage

If you’ve developed various games through the traditional programming techniques, you’ll surely have an advantage of having wider knowledge than the people who’re new to the Virtual Reality world.

The one who directly decides to learn Gaming in Virtual Reality Development has to first learn the standard techniques of the traditional game development, as this will create a base for further developing a VR application.

Time for Resource Management

Unity engine offers free tutorials for the new-bees or we can refer them as beginners in the VR world.

Now one has to add the suitable Assets of Sound and Art, as this plays the most vital role in the VR application development, as the experience of the VR platform must seem real or close to reality for a satisfied experience.

One can use the pre-created assets available on the Unreal Marketplace and Unity asset store that are developed by experienced artists, you can drop these directly into your choice of engine and they are ready to use.

You can also choose from other options like Mixamo or Turbo Squid, or other audio sites to acquire the perfect sound effects for your game or other VR App.

We suggest you to add three key tools: user attribution, matrices and advertising. These tools can help you know the users, i.e. what they are actually performing in the application; this can be achieved by Google Analytics.

Example of attributions: Adjust or Tune.

Adding these tools might take few minutes extra but the output will be worth all the extra efforts as this will create user interface.

Implementation Time

VR Development 1

Image Source

We recommend you to start with the basics, by creating a mobile VR.

You can firstly use various app development platforms that offers you to create VR apps without any coding, these mobile apps will not be as effective, but it will be good to start your VR development journey with it.

After creating a mobile VR app, you can now try building a next level game or other application by bringing together all the required resources discussed above, we suggest you to take up an easy project and try not to develop roller-costar applications or endless running games.

You must believe in your ideas and find ways to execute it, if you don’t think you have the required skills for developing or executing your ideas, you can always take help from other VR developers, there is no harm in consulting the more experienced one.

In the End, Keep Updated

As we all know, technologies keep on changing with time, thus you need to discover the latest technologies by keeping yourself updated by following news, subscribing to various podcasts or reading amusing articles on the technology changes. As there is a lot to learn even if you think that you’ve acquired all the knowledge about a topic.

Also be ready to learn new things and extend your boundaries, you’ll make several mistakes and you might end up creating non-functional applications, but never lose hope.

Tip: If you’ve a team of VR developers working together on developing a single project for a particular organization, you can always distribute work accordingly as per their interests or specialization in various streams.

The process of creating a Virtual Reality Application might consume a lot of time, but the results will always be satisfying!

Do share your thoughts about above virtual reality development article by commenting below.

The post How to Get Started with Virtual Reality (VR) Development? appeared first on The Crazy Programmer.

Convert Decimal Number to Roman Numeral in C and C++

$
0
0

Here you will get program to convert decimal number to roman numeral in C and C++.

How it Works?

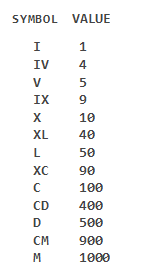
  • Divide the given number in the order 1000, 900, 500, 400, 100, 90, 50, 40, 10, 9, 5, 4, 1 to find largest base value.
  • Display the corresponding roman symbol of largest base value obtained by above method in output.
  • Subtract the given number with largest base value to get new number.
  • Repeat above process with the new number until it becomes 0.

Convert Decimal Number to Roman Numeral in C and C++

Example:

Decimal Number: 250

  • Divide it in order 1000, 900, 500, 400, 100, 90, 50, 40, 10, 9, 5, 4, 1 to find largest base value. Here 250 is divided by 100. The corresponding roman symbol for 100 is C.
  • Subtract 250 with 100 (largest base value in previous step) to get new number i.e. 150.
  • Again divide 150 in the order mentioned earlier. It is divided by 100, so corresponding roman symbol is C.
  • Subtract 150 with 100 to get new number i.e. 50.
  • Divide 50 again in the order mentioned earlier. 50 is divided by 50, so corresponding roman symbol is L.
  • Subtract 50 with 50. The new number obtained is 0 so we stop here.
  • The final roman numeral is CCL.

Below program implements above algorithm.

Program to Convert Decimal Number to Roman Numeral in C

#include<stdio.h>

void decimal2roman(int num){
    int decimal[] = {1000,900,500,400,100,90,50,40,10,9,5,4,1}; //base values
    char *symbol[] = {"M","CM","D","CD","C","XC","L","XL","X","IX","V","IV","I"};  //roman symbols
    int i = 0;

    while(num){ //repeat process until num is not 0
        while(num/decimal[i]){  //first base value that divides num is largest base value
            printf("%s",symbol[i]);    //print roman symbol equivalent to largest base value
            num -= decimal[i];  //subtract largest base value from num
        }
        i++;    //move to next base value to divide num
    }
}

int main()
{
    printf("250 -> ");
    decimal2roman(250);

    printf("\n1550 -> ");
    decimal2roman(1550);

    printf("\n670 -> ");
    decimal2roman(670);

    return 0;
}

Output

250 -> CCL
1550 -> MDL
670 -> DCLXX

Program to Convert Decimal Number to Roman Numeral in C++

#include<iostream>

using namespace std;

void decimal2roman(int num){
    int decimal[] = {1000,900,500,400,100,90,50,40,10,9,5,4,1}; //base values
    char *symbol[] = {"M","CM","D","CD","C","XC","L","XL","X","IX","V","IV","I"};  //roman symbols
    int i = 0;

    while(num){ //repeat process until num is not 0
        while(num/decimal[i]){  //first base value that divides num is largest base value
            cout<<symbol[i];    //print roman symbol equivalent to largest base value
            num -= decimal[i];  //subtract largest base value from num
        }
        i++;    //move to next base value to divide num
    }
}

int main()
{
    cout<<"250 -> ";
    decimal2roman(250);

    cout<<"\n1550 -> ";
    decimal2roman(1550);

    cout<<"\n670 -> ";
    decimal2roman(670);

    return 0;
}

Comment below if you any queries related to above program.

The post Convert Decimal Number to Roman Numeral in C and C++ appeared first on The Crazy Programmer.

C++ STL Stack Container Adaptor – std::stack

$
0
0

In this tutorial you will learn about STL stack container adaptor in C++ i.e. std::stack and all functions which it provides.

std::stack is a container adaptor. We know that container adaptors are not containers. They provide specific interfaces. Elements manipulated in container adaptors by encapsulated functions of specific classes.

Stack operates in Last in First out (LIFO) type of arrangement. Always elements will be inserted and also deleted at same side of the stack.

Working with direct operations on stack/queue and other container adaptors, will so much useful in competitive programming. It saves time and also encapsulated functions of object implemented in best complexity way. When program size too large, instead of writing entire code if we use direct functions from library that gives unambiguity while working.

C++ STL Stack Container Adaptor – std::stack

To work with stl container, we first need to include stack header file.

#include<stack>

The functions associated with stack are:

push(element): Inserting elements into stack is called “push” operation.

pop(element): Removing elements into stack is called “pop” operation.

top(element): Displays the top element of the stack.

size(element): Returns the size of the stack

empty(): This is Boolean operation which returns whether the stack is empty or not.

Program to show the above functions on stack:

#include<iostream>
#include<stack>

using namespace std;

int main()
{
	stack <int> stk; // declearing stack

	for (int i=0; i<5; i++){
		// pushing elements into stack
		stk.push(i);
	}

	cout << "size of the stack is ";
	cout << stk.size() << endl;

	cout << "top of the stack is ";
	cout << stk.top() << endl;

	// to show all elements we should pop each time.
	// Since we can only access top of the stack.
	cout << "elements of the stack are " << endl ;
	for (int i=0; i<5; i++){
		cout << stk.top() << " ";
		stk.pop(); // popping element after showing
	}
	cout << endl;

	if (stk.empty() == 1) {
		cout << "finally stack is empty " << endl;
	}
	else {
	    cout << "stack is not empty " << endl;
	}

	return 0;
}

Output

size of the stack is 5
top of the stack is 4
elements of the stack are
4 3 2 1 0
finally stack is empty

One other operations is:

swap(): Swap function swaps the elements in one stack to other.

#include <iostream>
#include <stack>

using namespace std;

int main(){
	stack <int> stk1, stk2;

	for (int i=1; i<6; i++){
		stk1.push(i+10);
	}

	cout << "elements 11, 12, 13, 14, 15 pushed into stack 1" << endl;
	for (int i=1; i<6; i++){
		stk2.push(i*10);
	}

	cout << "elements 10, 20, 30, 40, 50 pushed into stack 2" << endl;

	cout << "doing swapping operation..... " << endl;
	stk1.swap(stk2);
	cout << "after swapping " << endl;

	cout << "elements of stack 1 are " ;
	for (int i=0; i<5; i++){
		cout << stk1.top() << " ";
		stk1.pop();
	}

	cout << endl;
	cout << "elements of stack 2 are " ;
	for (int i=0; i<5; i++){
		cout << stk2.top() << " ";
		stk2.pop();
	}

	return 0;
}

Output

elements 11, 12, 13, 14, 15 pushed into stack 1
elements 10, 20, 30, 40, 50 pushed into stack 2
doing swapping operation…..
after swapping
elements of stack 1 are 50 40 30 20 10
elements of stack 2 are 15 14 13 12 11

Comment below if you have any queries related to above tutorial for stl stack or std::stack.

The post C++ STL Stack Container Adaptor – std::stack appeared first on The Crazy Programmer.

Viewing all 761 articles
Browse latest View live