In this tutorial you will learn about android xml parsing using XMLPullParser.
XML is a popular and very commonly used format for sharing data on internet. In android there are several ways to parse xml data like DOM, SAX and XMLPullParser. But in this article I will teach you how to parse xml using XMLPullParser.
Android XML Parsing Using XMLPullParser
Steps for XML Parsing
XML parsing includes following steps.
1. First we have to read the xml file or data inside InputStream.
Here I have assumed that student.xml file is present in res/raw folder of project. You can also fetch the xml data from internet using url. The xml file contains data of students as shown below.
4. Finally the data is read form XMLPullParser in following way.
String tag_name = "", text = "";
int event = parser.getEventType();
while (event != XmlPullParser.END_DOCUMENT) {
tag_name = parser.getName();
switch (event) {
case XmlPullParser.START_TAG:
break;
case XmlPullParser.TEXT:
text = parser.getText();
break;
case XmlPullParser.END_TAG:
switch(tag_name) {
case "name": textView.append("Name: " + text + "\n");
break;
case "rollno": textView.append("Roll No: " + text + "\n");
break;
case "age": textView.append("Age: " + text + "\n\n");
break;
}
break;
}
event = parser.next();
}
The above code should be placed inside try-catch block.
The getEventType() method gives the type of event. It can be END_DOCUMENT,START_TAG, END_TAG, etc. On the basis of these events we filter and read the xml data.
The getName() method gives tag name while getText() method gives text information present inside that tag.
Android XMLPullParser Example
Below is a simple example that parses student data present in xml format using XMLPullParser.
1. Create a new android project with package name com.androidxmlparser.
2. Create a folder raw under res. Add a file student.xml inside res/raw with following xml data.
3. By default you would get an activity MainActivity when you have created the project. This activity is used to display the parsed xml data. Just add following code inside its xml layout and java source file.
In this GPS tutorial you will learn how to get current location in android.
LocationManager class provides the facility to get latitude and longitude coordinates of current location. The class in which you want to get location should implement LocationListener and override all its abstract methods.
How to Get Current Location in Android Using Location Manager
Add following permissions to AndroidManifest.xml file.
In requestLocationUpdates() method the 2nd argument is time in milliseconds and 3rd argument is distance in meters. Here I have used 5000 and 5 that means after every 5 seconds and 5 meter the current location is fetched.
To get coordinates use getLatitude() and getLongitude() method on variable of Location class.
Whenever location is changed it can be fetched inside onLocationChanged() method.
Below is simple application that fetches current location on button click and displays it in textview.
In this tutorial I will teach you to integrate google maps in your android app using google maps api v2.
This API provides us various functionality like showing locations in map, showing routes, add marker, etc.
Android Google Maps API Tutorial
Android Project
1. Open Android Studio and go to New Project option. Now give a name to your project and press Next.
Image may be NSFW. Clik here to view.
2. Choose Google Maps Activity, choosing this activity makes easier to integrate google maps.
Image may be NSFW. Clik here to view.
3. Click Next and finally click on Finish to create the project.
Getting API Key
For using google maps in our project we need API key. It can be obtained in following way.
1. After creating the project you will see a file google_maps_api.xml as shown in below image. Copy the URL given in it and open it in browser.
Image may be NSFW. Clik here to view.
2. You will see a page as shown below. There agree with the terms and click Agree and continue. Make sure you are logged in to google account.
Image may be NSFW. Clik here to view.
3. Then click Create API key button.
Image may be NSFW. Clik here to view.
4. On the next page you will get API key, just copy it.
Image may be NSFW. Clik here to view.
5. Finally paste the API key in google_maps_api.xml file under string tag.
Image may be NSFW. Clik here to view.
6. Save and run the project.
When we created the project by default we got the code to display a simple google map with a marker at some location. Make sure google play services is installed and internet is enabled in the device on which you are running this app.
Image may be NSFW. Clik here to view.
Comment below if you have any doubts related to above tutorial.
I am using volley library in this example. It is a network library that is used to fetch data from server or internet. So add it to your project by adding following line of code in app level build.gradle file under dependencies section. After that sync the project.
compile 'com.android.volley:volley:1.0.0'
The following code is responsible for fetching json data from url in the form of json string using volley library.
StringRequest request = new StringRequest(url, new Response.Listener<String>() {
@Override
public void onResponse(String string) {
parseJsonData(string);
}
}, new Response.ErrorListener() {
@Override
public void onErrorResponse(VolleyError volleyError) {
Toast.makeText(getApplicationContext(), "Some error occurred!!", Toast.LENGTH_SHORT).show();
dialog.dismiss();
}
});
When data is fetched successfully then onResponse() method is called.
If there is any error while fetching data then onErrorResponse() is called and an error message is displayed in toast.
After creating the volley request we have to add it to request queue.
Here you will learn about best fit algorithm in C and C++ with program example.
Memory Management is one of the services provided by OS which is needed for Optimized memory usage of the available memory in a Computer System.
For this purpose OS uses 3 methods:-
First Fit
Best Fit
Worst Fit
In this section we will talk about Best Fit Memory Management Scheme.
What is Best Fit Memory Management Scheme?
Best fit uses the best memory block based on the Process memory request. In best fit implementation the algorithm first selects the smallest block which can adequately fulfill the memory request by the respective process.
Because of this memory is utilized optimally but as it compares the blocks with the requested memory size it increases the time requirement and hence slower than other methods. It suffers from Internal Fragmentation which simply means that the memory block size is greater than the memory requested by the process, then the free space gets wasted.
Once we encounter a process that requests a memory which is higher than block size we stop the algorithm.
Best Fit Algorithm
Get no. of Processes and no. of blocks.
After that get the size of each block and process requests.
Then select the best memory block that can be allocated using the above definition.
Display the processes with the blocks that are allocated to a respective process.
Value of Fragmentation is optional to display to keep track of wasted memory.
Stop.
Program for Best Fit Algorithm in C
#include<stdio.h>
void main()
{
int fragment[20],b[20],p[20],i,j,nb,np,temp,lowest=9999;
static int barray[20],parray[20];
printf("\n\t\t\tMemory Management Scheme - Best Fit");
printf("\nEnter the number of blocks:");
scanf("%d",&nb);
printf("Enter the number of processes:");
scanf("%d",&np);
printf("\nEnter the size of the blocks:-\n");
for(i=1;i<=nb;i++)
{
printf("Block no.%d:",i);
scanf("%d",&b[i]);
}
printf("\nEnter the size of the processes :-\n");
for(i=1;i<=np;i++)
{
printf("Process no.%d:",i);
scanf("%d",&p[i]);
}
for(i=1;i<=np;i++)
{
for(j=1;j<=nb;j++)
{
if(barray[j]!=1)
{
temp=b[j]-p[i];
if(temp>=0)
if(lowest>temp)
{
parray[i]=j;
lowest=temp;
}
}
}
fragment[i]=lowest;
barray[parray[i]]=1;
lowest=10000;
}
printf("\nProcess_no\tProcess_size\tBlock_no\tBlock_size\tFragment");
for(i=1;i<=np && parray[i]!=0;i++)
printf("\n%d\t\t%d\t\t%d\t\t%d\t\t%d",i,p[i],parray[i],b[parray[i]],fragment[i]);
}
Program for Best Fit Algorithm in C++
#include<iostream>
using namespace std;
int main()
{
int fragment[20],b[20],p[20],i,j,nb,np,temp,lowest=9999;
static int barray[20],parray[20];
cout<<"\n\t\t\tMemory Management Scheme - Best Fit";
cout<<"\nEnter the number of blocks:";
cin>>nb;
cout<<"Enter the number of processes:";
cin>>np;
cout<<"\nEnter the size of the blocks:-\n";
for(i=1;i<=nb;i++)
{
cout<<"Block no."<<i<<":";
cin>>b[i];
}
cout<<"\nEnter the size of the processes :-\n";
for(i=1;i<=np;i++)
{
cout<<"Process no. "<<i<<":";
cin>>p[i];
}
for(i=1;i<=np;i++)
{
for(j=1;j<=nb;j++)
{
if(barray[j]!=1)
{
temp=b[j]-p[i];
if(temp>=0)
if(lowest>temp)
{
parray[i]=j;
lowest=temp;
}
}
}
fragment[i]=lowest;
barray[parray[i]]=1;
lowest=10000;
}
cout<<"\nProcess_no\tProcess_size\tBlock_no\tBlock_size\tFragment";
for(i=1;i<=np && parray[i]!=0;i++)
cout<<"\n"<<i<<"\t\t"<<p[i]<<"\t\t"<<parray[i]<<"\t\t"<<b[parray[i]]<<"\t\t"<<fragment[i];
return 0;
}
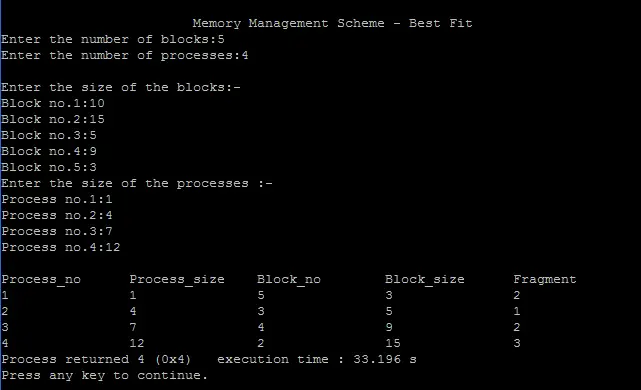
Output
Image may be NSFW. Clik here to view.
Comment below if you have any doubts related to above best fit algorithm in C and C++.
Here you will learn about first fit algorithm in C and C++ with program examples.
There are various memory management schemes in operating system like first fit, best fit and worst fit. In this section we will talk about first fit scheme.
What is First Fit Memory Management Scheme?
In this scheme we check the blocks in a sequential manner which means we pick the first process then compare it’s size with first block size if it is less than size of block it is allocated otherwise we move to second block and so on.
When first process is allocated we move on to the next process until all processes are allocated.
Here you will get android signature capture example.
You may have seen many eCommerce companies like Amazon provides a facility for digital signature. You can implement that feature in your app easily by using a library called Signature Pad.
Video Demo
Below tutorial shows you how to do this.
Android Signature Capture Example
Add to Layout
You can simply add a signature drawing view to your xml layout by using following tag.
You can simply apply a listener to Signature Pad widget in following way.
signaturePad = (SignaturePad) findViewById(R.id.signaturePad);
signaturePad.setOnSignedListener(new SignaturePad.OnSignedListener() {
@Override
public void onStartSigning() {
//Event triggered when the pad is touched
}
@Override
public void onSigned() {
//Event triggered when the pad is signed
}
@Override
public void onClear() {
//Event triggered when the pad is cleared
}
});
Get Data
You can get signature data by following methods.
getSignatureBitmap() – Gets signature bitmap with a white background.
getTransparentSignatureBitmap() – Gets signature bitmap with a transparent background.
For clearing the signature pad area use clear() method.
In below example I have just captured the signature and not saved it anywhere. You can get signature data using above methods and then save anywhere like in database or server.
Android Project
First create an android project with package name com.signaturecapture or you can use your existing project.
Now we have to add the Signature Pad library to our project. Add following line in your app level build.gradle file under dependencies section and then sync the project.
Here you will learn about flood fill algorithm in C and C++.
Flood Fill is a seed fill algorithm similar to Boundary Fill algorithm but sometimes when it is required to fill in an area that is not defined within a single color boundary we use flood fill instead of boundary fill.
For this purpose we can create a function or we can use a predefined function in the graphics.h header file which takes 3 arguments:-
In Flood Fill algorithm we start with some seed and examine the neighboring pixels, however pixels are checked for a specified interior color instead of boundary color and is replaced by a new color. It can be done using 4 connected or 8 connected region method.
Below we use 4 connected region recursive algorithm to implement this algorithm.
Algorithm
1. Create a function called as floodFill (x,y,oldcolor,newcolor)
void floodFill(int x,int y,int oldcolor,int newcolor)
{
if(getpixel(x,y) == oldcolor)
{
putpixel(x,y,newcolor);
floodFill(x+1,y,oldcolor,newcolor);
floodFill(x,y+1,oldcolor,newcolor);
floodFill(x-1,y,oldcolor,newcolor);
floodFill(x,y-1,oldcolor,newcolor);
}
}
//getpixel(x,y) gives the color of specified pixel
2. Repeat until the polygon is completely filled.
3. Stop.
Program for Flood Fill Algorithm in C and C++
C Program
#include<stdio.h>
#include<graphics.h>
#include<dos.h>
void floodFill(int x,int y,int oldcolor,int newcolor)
{
if(getpixel(x,y) == oldcolor)
{
putpixel(x,y,newcolor);
floodFill(x+1,y,oldcolor,newcolor);
floodFill(x,y+1,oldcolor,newcolor);
floodFill(x-1,y,oldcolor,newcolor);
floodFill(x,y-1,oldcolor,newcolor);
}
}
//getpixel(x,y) gives the color of specified pixel
int main()
{
int gm,gd=DETECT,radius;
int x,y;
printf("Enter x and y positions for circle\n");
scanf("%d%d",&x,&y);
printf("Enter radius of circle\n");
scanf("%d",&radius);
initgraph(&gd,&gm,"c:\\turboc3\\bgi");
circle(x,y,radius);
floodFill(x,y,0,15);
delay(5000);
closegraph();
return 0;
}
C++ Program
#include<iostream.h>
#include<graphics.h>
#include<dos.h>
void floodFill(int x,int y,int oldcolor,int newcolor)
{
if(getpixel(x,y) == oldcolor)
{
putpixel(x,y,newcolor);
floodFill(x+1,y,oldcolor,newcolor);
floodFill(x,y+1,oldcolor,newcolor);
floodFill(x-1,y,oldcolor,newcolor);
floodFill(x,y-1,oldcolor,newcolor);
}
}
//getpixel(x,y) gives the color of specified pixel
int main()
{
int gm,gd=DETECT,radius;
int x,y;
cout<<"Enter x and y positions for circle\n";
cin>>x>>y;
cout<<"Enter radius of circle\n";
cin>>radius;
initgraph(&gd,&gm,"c:\\turboc3\\bgi");
circle(x,y,radius);
floodFill(x,y,0,15);
delay(5000);
closegraph();
return 0;
}
Author Bio:
I am Rahul Maheshwari from India currently pursuing engineering degree in Computer Science. I am passionate about programming and loves to code as much as I can and likes to help people to become better in programming.
Here you will learn about boundary fill algorithm in C and C++.
Boundary Fill is another seed fill algorithm in which edges of the polygon are drawn. Then starting with some seed any point inside the polygon we examine the neighboring pixels to check whether the boundary pixel is reached. If boundary pixels are not reached, pixels are highlighted and process is continued until boundary pixels are reached.
Following is the algorithm for filling a region in a recursive manner with color specified fill color (f_color) up to a boundary color specified boundary color (b_color)
Algorithm
1. Create a function named as boundaryfill with 4 parameters (x,y,f_color,b_color).
void boundaryfill(int x,int y,int f_color,int b_color)
{
if(getpixel(x,y)!=b_color && getpixel(x,y)!=f_color)
{
putpixel(x,y,f_color);
boundaryfill(x+1,y,f_color,b_color);
boundaryfill(x,y+1,f_color,b_color);
boundaryfill(x-1,y,f_color,b_color);
boundaryfill(x,y-1,f_color,b_color);
}
}
//getpixel(x,y) gives the color of specified pixel
2. Call it recursively until the boundary pixels are reached.
3. Stop.
Program for Boundary Fill Algorithm in C and C++
C Program
#include<stdio.h>
#include<graphics.h>
#include<dos.h>
void boundaryfill(int x,int y,int f_color,int b_color)
{
if(getpixel(x,y)!=b_color && getpixel(x,y)!=f_color)
{
putpixel(x,y,f_color);
boundaryfill(x+1,y,f_color,b_color);
boundaryfill(x,y+1,f_color,b_color);
boundaryfill(x-1,y,f_color,b_color);
boundaryfill(x,y-1,f_color,b_color);
}
}
//getpixel(x,y) gives the color of specified pixel
int main()
{
int gm,gd=DETECT,radius;
int x,y;
printf("Enter x and y positions for circle\n");
scanf("%d%d",&x,&y);
printf("Enter radius of circle\n");
scanf("%d",&radius);
initgraph(&gd,&gm,"c:\\turboc3\\bgi");
circle(x,y,radius);
boundaryfill(x,y,4,15);
delay(5000);
closegraph();
return 0;
}
C++ Program
#include<iostream.h>
#include<graphics.h>
#include<dos.h>
void boundaryfill(int x,int y,int f_color,int b_color)
{
if(getpixel(x,y)!=b_color && getpixel(x,y)!=f_color)
{
putpixel(x,y,f_color);
boundaryfill(x+1,y,f_color,b_color);
boundaryfill(x,y+1,f_color,b_color);
boundaryfill(x-1,y,f_color,b_color);
boundaryfill(x,y-1,f_color,b_color);
}
}
//getpixel(x,y) gives the color of specified pixel
int main()
{
int gm,gd=DETECT,radius;
int x,y;
cout<<"Enter x and y positions for circle\n";
cin>>x>>y;
cout<<"Enter radius of circle\n";
cin>>radius;
initgraph(&gd,&gm,"c:\\turboc3\\bgi");
circle(x,y,radius);
boundaryfill(x,y,4,15);
delay(5000);
closegraph();
return 0;
}
Author Bio:
I am Rahul Maheshwari from India currently pursuing engineering degree in Computer Science. I am passionate about programming and loves to code as much as I can and likes to help people to become better in programming.
Here you will learn about liang barsky line clipping algorithm in C and C++.
This Algorithm was developed by Liang and Barsky. It is used for line clipping as it is more efficient than Cyrus Beck algorithm and Cohen Sutherland algorithm because it uses more efficient parametric equations to clip the given line.
These parametric equations are given as:
x = x1 + tdx
y = y1 + tdy, 0 <= t <= 1
Where dx = x2 – x1 & dy = y2 – y1
Liang Barsky line clipping algorithm uses 4 inequalities with 2 parameters p & q which are defined in the algorithm below.
Algorithm
1. Read 2 endpoints of line as p1 (x1, y1) & p2 (x2, y2).
2. Read 2 corners (left-top & right-bottom) of the clipping window as (xwmin, ywmin, xwmax, ywmax).
3. Calculate values of parameters pi and qi for i = 1, 2, 3, 4 such that
p1 = -dx, q1 = x1 – xwmin
p2 = dx, q2 = xwmax – x1
p3 = -dy, q3 = y1 – ywmin
p4 = dy, q4 = ywmax – y1
4. if pi = 0 then line is parallel to ith boundary
if qi < 0 then line is completely outside boundary so discard line
else, check whether line is horizontal or vertical and then check the line endpoints with the corresponding boundaries.
5. Initialize t1 & t2 as
t1 = 0 & t2 = 1
6. Calculate values for qi/pi for i = 1, 2, 3, 4.
7. Select values of qi/pi where pi < 0 and assign maximum out of them as t1.
8. Select values of qi/pi where pi > 0 and assign minimum out of them as t2.
9. if (t1 < t2)
{
xx1 = x1 + t1dx
xx2 = x1 + t2dx
yy1 = y1 + t1dy
yy2 = y1 + t2dy
line (xx1, yy1, xx2, yy2)
}
10. Stop.
Advantages
1. More efficient than other algorithms as line intersection with boundaries calculations are reduced.
2. Intersections of line are computed only once.
Program for Liang Barsky Line Clipping Algorithm in C and C++
I am Rahul Maheshwari from India currently pursuing engineering degree in Computer Science. I am passionate about programming and loves to code as much as I can and likes to help people to become better in programming.
Here you will learn about cohen sutherland line clipping algorithm in C and C++.
This is one of the oldest and most popular line clipping algorithm. To speed up the process this algorithm performs initial tests that reduce number of intersections that must be calculated. It does so by using a 4 bit code called as region code or outcodes. These codes identify location of the end point of line.
Each bit position indicates a direction, starting from the rightmost position of each bit indicates left, right, bottom, top respectively.
Once we establish region codes for both the endpoints of a line we determine whether the endpoint is visible, partially visible or invisible with the help of ANDing of the region codes.
There arises 3 cases which are explained in the algorithm below in step 4.
First of all we have to connect our project to firebase and then add the required dependencies. For doing this just follow below steps.
Note: Below method of adding firebase will work only in android studio 2.2 and higher versions. If you are using any older version then follow this link to learn how to add firebase.
1. In android studio go to Tools > Firebase. It will open firebase assistant that allows us to add firebase to android studio within few clicks.
Image may be NSFW. Clik here to view.
2. Now you will see a window as shown below. Just click on Storage section and then click Upload and download a file with Firebase Storage.
Image may be NSFW. Clik here to view.
3. Click on Connect to Firebase, this will open a browser where you have to login to firebase using google account.
Image may be NSFW. Clik here to view.
4. After that you will see a window as shown below. Here you can create a new firebase project or use an existing one. In my case I am using an existing project. Finally click on Connect to Firebase.
Image may be NSFW. Clik here to view.
5. Now click on AddFirebase Storage to your app. In the next window click on Accept Changes to add all firebase storage related dependencies to android studio project.
Image may be NSFW. Clik here to view.
Change Rules
By default we are not allowed to access firebase storage without authentication. To change it go to firebase console using any web browser. Open the firebase project that you have used in above steps and go to Storage and then Rules tab. Now change read and write rules to true as shown in below image.
Image may be NSFW. Clik here to view.
Android Project
Now comes the actual coding part. In this simple example I have given two button, one to choose the image from gallery and another to upload it.
1. Firstly image is selected from gallery using file chooser and displayed in ImageView.
2. Before using firebase we have to get its instance and then using the instance create reference to firebase storage app. It can be done by following code.
//creating reference to firebase storage
FirebaseStorage storage = FirebaseStorage.getInstance();
StorageReference storageRef = storage.getReferenceFromUrl("gs://fir-example-c4312.appspot.com"); //change the url according to your firebase app
3. Now a child reference is created and using it we call putFile() method to upload image to firebase storage.
4. If image is uploaded successfully then success message is shown otherwise error is shown in toast.
A checksum is a error detection method in Data Communication. It is used for errors which may have been introduced during transmission or storage. It is usually applied to an installation file after it is received from the download server.
The actual procedure which yields the checksum, given a data input is called a checksum function or checksum algorithm.
Checksum method can only detect errors but is unable to correct the error.
In this method a checksum is calculated based on the given binary strings which is sent with the data as redundant bits. This data + checksum is received at receiver end and checksum is calculated again, if checksum is 0 it means no error in data received, else there exists some error in the received data.
For the purpose of this program we are finding checksum for 2 binary strings.
Checksum Algorithm
Take 2 binary input strings.
Do their binary sum to find out the checksum which will be sent to the destination or to the receiver.
In binary sum there are 6 cases:-
If both bits are 0 and carry is 0, sum=0 and carry=0
If both bits are 0 and carry is 1,sum=1 and carry=0
If both bits are 1 and carry is 0,sum=0 and carry=1
If both bits are 1 and carry is 1,sum=1 and carry=1
If either bit is 1 and carry is 0,sum=1 and carry=0
If either bit is 1 and carry is 1,sum=0 and carry=1
While doing the addition we have to add the binary strings from rightmost end i.e LSB to MSB.
When binary sum is done 1’s complement of it is taken by reversing 1’s to 0’s and vice versa.
Here you will get program to implement lexical analyzer in C and C++.
Compiler is responsible for converting high level language in machine language. There are several phases involved in this and lexical analysis is the first phase.
Lexical analyzer reads the characters from source code and convert it into tokens.
Image may be NSFW. Clik here to view.
Different tokens or lexemes are:
Keywords
Identifiers
Operators
Constants
Take below example.
c = a + b;
After lexical analysis a symbol table is generated as given below.
Token
Type
c
identifier
=
operator
a
identifier
+
operator
b
identifier
;
separator
Now below I have given implementation of very simple lexical analyzer which reads source code from file and then generate tokens.
Program for Lexical Analyzer in C
#include<stdio.h>
#include<stdlib.h>
#include<string.h>
#include<ctype.h>
int isKeyword(char buffer[]){
char keywords[32][10] = {"auto","break","case","char","const","continue","default",
"do","double","else","enum","extern","float","for","goto",
"if","int","long","register","return","short","signed",
"sizeof","static","struct","switch","typedef","union",
"unsigned","void","volatile","while"};
int i, flag = 0;
for(i = 0; i < 32; ++i){
if(strcmp(keywords[i], buffer) == 0){
flag = 1;
break;
}
}
return flag;
}
int main(){
char ch, buffer[15], operators[] = "+-*/%=";
FILE *fp;
int i,j=0;
fp = fopen("program.txt","r");
if(fp == NULL){
printf("error while opening the file\n");
exit(0);
}
while((ch = fgetc(fp)) != EOF){
for(i = 0; i < 6; ++i){
if(ch == operators[i])
printf("%c is operator\n", ch);
}
if(isalnum(ch)){
buffer[j++] = ch;
}
else if((ch == ' ' || ch == '\n') && (j != 0)){
buffer[j] = '\0';
j = 0;
if(isKeyword(buffer) == 1)
printf("%s is keyword\n", buffer);
else
printf("%s is indentifier\n", buffer);
}
}
fclose(fp);
return 0;
}
Program for Lexical Analyzer in C++
#include<iostream>
#include<fstream>
#include<stdlib.h>
#include<string.h>
#include<ctype.h>
using namespace std;
int isKeyword(char buffer[]){
char keywords[32][10] = {"auto","break","case","char","const","continue","default",
"do","double","else","enum","extern","float","for","goto",
"if","int","long","register","return","short","signed",
"sizeof","static","struct","switch","typedef","union",
"unsigned","void","volatile","while"};
int i, flag = 0;
for(i = 0; i < 32; ++i){
if(strcmp(keywords[i], buffer) == 0){
flag = 1;
break;
}
}
return flag;
}
int main(){
char ch, buffer[15], operators[] = "+-*/%=";
ifstream fin("program.txt");
int i,j=0;
if(!fin.is_open()){
cout<<"error while opening the file\n";
exit(0);
}
while(!fin.eof()){
ch = fin.get();
for(i = 0; i < 6; ++i){
if(ch == operators[i])
cout<<ch<<" is operator\n";
}
if(isalnum(ch)){
buffer[j++] = ch;
}
else if((ch == ' ' || ch == '\n') && (j != 0)){
buffer[j] = '\0';
j = 0;
if(isKeyword(buffer) == 1)
cout<<buffer<<" is keyword\n";
else
cout<<buffer<<" is indentifier\n";
}
}
fin.close();
return 0;
}
Output
Image may be NSFW. Clik here to view.
The source code present in file is shown in above image.
Comment below if you have any queries regarding above program for lexical analyzer in C and C++.
Here you will get program for bucket sort in C and C++.
In bucket sort algorithm the array elements are distributed into a number of buckets. Then each bucket sorted individually either using any other sorting algorithm or by recursively applying bucket sort.
Take example shown in below image.
Image may be NSFW. Clik here to view.
Elements are distributed among buckets
Image may be NSFW. Clik here to view.
Then, elements are sorted within each bucket
Below is the program to implement this algorithm. In this program it is assumed that the array elements are between 0 to 10.
Program for Bucket Sort in C
#include<stdio.h>
#define SIZE 10
void bucketSort(int a[], int n) {
int i, j, k, buckets[SIZE];
for(i = 0; i < SIZE; ++i)
buckets[i] = 0;
for(i = 0; i < n; ++i)
++buckets[a[i]];
for(i = 0, j = 0; j < SIZE; ++j)
for(k = buckets[j]; k > 0; --k)
a[i++] = j;
}
int main() {
int i, a[] = {3, 6, 5, 1, 8, 4, 3, 1}, n = 8;
printf("Before sorting:\n");
for(i = 0; i < n; ++i)
printf("%d ", a[i]);
bucketSort(a, 8);
printf("\n\nAfter sorting:\n");
for(i = 0; i < n; ++i)
printf("%d ", a[i]);
return 0;
}
Program for Bucket Sort in C++
#include<iostream>
#define SIZE 10
using namespace std;
void bucketSort(int a[], int n) {
int i, j, k, buckets[SIZE];
for(i = 0; i < SIZE; ++i)
buckets[i] = 0;
for(i = 0; i < n; ++i)
++buckets[a[i]];
for(i = 0, j = 0; j < SIZE; ++j)
for(k = buckets[j]; k > 0; --k)
a[i++] = j;
}
int main() {
int i, a[] = {3, 6, 5, 1, 8, 4, 3, 1}, n = 8;
cout << "Before sorting:\n";
for(i = 0; i < n; ++i)
cout << a[i] << " ";
bucketSort(a, 8);
cout<< "\n\nAfter sorting:\n";
for(i = 0; i < n; ++i)
cout<< a[i] << " ";
return 0;
}
Here you get encryption and decryption program for hill cipher in C and C++.
What is Hill Cipher?
In cryptography (field related to encryption-decryption) hill cipher is a polygraphic cipher based on linear algebra. Invented by Lester S. Hill in 1929 and thus got it’s name. It was the first cipher that was able to operate on 3 symbols at once.
Encryption: The given message string and key string is represented in the form of matrix. Then key and message matrix are multiplied. Finally modulo 26 is taken for each element of matrix obtained by multiplication. The key matrix that we take here should be invertible, otherwise decryption will not be possible.
Decryption: The encrypted message matrix is multiplied by the inverse of key matrix and finally its modulo 26 is taken to get the original message.
To learn more about hill cipher you can visit following link.