Quantcast
Channel: The Crazy Programmer
Viewing all 761 articles
Browse latest View live

AJAX with JSP Using jQuery Example

$
0
0

Here you will get an example of AJAX with JSP using jQuery.

AJAX is used for sending and receiving data from server without reloading the page. We can implement AJAX easily using jQuery. It provides various methods for AJAX functionality.

I have created this example using Eclipse IDE. Below I have shared detailed steps for this.


AJAX with JSP Using jQuery Example

1. First create dynamic web project by going to File>New>Dynamic Web Project.

AJAX with JSP Using jQuery Example


2. Now give any name and click on Finish to create the project.

AJAX with JSP Using jQuery Example


3. To use jQuery in our code we need to download the jQuery library. Go to below link and download the development version of jQuery library.

Download link: https://jquery.com/download/


4. After that copy and paste it in WebContent folder in your project. See below screenshot.

AJAX with JSP Using jQuery Example


5. Create two files index.jsp and content.jsp in WebContent folder. Copy and paste following code in respective files.

index.jsp

<html>
    <head>
        <title>AJAX With JSP Using jQuery</title>
        
        <script src="jquery-1.11.3.js"></script>
        
        <script>
        $(document).ready(function(){
            $("#btn").click(function(){
                $.get("content.jsp",function(data){
                    $("h2").html(data);	
                });
                
            });        
        });
        </script>
        
    </head>
    
    <body>
    <h2></h2>
    <input type="button" id="btn" value="Show"/>
    </body>
</html>


content.jsp

<%out.print("This is AJAX with JSP using jQuery");%>


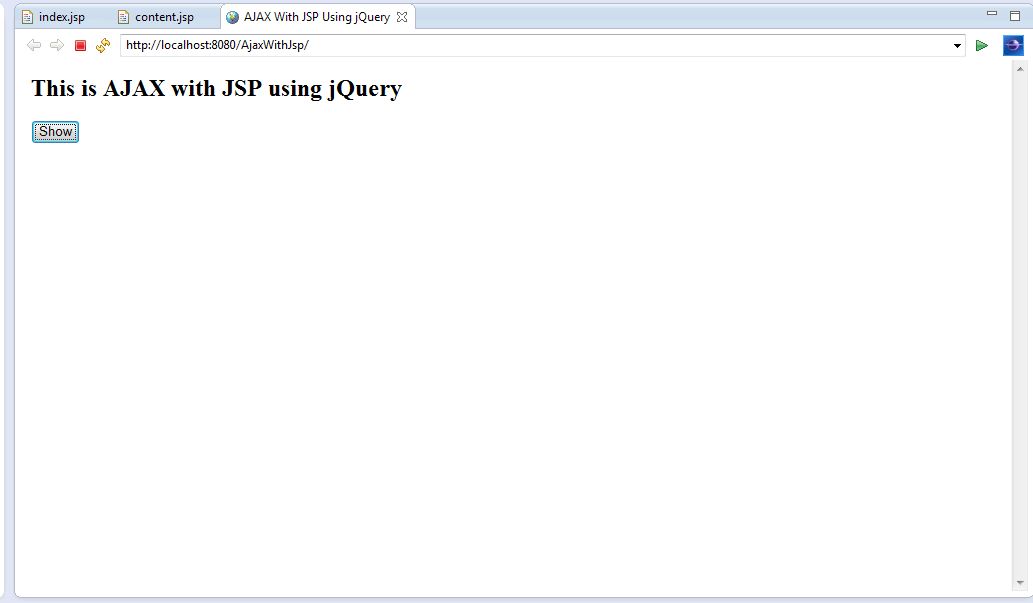
6. Finally run your project on server.


Output

AJAX with JSP Using jQuery Example

Explanation

The jQuery code is written inside head section. For using jQuery library we have to include it on our page. I have done this by providing the source of library in <script src=””></script> tag.

When we click on Show button, the get() function handles AJAX GET request and fetch data from server. Its first argument is the url of the page from where data is to be fetched. In second argument another function is called, the information fetched from server is stored in data. Finally we are writing the data in h2 tag using html() function.


Comment below if you are facing any problem.

Happy Coding!! :) :)

The post AJAX with JSP Using jQuery Example appeared first on The Crazy Programmer.


Perfect Number in C

$
0
0

Here you will get program for perfect number in C.

Perfect number is a positive number which is equal to the sum of all its divisors excluding itself.

For example:

28 is a perfect number as 1 + 2 + 4 + 7 + 14 = 28.

15 is not perfect number as 1 + 3 + 5 is not equal to 15.


Below I have shared a program to check whether a number is a perfect number or not.


Program for Perfect Number in C

#include<stdio.h>

int main(){
	int num,j,s=0;
	printf("Enter a number:");
	scanf("%d",&num);
	
	for(j=1;j<num;++j){
		if(num%j==0){
			s=s+j;
		}
	}

	if(s==num){
		printf("Perfect Number");
	}	
	else{
		printf("Not perfect number");
	}
	
	return 0;
}


Output

Perfect Number in C

The post Perfect Number in C appeared first on The Crazy Programmer.

Android Session Management Using SharedPreferences

$
0
0

Here you will get an example of android session management using SharedPreferences.

If you don’t know about SharedPreferences then read my previous tutorial: Android SharedPreferences Example

In this tutorial you will learn how to manage login session of user. The whole process works like this:

  • When user enters correct username and password then the login details are stored in SharedPreferences and user is redirected to home or welcome screen. After opening home screen I have killed or finished login screen so that user can’t go back.
  • Now even if user closes the app and open it again then he did not require to enter the login details because the details are already stored in SharedPreferences. He will be directly redirected to home screen.
  • When user click on logout button, the data stored in SharedPreferences is deleted and login session is destroyed. The user is redirected to login screen and home screen is killed so that he can’t go back.


In this way user login session is managed. Session management concept is very important and frequently used while developing any android app.

Below I have shared an example that will help you to implement it in your app.


Android Session Management Using SharedPreferences

Create a new project with package name com.sessionmanagement.

Now create two blank activities with name MainActivity and Home. By default you may get MainActivity, in that case you have to create only Home activity.

Now add following code in respective files.


Note: Here I have used programmer as username and password. You can change the login details according to you or you can get the details from server or database and then compare with it.


MainActivity.java

package com.sessionmanagement;

import android.app.Activity;
import android.content.Intent;
import android.content.SharedPreferences;
import android.os.Bundle;
import android.view.View;
import android.widget.Button;
import android.widget.EditText;
import android.widget.Toast;


public class MainActivity extends Activity {
    EditText username,password;
    Button button;
    SharedPreferences sp;

    @Override
    protected void onCreate(Bundle savedInstanceState) {
        super.onCreate(savedInstanceState);
        setContentView(R.layout.activity_main);

        username=(EditText)findViewById(R.id.username);
        password=(EditText)findViewById(R.id.password);
        button=(Button)findViewById(R.id.button);

        sp=getSharedPreferences("login",MODE_PRIVATE);

        //if SharedPreferences contains username and password then directly redirect to Home activity
        if(sp.contains("username") && sp.contains("password")){
            startActivity(new Intent(MainActivity.this,Home.class));
            finish();   //finish current activity
        }

        button.setOnClickListener(new View.OnClickListener() {
            @Override
            public void onClick(View v) {
                loginCheck();
            }
        });
    }

    void loginCheck(){
        //check username and password are correct and then add them to SharedPreferences
        if(username.getText().toString().equals("programmer") && password.getText().toString().equals("programmer")){
            SharedPreferences.Editor e=sp.edit();
            e.putString("username","programmer");
            e.putString("password","programmer");
            e.commit();

            Toast.makeText(MainActivity.this,"Login Successful",Toast.LENGTH_LONG).show();

            startActivity(new Intent(MainActivity.this,Home.class));
            finish();
        }
        else{
            Toast.makeText(MainActivity.this,"Incorrect Login Details",Toast.LENGTH_LONG).show();
        }
    }
}


activity_main.xml

<LinearLayout xmlns:android="http://schemas.android.com/apk/res/android"
    xmlns:tools="http://schemas.android.com/tools" android:layout_width="match_parent"
    android:layout_height="match_parent" android:paddingLeft="15dp"
    android:paddingRight="15dp"
    android:paddingTop="15dp"
    android:paddingBottom="15dp" tools:context=".MainActivity"
    android:orientation="vertical">

    <TextView
        android:layout_width="match_parent"
        android:layout_height="wrap_content"
        android:gravity="center"
        android:text="Login"
        android:textSize="40dp"/>

    <EditText
        android:layout_width="match_parent"
        android:layout_height="wrap_content"
        android:layout_marginTop="20dp"
        android:hint="Enter Username"
        android:id="@+id/username"/>

    <EditText
        android:layout_width="match_parent"
        android:layout_height="wrap_content"
        android:layout_marginTop="10dp"
        android:hint="Enter Password"
        android:id="@+id/password"/>

    <Button
        android:layout_width="match_parent"
        android:layout_height="wrap_content"
        android:text="Login"
        android:textSize="20dp"
        android:layout_marginTop="10dp"
        android:id="@+id/button"/>

</LinearLayout>


Home.java

package com.sessionmanagement;

import android.app.Activity;
import android.content.Intent;
import android.content.SharedPreferences;
import android.os.Bundle;
import android.view.View;
import android.widget.Button;


public class Home extends Activity {
    Button logout;

    @Override
    protected void onCreate(Bundle savedInstanceState) {
        super.onCreate(savedInstanceState);
        setContentView(R.layout.activity_home);

        logout=(Button)findViewById(R.id.logout);

        logout.setOnClickListener(new View.OnClickListener() {
            @Override
            public void onClick(View v) {
                SharedPreferences sp=getSharedPreferences("login",MODE_PRIVATE);
                SharedPreferences.Editor e=sp.edit();
                e.clear();
                e.commit();

                startActivity(new Intent(Home.this,MainActivity.class));
                finish();   //finish current activity
            }
        });
    }
}


activity_home.xml

<LinearLayout xmlns:android="http://schemas.android.com/apk/res/android"
    xmlns:tools="http://schemas.android.com/tools" android:layout_width="match_parent"
    android:layout_height="match_parent" android:paddingLeft="15dp"
    android:paddingRight="15dp"
    android:paddingTop="15dp"
    android:paddingBottom="15dp" tools:context=".MainActivity"
    android:orientation="vertical">

    <TextView
        android:layout_width="match_parent"
        android:layout_height="wrap_content"
        android:gravity="center"
        android:text="Home"
        android:textSize="40dp"/>


    <TextView
        android:layout_width="match_parent"
        android:layout_height="wrap_content"
        android:gravity="center"
        android:text="-- Welcome --"
        android:textSize="30dp"
        android:layout_marginTop="10dp"/>

    <Button
        android:layout_width="match_parent"
        android:layout_height="wrap_content"
        android:textSize="20dp"
        android:text="Logout"
        android:layout_marginTop="20dp"
        android:id="@+id/logout"/>
</LinearLayout>


Finally run and test your app.


Output

Android Session Management Using SharedPreferences

Android Session Management Using SharedPreferences

Comment below if you have any queries related to above android session management tutorial.

Happy Coding!! :) :)

The post Android Session Management Using SharedPreferences appeared first on The Crazy Programmer.

Convert ArrayList to Array in Java

$
0
0

In this tutorial you will learn how to convert ArrayList to Array in Java.

Mainly there are two ways to convert ArrayList to array.

  • Using manual way
  • Using toArray() method

Below I have share an example for both the ways.

Convert ArrayList to Array in Java

How to Convert ArrayList to Array in Java

Convert Using Manual Way

In this method we will first create an array of size equal to ArrayList size. After that fetch each element of ArrayList using get() method and then copy it into array.

package com;

import java.util.ArrayList;

public class ArrayListToArray {
	public static void main(String args[]){
		ArrayList<String> list=new ArrayList<String>();
		
		//Adding few elements in ArrayList
		list.add("C");
		list.add("C++");
		list.add("Java");
		list.add("Android");
		
		String str[]=new String[list.size()];
		
		//converting ArrayList to String Array
		for(int i=0;i<list.size();++i){
			str[i]=list.get(i);
		}
		
		//printing the converted String Array
		for(int i=0;i<str.length;++i){
			System.out.println(str[i]+" ");
		}
	}
}


Output

C
C++
Java
Android


Convert Using toArray() Method

ArrayList class provides a method toArray() which directly converts an ArrayList to Array. It can be done in following way.

package com;

import java.util.ArrayList;

public class ArrayListToArray {
	public static void main(String args[]){
		ArrayList<String> list=new ArrayList<String>();
		
		//Adding few elements in ArrayList
		list.add("C");
		list.add("C++");
		list.add("Java");
		list.add("Android");
		
		String str[]=new String[list.size()];
		
		//converting ArrayList to String Array
		str=list.toArray(str);
		
		//printing the converted String Array
		for(int i=0;i<str.length;++i){
			System.out.println(str[i]+" ");
		}
	}
}


Output

C
C++
Java
Android


These were the simple ways to convert ArrayList to Array in Java. Comment below if you found anything incorrect or have doubts related to above tutorial.

The post Convert ArrayList to Array in Java appeared first on The Crazy Programmer.

Create Java SOAP Web Service Using Eclipse

$
0
0

In this tutorial I will teach you the simplest way to create Java SOAP web service using Eclipse IDE.

I have created this example using Eclipse Kepler. I am sure it will work with any other Eclipse version. But make sure your IDE contains Apache Tomcat and Apache Axis.

Apache Axis will do the work of creating web service using Java source file and Apache Tomcat server will be used to run and test the web service.

So without wasting any time lets begin the process.

Create Java SOAP Web Service Using Eclipse

Create Java SOAP Web Service Using Eclipse

1. First of all open Eclipse and go to File > New > Dynamic Web Project

AJAX with JSP Using jQuery Example


2. Give a project name and then click on Finish button to create a dynamic web project.

Create Java SOAP Web Service Using Eclipse 1


3. Now create a Java class inside src folder in com package. You can choose the package and class name according to you.

Create Java SOAP Web Service Using Eclipse 2

Create Java SOAP Web Service Using Eclipse 3


4. For demonstration purpose I am creating a function in our class that will take two numbers and return sum of these two numbers. Add following code in your class. You can create more functions according to your requirement.

package com;

public class DemoClass {
	public String func(int a,int b){
		return String.valueOf(a+b);
	}
}


5. Right click on Java class and go to Web Services > Create Web Service.

Create Java SOAP Web Service Using Eclipse 4


6. Select all the settings as given in below screenshot. Finally click on Finish button to create the web service.

Create Java SOAP Web Service Using Eclipse 5


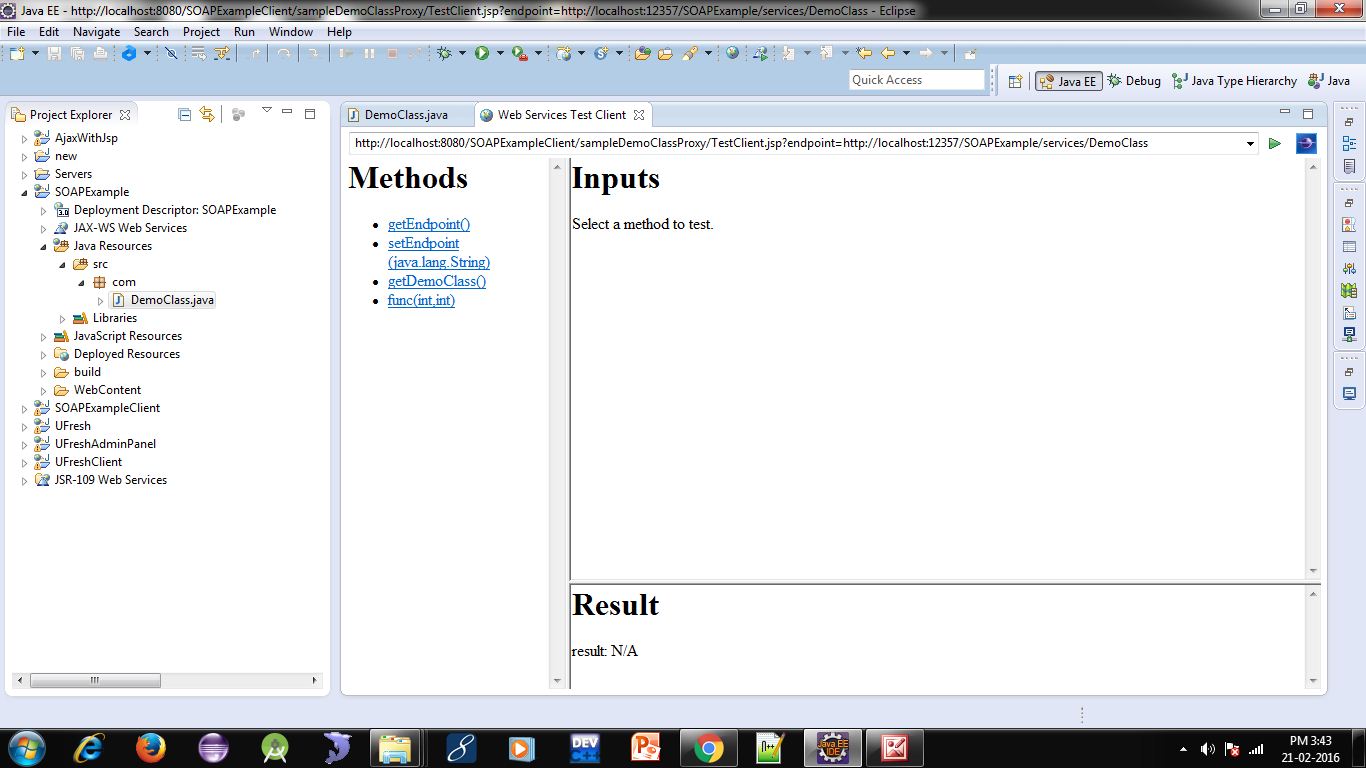
7. After the web service is created a browser will be opened. Here we have to test our web service is working properly or not.

Create Java SOAP Web Service Using Eclipse 6


8. Under Methods you can see all the methods that we have in our class. In this case we have only one method func(). Click on it, now enter values of arguments a and b in the text boxes provided. Finally click on Invoke button to invoke the method. You can see the result of the method under Result.

Create Java SOAP Web Service Using Eclipse 7


9. A WSDL file is created in SOAP web service. It contains all the details of the web service. Like name of methods, name of arguments, return type, etc. You can see the WSDL file by going to folder WebContent > wsdl.

Create Java SOAP Web Service Using Eclipse 8


10. In our case the WSDL file will look like this.

<?xml version="1.0" encoding="UTF-8"?>
<wsdl:definitions targetNamespace="http://com" xmlns:apachesoap="http://xml.apache.org/xml-soap" xmlns:impl="http://com" xmlns:intf="http://com" xmlns:wsdl="http://schemas.xmlsoap.org/wsdl/" xmlns:wsdlsoap="http://schemas.xmlsoap.org/wsdl/soap/" xmlns:xsd="http://www.w3.org/2001/XMLSchema">
<!--WSDL created by Apache Axis version: 1.4
Built on Apr 22, 2006 (06:55:48 PDT)-->
 <wsdl:types>
  <schema elementFormDefault="qualified" targetNamespace="http://com" xmlns="http://www.w3.org/2001/XMLSchema">
   <element name="func">
    <complexType>
     <sequence>
      <element name="a" type="xsd:int"/>
      <element name="b" type="xsd:int"/>
     </sequence>
    </complexType>
   </element>
   <element name="funcResponse">
    <complexType>
     <sequence>
      <element name="funcReturn" type="xsd:string"/>
     </sequence>
    </complexType>
   </element>
  </schema>
 </wsdl:types>

   <wsdl:message name="funcRequest">

      <wsdl:part element="impl:func" name="parameters">

      </wsdl:part>

   </wsdl:message>

   <wsdl:message name="funcResponse">

      <wsdl:part element="impl:funcResponse" name="parameters">

      </wsdl:part>

   </wsdl:message>

   <wsdl:portType name="DemoClass">

      <wsdl:operation name="func">

         <wsdl:input message="impl:funcRequest" name="funcRequest">

       </wsdl:input>

         <wsdl:output message="impl:funcResponse" name="funcResponse">

       </wsdl:output>

      </wsdl:operation>

   </wsdl:portType>

   <wsdl:binding name="DemoClassSoapBinding" type="impl:DemoClass">

      <wsdlsoap:binding style="document" transport="http://schemas.xmlsoap.org/soap/http"/>

      <wsdl:operation name="func">

         <wsdlsoap:operation soapAction=""/>

         <wsdl:input name="funcRequest">

            <wsdlsoap:body use="literal"/>

         </wsdl:input>

         <wsdl:output name="funcResponse">

            <wsdlsoap:body use="literal"/>

         </wsdl:output>

      </wsdl:operation>

   </wsdl:binding>

   <wsdl:service name="DemoClassService">

      <wsdl:port binding="impl:DemoClassSoapBinding" name="DemoClass">

         <wsdlsoap:address location="http://localhost:8080/SOAPExample/services/DemoClass"/>

      </wsdl:port>

   </wsdl:service>

</wsdl:definitions>


Watch Video Tutorial

So, this was the simplest way to create Java SOAP web service using eclipse. Comment below if you are facing any problem. I will try my best to help you.

The post Create Java SOAP Web Service Using Eclipse appeared first on The Crazy Programmer.

How to Insert Date and Time in MySQL Using Java

$
0
0

In this example I will show you the simplest way to insert date and time in MySQL database using Java.

This example is for inserting current date and time. You can parse any date and time to insert. Below are the steps to do this.


How to Insert Date and Time in MySQL Using Java

1. First establish connection with MySQL database.

2. Now create an object of java.utl.Date class.

3. After that create objects of java.sql.Date and java.sql.Timestamp. There constructor will take object of java.util.Date class as an argument. The getTime() method is used to get current date or time.

4. The java.sql.Date class is used for date and java.sql.Timestamp is used for storing time.

5. Now prepare a statement with insert query.

6. The setDate() method is used to set date while setTimestamp() is used to set time.

7. Finally execute the query by executeUpdate() method to insert the date and time in database.


Below I have shared an example for this.

Example

package com;

import java.sql.Connection;
import java.sql.DriverManager;
import java.sql.PreparedStatement;

public class DateTimeExample {
	public static void main(String args[]){
		try{
			Class.forName("com.mysql.jdbc.Driver");
			Connection con=DriverManager.getConnection("jdbc:mysql://localhost:3306/demo","root","root");
			
			java.util.Date date=new java.util.Date();
			
			java.sql.Date sqlDate=new java.sql.Date(date.getTime());
			java.sql.Timestamp sqlTime=new java.sql.Timestamp(date.getTime());
			
			PreparedStatement ps=con.prepareStatement("insert into record (date,time) values(?,?)");
			ps.setDate(1,sqlDate);
			ps.setTimestamp(2,sqlTime);
			ps.executeUpdate();			
			
			ps.close();
			con.close();
		}catch(Exception e){
			e.printStackTrace();
		}
	}
}


After adding the record the table will look like.

How to Insert Date and Time in MySQL Using Java

Comment below if you have any doubts related to above tutorial.

The post How to Insert Date and Time in MySQL Using Java appeared first on The Crazy Programmer.

Kali Linux Commands List (Cheat Sheet)

$
0
0

Here you will get Kali Linux commands list (cheat sheet).

Kali Linux is a Debian-based Linux distribution which was developed for penetration testing and security auditing. It provides various tools for testing security vulnerabilities. It is widely used by hackers for hacking purpose. If you have ever tried wifi password hacking then you might be familiar with Kali Linux OS.

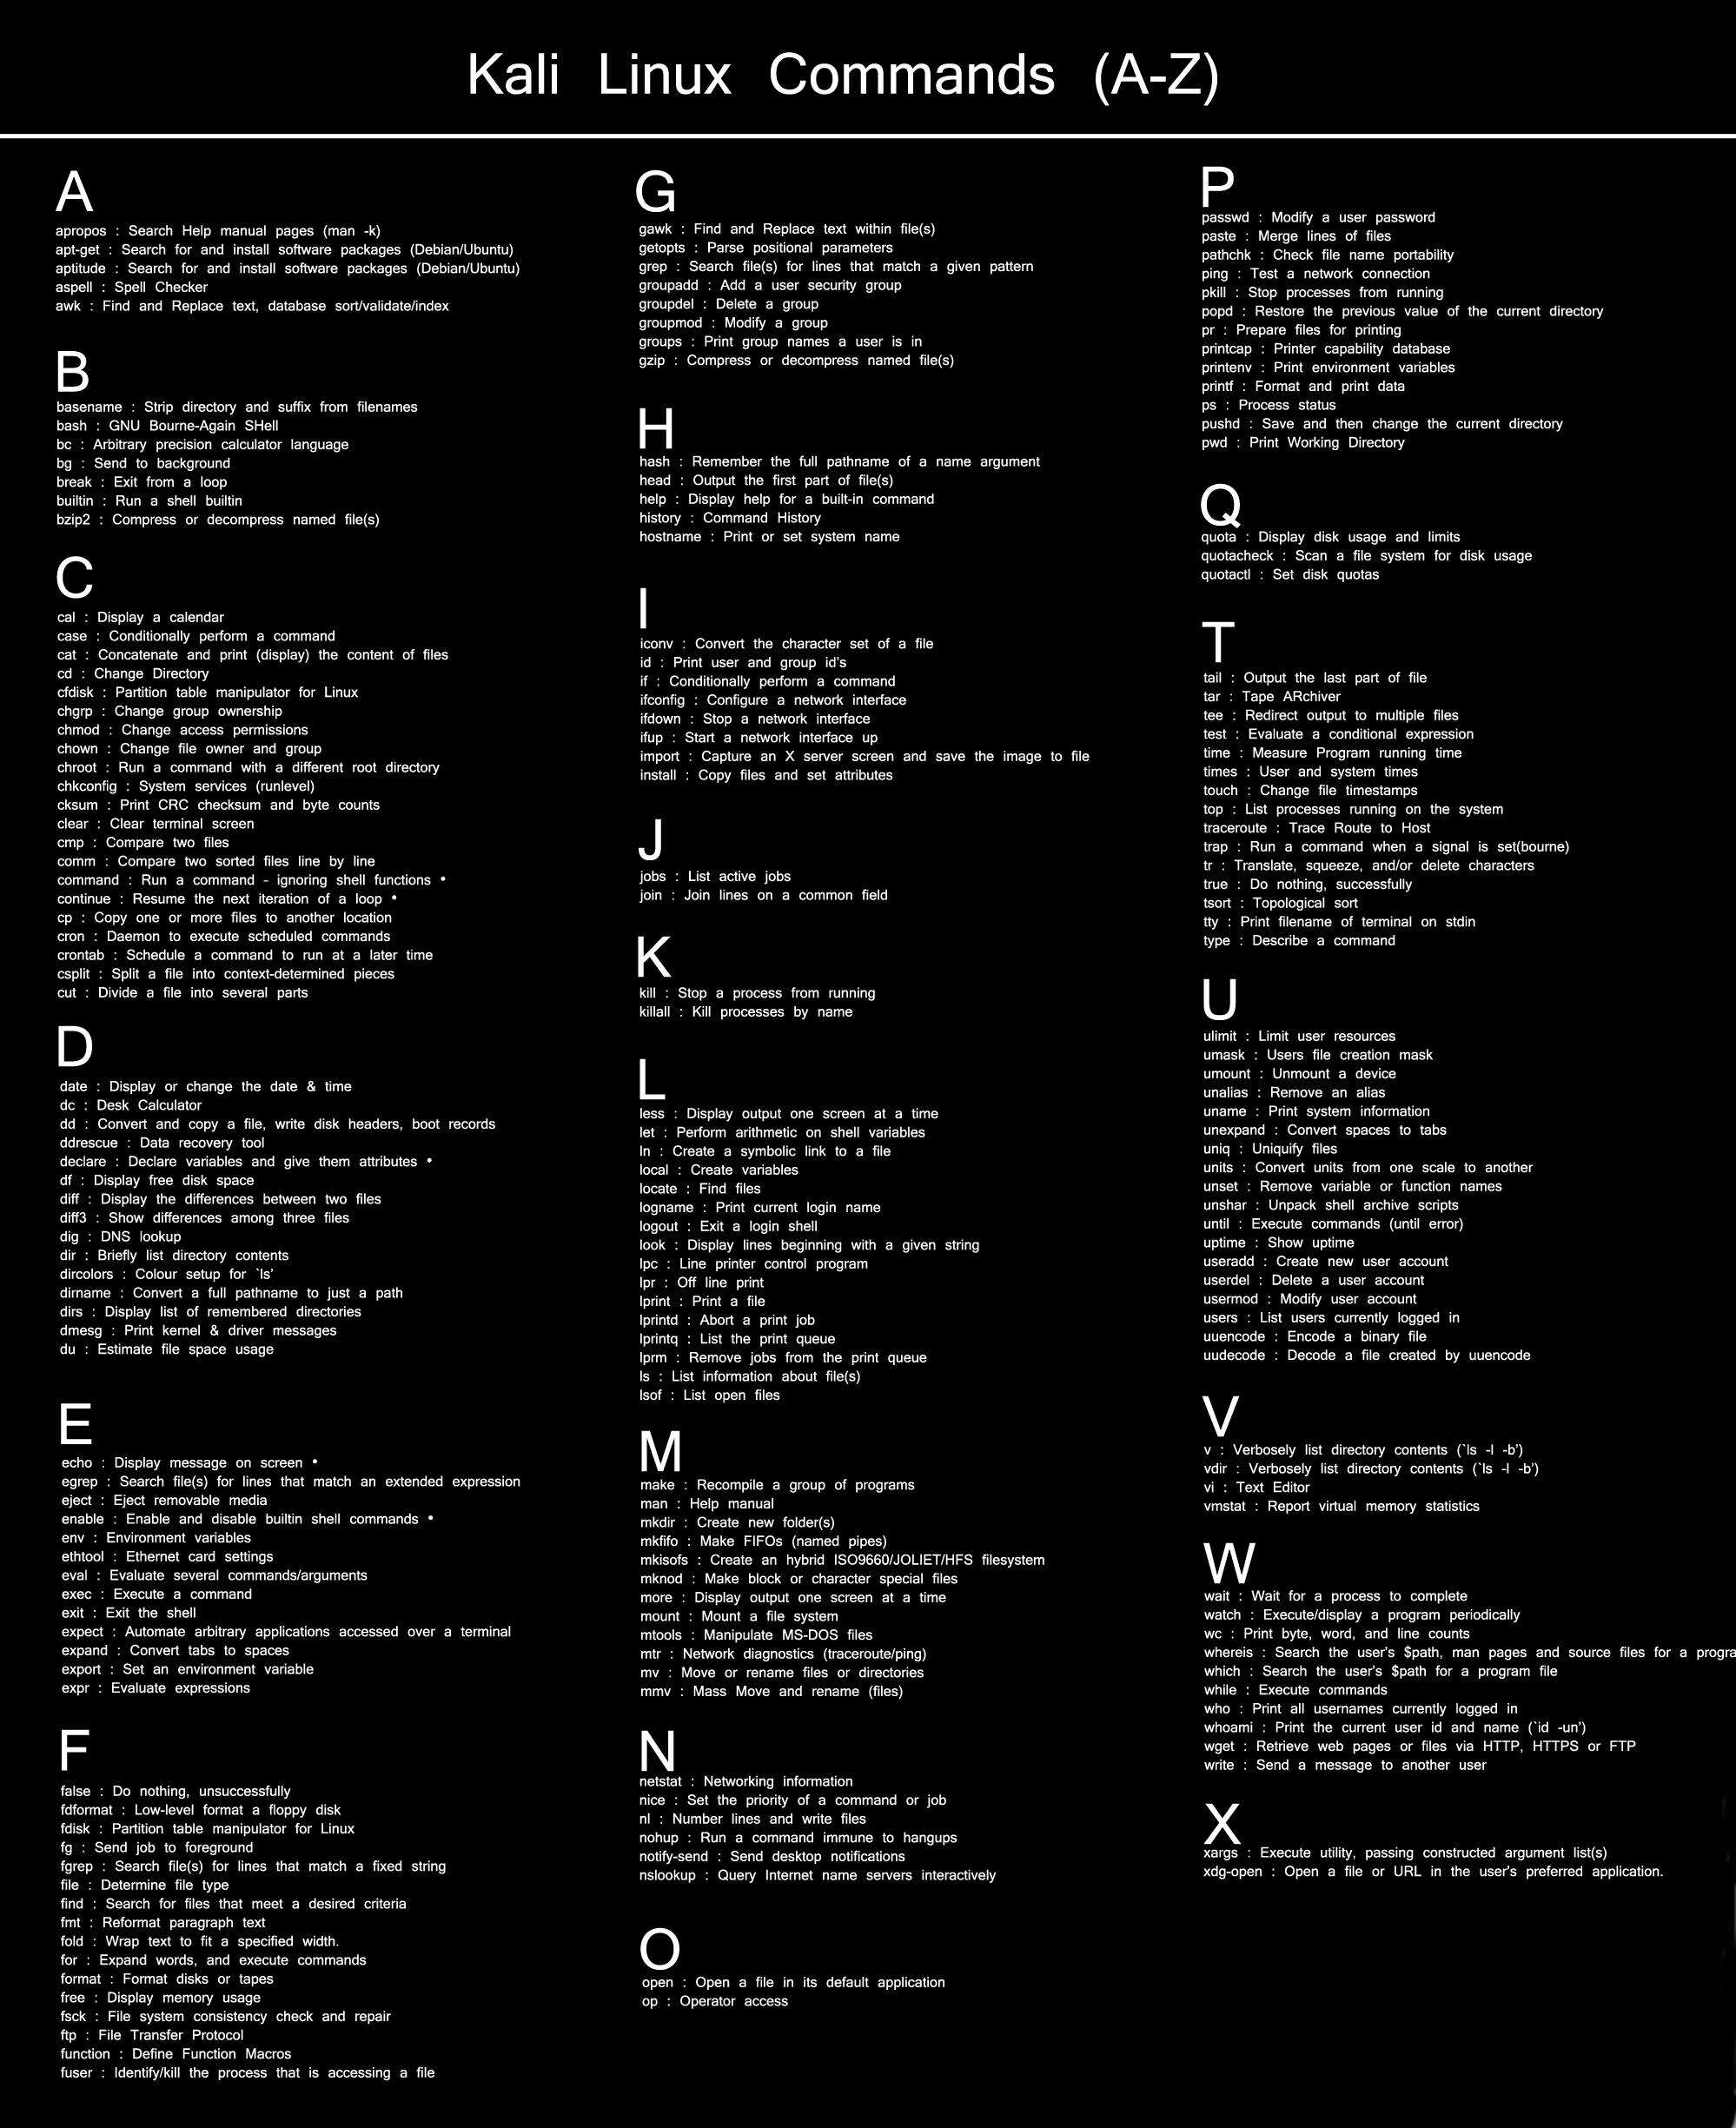
You can download the commands cheat sheet from below link.

Download Cheat Sheet: http://www.thecrazyprogrammer.com/wp-content/uploads/2016/02/Kali-Linux-Commands-Cheat-Sheet.png

Below I have shared a list of all the commands.


Kali Linux Commands List (Cheat Sheet)

Kali Linux Commands Cheat Sheet


Tip: Click on the image to open in new tab and then zoom it to see commands clearly.

Just try these Kali Linux commands and share your experience with me.

Source: https://www.latesthackingnews.com/kali-linux-commands-cheat-sheet/

The post Kali Linux Commands List (Cheat Sheet) appeared first on The Crazy Programmer.

Configure Apache Tomcat Server in Eclipse IDE

$
0
0

In this tutorial you will learn how to configure Apache Tomcat server in Eclipse IDE.

Eclipse is a very popular IDE for developing Java applications. When you will download Eclipse, it doesn’t come with Tomcat server installed in it. Below is the step by step guide to download Apache Tomcat v7.0 and then add it to Eclipse. The same method will work for adding any other tomcat version.

Also Read: How to Import Existing Project in Eclipse or MyEclipse

Configure Apache Tomcat Server in Eclipse IDE


Configure Apache Tomcat Server in Eclipse IDE

1. First we need to download Apache Tomcat Server. You can skip this step if you already downloaded and installed Tomcat server. Go to https://tomcat.apache.org/.

2. In left sidebar under Download section you can see all the available versions. Select any version according to you. Let say we want to download Tomcat 7.0, so click on it.

Configure Apache Tomcat Server in Eclipse IDE 1

3. Scroll down and under Binary Distributions click on 32-bit/64-bit Windows Service Installer.  This will start the downloading. It is an executable file, just run it to install Tomcat Server.

Configure Apache Tomcat Server in Eclipse IDE 2

4. After that open Eclipse IDE. Go to Window > Preferences.

Configure Apache Tomcat Server in Eclipse IDE 3

5. In the new window, go to Server > Runtime Environments.

Configure Apache Tomcat Server in Eclipse IDE 4

6. Click on Add button, it will open a window as given below. Now select appropriate Tomcat version. As in this case we have downloaded and installed v7.0, so I selected Apache Tomcat v7.0. Then click on Next button.

Configure Apache Tomcat Server in Eclipse IDE 5

7. Click on Browse button to select the Apache Tomcat installation directory. After that click on Finish button.

Configure Apache Tomcat Server in Eclipse IDE 6

8. Finally click on OK button to finish the configuration process.

Configure Apache Tomcat Server in Eclipse IDE 7

9. You can run a web project to test whether the server is working or not.


Below I have added a video tutorial that will help you to configure easily.

Comment below if you are facing any difficulty to configure Apache Tomcat server in Eclipse IDE.

Happy Coding!! :) :)

The post Configure Apache Tomcat Server in Eclipse IDE appeared first on The Crazy Programmer.


Dangling Pointer in C

$
0
0

Here you will learn about dangling reference and dangling pointer in C.

In computer programming, memory is allocated for holding data object. After the work is done the memory is deallocated so that this memory can be used to store any other data object.

Also Read: void pointer in C

What is Dangling Pointer?

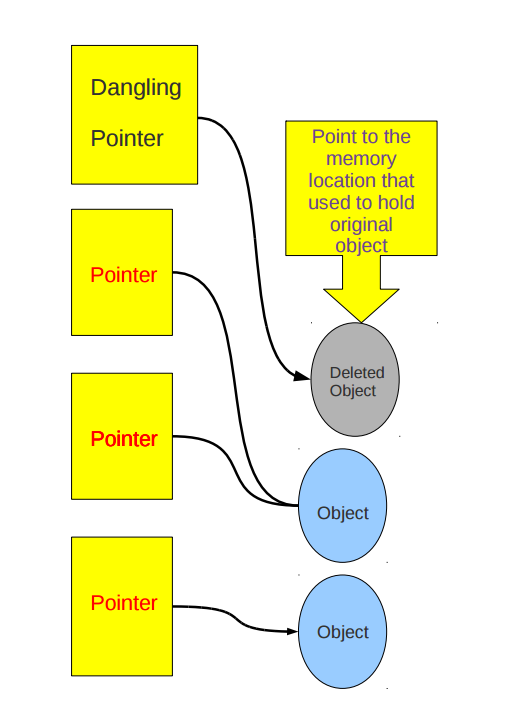
While programming, we use pointers that contain memory addresses of data objects. Dangling pointer is a pointer that points to the memory location even after its deallocation. Or we can say that it is pointer that does not point to a valid data object of the appropriate type. The memory location pointed by dangling pointer is known as dangling reference.

Now if we access the data stored at that memory location using the dangling pointer then it will result in program crash or an unpredictable behaviour.

Dangling Pointer in C

Let’s take an example to understand this.


Cause of Dangling Pointer in C

void function(){
	int *ptr = (int *)malloc(SIZE);
	. . . . . .
	. . . . . . 
	free(ptr);	//ptr now becomes dangling pointer which is pointing to dangling reference
}


In above example we first allocated a memory and stored its address in ptr. After executing few statements we deallocated the memory. Now still ptr is pointing to same memory address so it becomes dangling pointer.

I have mentioned only one scenario of dangling pointer. There are many other situations that causes dangling pointer problem.

To read more you can visit: https://en.wikipedia.org/wiki/Dangling_pointer


How to Solve Dangling Pointer Problem in C?

To solve this problem just assign NULL to the pointer after the deallocation of memory that it was pointing. It means now pointer is not pointing to any memory address.

Let’s understand this by a code in C.


void function(){
	int *ptr = (int *)malloc(SIZE);
	. . . . . .
	. . . . . . 
	free(ptr);	//ptr now becomes dangling pointer which is pointing to dangling reference
	ptr=NULL;	//now ptr is not dangling pointer
}


If you have any doubts related to above dangling pointer in C tutorial then feel free to ask by commenting below.

The post Dangling Pointer in C appeared first on The Crazy Programmer.

JavaScript Captcha Example

$
0
0

In this tutorial you will get JavaScript captcha example.

Captcha is used to determine whether or not the user that is filling and submitting a web form is human. While developing web projects we often require to add captcha feature.

So here I have shared the simplest way to create captcha in JavaScript. It will look like as shown in below image.

JavaScript Captcha Example

JavaScript Captcha Example

The below code generates a 4 digits captcha in JavaScript.

<html>
<head><title>JavaScript Captcha Example</title></head>
<body onload="generateCaptcha()">

<script>
var captcha;

function generateCaptcha() {
    var a = Math.floor((Math.random() * 10));
    var b = Math.floor((Math.random() * 10));
    var c = Math.floor((Math.random() * 10));
    var d = Math.floor((Math.random() * 10));

	captcha=a.toString()+b.toString()+c.toString()+d.toString();
	
    document.getElementById("captcha").value = captcha;
}

function check(){
	var input=document.getElementById("inputText").value;

	if(input==captcha){
		alert("Equal");
	}
	else{
		alert("Not Equal");
	}
}
</script>

<input type="text" id="captcha" disabled/><br/><br/>
<input type="text" id="inputText"/><br/><br/>
<button onclick="generateCaptcha()">Refresh</button>
<button onclick="check()">Submit</button>

</body>
</html>


Explanation

In above script the generateCaptcha() function is used to generate the captcha as the page loads. This is done by the onload attribute in body tag. Inside generateCaptcha() we have used Math.floor((Math.random() * 10)) to generate a random number between 1 (included) and 10 (excluded). In this way we generate for random numbers and then join them to form a string. The toString() method is used to convert number to string. Now we set this string as value of captcha textbox.

When Submit button is clicked the check() function is called that checks whether the entered captcha matches with original captcha or not. If they match, “Equal” alert is displayed otherwise “Not Equal” alert is displayed.

The Refresh button is used to regenerate the captcha.

The above JavaScript captcha code is easy to understand, still if you are facing any problem then comment below.

The post JavaScript Captcha Example appeared first on The Crazy Programmer.

Convert Array to ArrayList in Java

$
0
0

In this tutorial you will learn how to convert array to arraylist in Java.

There are mainly two ways to convert a Java array to arraylist.

  • Using Arrays.asList() method
  • Using Collections.addAll() method

Below I have shared an example of each of these methods. In these examples we are converting string array to arraylist.

Also Read: Convert ArrayList to Array in Java

Convert Array to ArrayList in Java

Convert Array to ArrayList in Java

1. Using Arrays.asList() method

The asList() method of Arrays class directly converts an array to arraylist. It has following syntax.

ArrayList<T> arrayList=new ArrayList<T>(Arrays.asList(array));


Example

package com;

import java.util.ArrayList;
import java.util.Arrays;

public class ArrayToArrayList {
	public static void main(String...s){
		String str[]={"C","C++","Java","Android","JavaScript"};

		//converting Array to ArrayList
		ArrayList<String> al=new ArrayList<String>(Arrays.asList(str));
		
		for(int i=0;i<al.size();++i){
			System.out.println(al.get(i));
		}
	}
}


Output

C
C++
Java
Android
JavaScript


2. Using Collections.addAll() method

The addAll() method of Collections class can also be used for converting array to arraylist. It is faster than Arrays.asList() method. It has following syntax.

Collections.addAll(arrayList,array);


Example

package com;

import java.util.ArrayList;
import java.util.Collections;

public class ArrayToArrayList {
	public static void main(String...s){
		String str[]={"C","C++","Java","Android","JavaScript"};
		ArrayList<String> al=new ArrayList<String>();

		//converting Array to ArrayList
		Collections.addAll(al,str);
		
		for(int i=0;i<al.size();++i){
			System.out.println(al.get(i));
		}
	}
}


Output

C
C++
Java
Android
JavaScript


Comment below if you have doubts related to above array to arraylist examples.

The post Convert Array to ArrayList in Java appeared first on The Crazy Programmer.

JSP Login and Logout System Example Using Session

$
0
0

In this tutorial you will learn how to make JSP login and logout system using session. I have used MySQL as a database in this example.

This system has following files.

index.jsp: It contains a login form which is displayed to user.

loginRequestHandler.jsp: When login form is submitted, this page handles the login request.

home.jsp: If the login details are correct then the user will be redirect to home page. It contain welcome message with a logout link.

logout.jsp: It invalidates the session and logout the user from system.

DBConnection.java: It handles connectivity with the database.

LoginBean.java: It is a bean class that has getter and setter methods.

LoginDAO.java: This class verifies the email and password from the database.


The database table that I have used has following structure.

Login Table


I have done proper session tracking in this example. If the user is not logged in and tries to open home.jsp page then he/she will be redirected to index.jsp page for login. If he/she is already logged in and tries to open index.jsp then he/she will be directly redirected to home.jsp.

Below I have shared the code for each of these files.


index.jsp

<html>
    <head>
        <title>Login System</title>
    </head>

    <body>
        <%
        String email=(String)session.getAttribute("email");
        
        //redirect user to home page if already logged in
        if(email!=null){
            response.sendRedirect("home.jsp");
        }

        String status=request.getParameter("status");
        
        if(status!=null){
        	if(status.equals("false")){
        		   out.print("Incorrect login details!");	           		
        	}
        	else{
        		out.print("Some error occurred!");
        	}
        }
        %>
    
        <form action="loginRequestHandler.jsp">
            <table cellpadding="5">
                <tr>
                    <td><b>Email:</b></td>
                    <td><input type="text" name="email" required/></td>
                </tr>

                <tr>
                    <td><b>Password:</b></td>
                    <td><input type="password" name="password" required/></td>
                </tr>

                <tr>
                    <td colspan="2" align="center"><input type="submit" value="Login"/></td>
                </tr>

            </table>
        </form>
    
    </body>
</html>


loginRequestHandler.jsp

<%@page import="com.LoginDAO"%>
<jsp:useBean id="loginBean" class="com.LoginBean" scope="session"/>
<jsp:setProperty name="loginBean" property="*"/>

<%
String result=LoginDAO.loginCheck(loginBean);

if(result.equals("true")){
	session.setAttribute("email",loginBean.getEmail());
	response.sendRedirect("home.jsp");
}

if(result.equals("false")){
	response.sendRedirect("index.jsp?status=false");
}

if(result.equals("error")){
    response.sendRedirect("index.jsp?status=error");
}

%>


home.jsp

<html>
    <head>
        <title>Login System</title>
    </head>

    <body>
        <%
        String email=(String)session.getAttribute("email");
        
        //redirect user to login page if not logged in
        if(email==null){
        	response.sendRedirect("index.jsp");
        }
        %>
    
        <p>Welcome <%=email%></p>    
        <a href="logout.jsp">Logout</a>
    </body>
</html>


logout.jsp

<%
session.invalidate();
response.sendRedirect("index.jsp");
%>


DBConnection.java

package com;

import java.sql.Connection;
import java.sql.DriverManager;

public class DBConnection {
	static final String URL="jdbc:mysql://localhost:3306/";
	static final String DATABASE_NAME="test";
	static final String USERNAME="root";
	static final String PASSWORD="root";
	
	public static Connection getConnection(){
		Connection con=null;
		
		try{
			Class.forName("com.mysql.jdbc.Driver");
			con=DriverManager.getConnection(URL+DATABASE_NAME,USERNAME,PASSWORD);

		}catch(Exception e){
			e.printStackTrace();
		}
		
		return con;
	}
}


LoginBean.java

package com;

public class LoginBean {
	private String email;
	private String password;
	
	public String getEmail() {
		return email;
	}
	public void setEmail(String email) {
		this.email = email;
	}
	public String getPassword() {
		return password;
	}
	public void setPassword(String password) {
		this.password = password;
	}
}


LoginDAO.java

package com;

import java.sql.Connection;
import java.sql.PreparedStatement;
import java.sql.ResultSet;

public class LoginDAO {
	public static String loginCheck(LoginBean loginBean){
		String query="select * from login where email=? and password=?";
		
		try{
			Connection con=DBConnection.getConnection();
			PreparedStatement ps=con.prepareStatement(query);
			ps.setString(1,loginBean.getEmail());
			ps.setString(2,loginBean.getPassword());
			
			ResultSet rs=ps.executeQuery();
			
			if(rs.next()){
				return "true";
			}
			else{
				return "false";
			}
		}catch(Exception e){
			e.printStackTrace();
		}
		
		return "error";
	}
}


Screenshots

Index Page

Home Page

Comment below if you are facing difficulty to understand anything in above JSP login and logout system.

Happy Coding!! :) :)


The post JSP Login and Logout System Example Using Session appeared first on The Crazy Programmer.

How to Remove Duplicate Elements from ArrayList in Java

$
0
0

In this tutorial you will learn how to remove duplicate elements from arraylist in Java.

We can remove repeated elements in arraylist by two ways.

  • Using HashSet – Do not maintain the insertion order.
  • Using LinkedHashSet – Maintain the insertion order.


First we create an ArrayList and add some duplicate elements to it.

Now copy elements of ArrayList to HashSet or LinkedHashSet.

Remove all elements of ArrayList by clear() method.

Finally copy elements of HashSet or LinkedHashSet back to the ArrayList.

Below example shows how to implement this.


How to Remove Duplicate Elements from ArrayList in Java

package com;

import java.util.ArrayList;
import java.util.HashSet;
import java.util.LinkedHashSet;

public class RemoveDuplicateElements {
	public static void main(String args[]){
		ArrayList<String> al1=new ArrayList<String>();
		ArrayList<String> al2=new ArrayList<String>();
		HashSet<String> hs=new HashSet<String>();
		LinkedHashSet<String> lhs=new LinkedHashSet<String>();
		
		al1.add("C");
		al1.add("C++");
		al1.add("C++");
		al1.add("Android");		
		al1.add("Java");
		al1.add("Java");
		
		al2.addAll(al1);
		
		System.out.println("HashSet");
		System.out.println("Before: "+al1);
		
		hs.addAll(al1);
		al1.clear();
		al1.addAll(hs);
		System.out.println("After: "+al1);

		System.out.println("\nLinkedHashSet");
		System.out.println("Before: "+al2);

		lhs.addAll(al2);
		al2.clear();
		al2.addAll(lhs);
		System.out.println("After: "+al2);
	}
}


Output

How to Remove Duplicate Elements from ArrayList in Java

You can observe the output. In case of HashSet, the insertion order is not maintained while in LinkedHashSet the insertion order is maintained.

Comment below if have any doubts regarding above tutorial.

The post How to Remove Duplicate Elements from ArrayList in Java appeared first on The Crazy Programmer.

dbForge Studio for SQL Server – Ultimate SQL Server Manager Tool from Devart

$
0
0

dbForge Studio for SQL Server is an integrated environment for managing, administering, accessing, configuring, and developing SQL Server. The tool consists of various graphical utilities and script editors that provide developers and administrators of all skill levels the opportunity to access and manage SQL Server. You can download the latest version of dbForge Studio for SQL Server from the Devart website.

Features highlights

dbForge Studio for SQL Server provides a rich environment for managing and developing queries in SQL Server:

SQL Coding Assistance features help you to learn more about the SQL code you are using, keep track of the parameters you are typing with only a few keystrokes. Automatic SQL formatting allows you to follow common coding style standards. The tool provides a great number of built-in SQL snippets that save your time allowing you to store and reuse repeated code fragments. Quick Object Info displays the complete description for any identifier in your code.

dbForge 1

SQL Source Control allows you to version controlling your database development and deployment processes. It takes a few seconds to link an SQL database to one of the supported source control systems: Subversion (SVN), Team Foundation Server (including TFS Cloud), Git (including GitHub), Perforce (P4), Mercurial, SourceGear Vault. Thus, you can source-control an SQL database working folder in the same way as you version-control other files. The tool allows you to commit your local changes to a remote repository as well as update the local working copy with the latest changes from the source control. In case you face with a conflict, you can resolve it visually in a handy interface.

dbForge 2

Built-in Index Manager lets you to analyze the status of SQL indexes and fix issues with index fragmentation. The tool lets you to quickly gather index fragmentation statistics and detect databases that require maintenance. You can instantly rebuild and reorganize SQL indexes in visual mode or generate SQL script for the future use.

dbForge 3

Unit Test is a tool, based on the open-source tSQLt framework, for implementing automated unit testing. Thus, you can develop stable and reliable SQL code that can be properly regression tested at the unit level.

dbForge 4

Table Designer looks very familiar to one in SSMS. It provides you visual editors for column, index, primary and foreign keys, check constraints, statistics, and table storage properties.

dbForge 5

Built-in Database Diagram tool helps you to visualize a database. You can create one or more diagrams that illustrates several or all tables, columns, keys, and relationships in the particular database. dbForge Studio for SQL Server allows you to create as many database diagrams as you want. Every table may be added on any number of diagrams, which allow you to create different diagrams to visualize different parts of the database.

dbForge 6
Query Profiler supplies you with graphical representation of actual and estimated query execution plans. Graphical plans are commonly used type of execution plan. They are quick and easy to read. You can view both estimated and actual execution plans in graphical format and the graphical structure makes understanding most plans very easy. The detailed data for the plan is hidden behind ToolTips and Property sheets. The tool allows you to compare different plans while doing some performance tuning.

dbForge 7

Schema Compare tool allows you to synchronize database schemas with complex object dependencies. When the schema comparison process finishes, its results appear in a window. In addition, dbForge Studio for SQL Server generates a Data Definition Language (DDL) script that you can use to synchronize the different schemas.

dbForge 8

In case you need to transfer data from one SQL Server instance to another, or to compare databases with different structures on two remote SQL Server instances, the Data Compare tool is what you need. With this tool, you can easy synchronize table data between servers, analyze data differences and create reports. You can even schedule regular data synchronization and automate the process.

dbForge 9

While developing applications, it is a challenge to perform testing under conditions that closely simulate production environment. If you do not have meaningful test data in test environment, it is not possible to determine the way the application will behave after the release. Built-in Data Generator provides s a great choice of predefined generators with sensible configuration options that allow emulating column-intelligent and meaningful data.

dbForge 10

If you are not too proficient with T SQL, visual Query Builder will help you to create complex queries using only a mouse. The tool provides visual editors for each query clause and automatically creates relationships between tables.

dbForge 11

Built-in Event Profiler allows you to capture and analyze SQL Server events. The events and data columns are stored in a physical trace file for later examination. You can use this information to identify and troubleshoot many SQL Server-related problems.

dbForge 12

With dbForge Studio for SQL Server you can easily build SQL reports of any complexity, edit report parameters, customize formatting, calculate summaries in the user-friendly interface of SQL Server Report Builder.

dbForge 13

Conclusion
As you can see, dbForge Studio for SQL Server is a powerful sql manager tool that completely covers most of database developers’ and administrators’ needs. The important point is that the dbForge Studio for SQL Server is very affordable solution. Prices start from 249$, which is awesome!

The post dbForge Studio for SQL Server – Ultimate SQL Server Manager Tool from Devart appeared first on The Crazy Programmer.

Top 7 Reasons Why Node.js Is So Popular

$
0
0

To put it simple, Node.js outshines other web applications by replacing websockets with revolutionary push technology. You would ask, what is so unique about it? Well, we finally have cutting-edge web applications with two-way, real-time connections where both the server and client can build communication, allowing them to exchange valuable data. Now this is in stark contrast to our conventional web response paradigm where only the client initiates communication.

Top 7 Reasons Why Node.js is So Popular

Node.js server technology is used to create and run a wide variety of web applications, and is quite similar to what Ruby On Rails, Spring Framework and ASP.NET does. It leverages JavaScript as the main language, which is a lightweight built-in web server and has a plethora of Plugins managed via the Node Package Manager (NPM), allowing you to custom-build your applications to meet your needs. It may sound like any other good web technology, but it has certain features that make it a popular choice among developers to build a wide spectrum of web applications.

Discussed here are the top 7 reasons why you should use Node.js:

1. It is JavaScript Everywhere

One of the biggest reasons why Node.js is so popular is because it uses JavaScript as its main language to build web applications. And to be honest, JavaScript is now the only choice to develop web applications in the browser. What more! A new and robust framework is introduced quite frequently to woo developers. With Node.js, JavaScript has literally revolutionized on the server. The language is common to most web developers, and is certainly driving the world today. And according to experts, the trend will not fade away soon.

Since JavaScript is a language that most developers know or have used at some point of time, the transition from another web technology to Node.js is a breeze. This makes it a preferred choice among web developers.

2. It’s lightning Fast

Node.js is primarily a JavaScript runtime that is powered by V8, developed by Google for use in Chrome. V8 has the ability to compile and execute JavaScript at lightning fast speed, mainly because it compiles JavaScript into a native machine code. In addition to this, Node.js has a magical event loop, which is a single thread performing all I/O operations in an asynchronous manner. In Node.js, when an application has to perform I/O operation, it sends asynchronous tasks and callback action to the event loop, and then continues to perform the rest of the program. On completion of sync operation, the event loop automatically returns to the task to execute callback. This is much unlike traditional looping, which consumes a lot of memory and is exceptionally difficult to execute.

Thus, reading/writing to file system, network connections, and to the database is executed very fast in Node. It allows developers to build fast and highly scalable network applications that are capable of handling bulk amounts of simultaneous connections having high throughput.

3. It is Lightweight

Typically, Node.js uses a basic event-driven architecture. This means everything executed on it, including every single operation and call, is a series of asynchronous callback. This enables Node to run on a single thread as unlike other web technologies where a new thread is spawned for every client request. This not only makes it light-in-weight, but also forms the foundation of Node’s non-blocking I/O feature.

4. A Single Language for All Layers

Another key benefit of Node.js is language re-use. Other web technologies like Spring or ASP.NET requires developers to have knowledge in another language to write code on the server-side, be it VB.NET, Java, or C#. This means all functions necessarily include two languages – one on the client-side and the other on server-side. On the contrary, Node uses only JavaScript for the client and server side. Thus, web developers have to interact only in a single language across all layers. Adding to it, this can be re-used over and over again for future communications.

5. High Performance

PayPal uses Node.js, and has reported doubling the number of requests per-second and reducing the response time by 35%. On the other hand, Wal Mart, the retail giant had a superb experience with Node.js in 2013, when they put all their mobile-based traffic via Node.js on Black Friday, the busiest shopping time of the year. Amazingly, on Black Friday, Wal Mart servers did not go over a mere 1% CPU utilization and yet they deploy with 200,000,000 users online. LinkedIn, the global networking site, moved from Ruby to Node to handle their mobile traffic, and reduced the number of servers to 30 to 3, i.e. almost 90% reduction. The new system was up to 20 times faster. All these figures clearly indicate performance capability of Node.js.

6. It can be Hosted Anywhere

Or to say, almost anywhere! Considering exponential growth in Node.js usage in recent years, there are several cloud-based hosting providers and web servers that support web applications built on Node out-of-the-box. This includes Google, Amazon AWS, Heroku, Microsoft IIS, Microsoft Azure, and many others.

7. It is Easy to Modify and Maintain

Traditionally built applications become less adaptive and rigid over time as new requirements are fed. Eventually, they start creaking under the stress they were not built for. However, developing new services using Node.js is comparatively easier. With Node, a bunch of small applications is built instead of a single, large application. This allows making changes or adding a new functionality with much ease, without having to make changes deep inside the code-base.

Conclusion

Yes, Node.js is trending at the moment. It has huge possibilities that developers can leverage to build highly robust and scalable web applications. So, it is worth a try before it is dead. After all, this is the world of web development!

Author Bio:

Mehul Rajput is a CEO of Mindinventory, a prominent web development and mobile app development company specialized in Node.js development services. He does blogging as hobby and love to write on web and mobile technologies.

The post Top 7 Reasons Why Node.js Is So Popular appeared first on The Crazy Programmer.


Online Quiz System Project in JSP (Java)

$
0
0

Here you will get the online quiz system project in JSP (Java).

Few days back my college organized a tech fest. There was a coding competition event in that fest. The first round was an online test that contains some C and C++ questions. I was managing that event and developed an online quiz system for it.

I thought that I should share this online test system with you guys. So here in this article I am sharing the system along with database, you can use it as a project in your school or college.

You can customize it according to your requirements.

Online Quiz System Project in JSP

Online Quiz System Project in JSP

The technologies and tools used by me to develop this system are:

Technologies used: JSP, JavaScript, jQuery, AJAX, JSON and MySql.

Tools Used: Eclipse IDE, MySql, SQLyog, Apache Tomcat Server.


How the system works?

Student Panel:

1. The student first gets a registration page where he/she has to register using name and email.

2. After successful registration, an instructions page is displayed. The instructions are as follows:

  • Total Questions: 15
  • Time Alloted: 20 Minutes
  • Questions based on C and C++
  • There is no negative marking
  • Top 20 will be short listed for the next round
  • Click on Start button to start the test
  • After the test starts, don’t press back or refresh button or don’t close the browser window

3. When student clicks on Start button the test starts. There are total 3 sets of questions, so randomly a set is allotted to contestant. After attempting all the questions a Submit button is shown which submits the data that is stored in database.


Online Quiz System Project in JSP 3

Online Quiz System Project in JSP 2

Online Quiz System Project in JSP 1


Admin Panel:

The admin can see, add and delete questions in various sets. For each correct answer 1 point is given to the contestant. On result page the admin can see the result. The contestants are sorted according to their points.

Admin Email: admin@technoholix2k16.com
Admin Password: tcp@gits


Online Quiz System Project in JSP 4

Online Quiz System Project in JSP 5

Online Quiz System Project in JSP 6

Below is the link to download the project with database backup file.

Download Project

Comment below if you are facing any difficulty to use this project.

The post Online Quiz System Project in JSP (Java) appeared first on The Crazy Programmer.

How to Backup or Restore MySql Database Using SQLyog

$
0
0

This tutorial will guide you how to backup or restore mysql database using sqlyog.

It is really important to create regular backups of database on which you are working. It will keep the database safe from any kind of loss. In case any loss occurs, you can restore the database by its backup. Database backup is also useful when you want to use the database in any other machine.

SQLyog is a great tool for managing database. Below I have shared the steps by which you can backup and restore mysql database.

If you don’t have SQLyog in your system then you can download it from below link.

Download SQLyog: https://www.webyog.com/


How to Backup or Restore MySql Database Using SQLyog

How to Create New Connection

Before working with database, we first need to connect SQLyog with the mysql database. Follow below steps to create a connection with database.

1. Open SQLyog and click on New button.

2. Now give a name to this connection.

How to Backup or Restore MySql Database Using SQLyog 1

3. After that, specify the Host Address, Username, Password and Port. Then click on Connect button, if you have entered all information correctly then SQLyog will be connected to the database.

How to Backup or Restore MySql Database Using SQLyog 2


How to Backup Database

1. In left column you can see the list of all the databases. Just right click on desired database and select Backup/Export > Backup Database As SQL Dump…

How to Backup or Restore MySql Database Using SQLyog 3

2. It will open a window as given below. Just select backup location and give a name to the backup file. Then click on Export button to backup the database.

How to Backup or Restore MySql Database Using SQLyog 4

You are done!


How to Restore Database

1. At top menu go to Database > Import > Restore From SQL Dump…

How to Backup or Restore MySql Database Using SQLyog 5

2. Now browse and choose the database backup file. Then click on Execute button to restore the database.

How to Backup or Restore MySql Database Using SQLyog 6

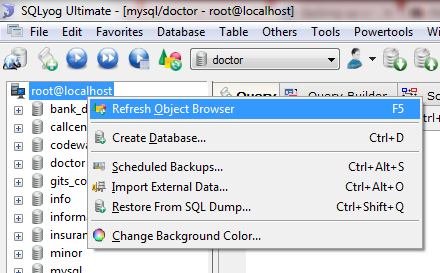
3. You have to refresh the object browser to see the restored database. It can be done in following way.

How to Backup or Restore MySql Database Using SQLyog 7

This was the simplest way to backup or restore mysql database using sqlyog. Comment below if you are facing any problem.

The post How to Backup or Restore MySql Database Using SQLyog appeared first on The Crazy Programmer.

Java SQLite Tutorial

$
0
0

In this tutorial you will learn about Java SQLite.

SQLite is lightweight, zero configuration, serverless SQL database library. In this tutorial I will teach you how to use SQLite database with Java.

Note: I have made this tutorial using Eclipse. Because it is easier to import library in an IDE.

First off all you need to download the SQLite JDBC library or jar. Download it from below link.

Download: http://www.java2s.com/Code/Jar/s/Downloadsqlitejdbc372jar.htm

Now just import it into your project. If you don’t know how to import library in Eclipse then follow below link.

http://stackoverflow.com/questions/3280353/how-to-import-a-jar-in-eclipse

Java SQLite Tutorial

Java SQLite Tutorial

Connection with Database

Below example shows how you can connect Java with SQLite database. Here demo.db is the database name, you can change it according to you. If the database doesn’t exists then it will be created.

package com;

import java.sql.Connection;
import java.sql.DriverManager;

public class JavaSQLiteExample {

	public static void main(String args[]){
		try{
			
			//establish connection with database
			Class.forName("org.sqlite.JDBC");
			Connection con=DriverManager.getConnection("jdbc:sqlite:demo.db");

			if(con!=null){
				System.out.println("Connection established");
			}
			con.close();
		}catch(Exception e){
			e.printStackTrace();
			System.out.println("Some error occured");
		}
	}	
}


On successful connection the program show output “Connection established” otherwise “Some error occurred”.


Java SQLite Example

The below program first establish connection with SQLite database, create a table, insert some record in it and then finally display the records. This shows that how you can work with SQLite using Java.

package com;

import java.sql.Connection;
import java.sql.DriverManager;
import java.sql.ResultSet;
import java.sql.Statement;

public class JavaSQLiteExample {

	public static void main(String args[]){
		try{
			
			//establish connection with database
			Class.forName("org.sqlite.JDBC");
			Connection con=DriverManager.getConnection("jdbc:sqlite:demo.db");
			
			Statement st=con.createStatement();
			
			//create table
			System.out.println("Create table:");
			st.executeUpdate("drop table record");
			st.executeUpdate("create table record (name text,age int)");
			
			//insert some records 
			System.out.println("Insert some records:");
			st.executeUpdate("insert into record values('neeraj',21)");
			st.executeUpdate("insert into record values('mayank',22)");
			st.executeUpdate("insert into record values('sumit',22)");

			//reading records
			System.out.println("Reading records:");
			ResultSet rs=st.executeQuery("select * from record");
			
			while(rs.next()){
				System.out.println(rs.getString("name")+" "+rs.getString("age"));
			}
			
			rs.close();
			st.close();
			con.close();
		}catch(Exception e){
			e.printStackTrace();
		}
	}	
}


Output

Java SQLite Tutorial Output

So this was the simple Java SQLite tutorial. You can comment below if you are facing any problem.

The post Java SQLite Tutorial appeared first on The Crazy Programmer.
Factorial of Large Number in Java

$
0
0

It is not possible to store factorial for large number like 50 into inbuilt data types like integer or long. Because factorial of 50 has almost 60 digits. Imagine how we can store it in int or long. We can find factorial of such numbers using BigInteger class defined in java.math package. 

Below program shows how you can do this.

Also Read: Factorial of Large Number in C and C++

Program for Factorial of Large Number in Java

import java.math.BigInteger;
import java.util.Scanner;

class BigFactorial {
	public static void main(String arg[]){
		BigInteger fac=new BigInteger("1");
		int n;
		
		Scanner sc=new Scanner(System.in);
		System.out.println("Enter a number:");
		n=sc.nextInt();
		
		for(int i=2;i<=n;++i){
			fac=fac.multiply(BigInteger.valueOf(i));
		}
		
		System.out.println(fac);
	}
}


Output

Factorial of Large Number in Java

Comment below if you are facing any difficulty to understand this program.

The post Factorial of Large Number in Java appeared first on The Crazy Programmer.

Applications of Stack

$
0
0

Here you will learn about applications of stack.

Stack is an abstract data type and a data structure that follows LIFO (last in first out) strategy. It means the element added last will be removed first. Stack allows two operations push and pop. Push adds an element at the top of the stack and pop removes an element from top of the stack.

Below I have mentioned few applications of stack data structure.

Applications of Stack

Applications of Stack

Expression Evaluation

Stack is used to evaluate prefix, postfix and infix expressions.


Expression Conversion

An expression can be represented in prefix, postfix or infix notation. Stack can be used to convert one form of expression to another.


Syntax Parsing

Many compilers use a stack for parsing the syntax of expressions, program blocks etc. before translating into low level code.


Backtracking

Suppose we are finding a path for solving maze problem. We choose a path and after following it we realize that it is wrong. Now we need to go back to the beginning of the path to start with new path. This can be done with the help of stack.


Parenthesis Checking

Stack is used to check the proper opening and closing of parenthesis.


String Reversal

Stack is used to reverse a string. We push the characters of string one by one into stack and then pop character from stack.


Function Call

Stack is used to keep information about the active functions or subroutines.


There are various other applications of stack. I have mentioned some of them. Comment below if you found any mistake in above article.

The post Applications of Stack appeared first on The Crazy Programmer.

Viewing all 761 articles
Browse latest View live