Quantcast
Channel: The Crazy Programmer
Viewing all 761 articles
Browse latest View live

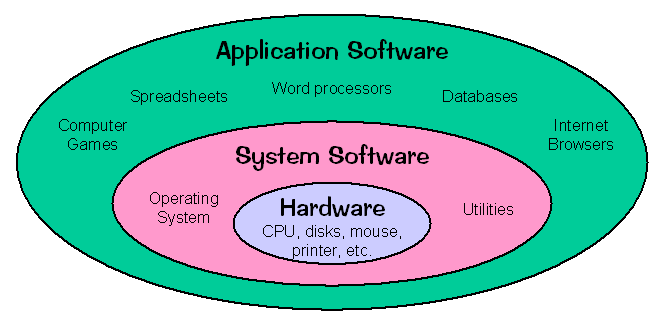
Difference between System Software and Application Software

$
0
0

In this tutorial you will learn about difference between system software and application software.

System software is general purpose software which is used to operate computer hardware. It provides platform to run application softwares.

Application software is specific purpose software which is used by user for performing specific task.

Below I have shared some main differences between them.

Difference between System Software and Application Software

Image Source

Difference between System Software and Application Software

S.No. System Software Application Software
1. System software is used for operating computer hardware. Application software is used by user to perform specific task.
2. System softwares are installed on the computer when operating system is installed. Application softwares are installed according to user’s requirements.
3. In general, the user does not interact with system software because it works in the background. In general, the user interacts with application sofwares.
4. System software can run independently. It provides platform for running application softwares. Application software can’t run independently. They can’t run without the presence of system software.
5. Some examples of system softwares are compiler, assembler, debugger, driver, etc. Some examples of application softwares are word processor, web browser, media player, etc.


Comment below if you found anything incorrect in above difference between system software and application software tutorial. Please mention below if you know about any other difference.

The post Difference between System Software and Application Software appeared first on The Crazy Programmer.


Count Trailing Zeros in Factorial of Number

$
0
0

Here you will learn about how to count trailing zeros in factorial of number.

One simple approach to count trailing zeros is first find factorial of number and then count the zeros in the factorial one by one. It is fine for smaller number like 10.

10! = 3628800

So, trailing zeros = 2

But what about big numbers like 100. The factorial of 100 has 24 zeros in the end and almost 160 digits. Its really hard to store that big number and then count the zeros one by one.

There is a simple and very fast method to do this. We can count the zeros by counting the 5s in prime factor of n factorial.


Trailing zeros in n! = Count 5s in prime factors of n!
= floor(n/5) + floor(n/25) + floor(n/125) + . . . .


It is very frequently asked question in competitive programming. Let us see how this method can be implemented in C.


C Program to Count Trailing Zeros in Factorial of Number

#include<stdio.h>

int main(){
	int i,n,count=0;
	
	printf("Enter a number:");
	scanf("%d",&n);
	
	//repeatedly divide n by powers of 5 and update count
	for(i=5;n/i>=1;i*=5){
		count+=n/i;
	}	
	printf("Trailing Zeroes=%d",count);
	return 0;
}


Output

Count Trailing Zeros in Factorial of Number

If you have any doubts regarding above tutorial then comment below.

The post Count Trailing Zeros in Factorial of Number appeared first on The Crazy Programmer.

Create Attractive Form Using HTML, CSS and JavaScript

$
0
0

The web has changed a lot in the previous few years and introduction of new technologies like HTML5 and CSS3 has given a boost to it.

We all see a lot of attractive forms on modern day websites. In this tutorial we will learn how to make one using HTML, CSS and a little bit of JavaScript.

So lets start. Here we will make three files:

1. form.html (Frame of the form)
2. style.css (styling of the form)
3. script.js (Make the form interactive)


form.html

So let’s first create the frame of our form, add the below code into the form.html file.

<!DOCTYPE html>
<html>
<head>
<title>Form</title>
<link type="text/css" rel="stylesheet" href="style.css" />
<link href='https://fonts.googleapis.com/css?family=Abel' rel='stylesheet' type='text/css'>
<link href='https://fonts.googleapis.com/css?family=Alegreya+Sans:800' rel='stylesheet' type='text/css'>
</head>
<body>
<div id="container">
<form>
<p><input type="text" class="box" value="ENTER USERNAME" id="username" /></p>
<p><input type="password" class="box" value="ENTER PASSWORD" id="pass" /></p>
<p style="text-align:left"><input type="submit" id="button" /></p>
</form>
</div>
<script type="text/javascript" src="script.js"></script>
</body>
</html>


style.css

Now we will add some styling to our form. Add the below code to style.css to make your form attractive.

#container{
width:20%;
margin:auto;
padding:10px 0 5px 0;
border-bottom:3px solid red;
background:#2E2E2E;
}
#container p{
text-align:Center;
}
.box{
border-top:none;
border-left:none;
border-right:none;
border-bottom:2px solid #6E6E6E;
width:65%;
background:#2E2E2E;
outline: none;
color:white;
font-family:'Abel', sans-serif;
font-size:100%;
}
#container label{
font-family:'Abel', sans-serif;
color:white;
padding:0 10px 0 0;
}
.box[type=text]:focus{border-bottom:2px solid #FA5858;}
#button{
border:none;
width:30%;
padding:5px;
font-family: 'Alegreya Sans', sans-serif;
color:white;
background:#FA5858;
margin:0 0 0 55px;
}


script.js

Now we will add some interactive elements to our form. The below javascript code will empty the input field when the user will click on it and will restore it if the user leaves it empty. Add the below code into the script.js file.

var username = document.getElementById("username");
var pass = document.getElementById("pass");
pass.onfocus = function(){
if(pass.value=="ENTER PASSWORD"){
pass.value="";
}
};
username.onfocus = function(){
if(this.value=="ENTER USERNAME"){
this.value="";
}
};
pass.onblur = function(){
if(this.value==""){
pass.value="ENTER PASSWORD";
}
};
username.onblur = function(){
if(this.value==""){
this.value="ENTER USERNAME";
}
};


Now we have successfully made our form after doing all the above things correctly your form will look something as shown below.

Create Attractive Form Using HTML, CSS and JavaScript
If you have any queries then please comment them below.


Tutorial by: Mohd Shibli
Find out more by the author at: http://www.psychocodes.in
Follow the author on facebook: http://www.fb.com/mohd.shibli.940

The post Create Attractive Form Using HTML, CSS and JavaScript appeared first on The Crazy Programmer.

EaseUS Todo PCTrans 9.0 – Best Data Transfer Software

$
0
0

Here’s another masterpiece from EaseUS, Todo PCTrans (Version 9.0). EaseUS has developed numerous software for backup utilities.

Here, we shall give you a brief information about EaseUS Todo PCTrans Free version and the EaseUS Todo PCTrans Pro version.

This is one of the best data transfer software.


What is Todo PCTrans?

The EaseUS Todo PCTrans is a straightforward and efficient software to transfer all your files from one system to another.

It enables you to move your files, documents, audios, videos, softwares and other files from your old system to the new system. PC Trans application will not harm your previous data.

Todo PCTrans provides reliability, efficiency and security for transferring files within multiple systems.

The best part of this application is that it does not require any technical knowledge for the end users.

You can even transfer data and applications to other partitions on your local hard drive.

EaseUS Todo PCTrans 9.0 – Best Data Transfer Software

When Can You Use Todo PCTrans?

1. You’ve got a new PC at your Office or Home? Want to transfer data, applications and settings from your old computer to the new PC? The EaseUS Todo PCTrans free application will help you to move data efficiently.

2. Looking forward to upgrading your PC from Windows XP to any other Windows platform such as Windows 7/8/8.1/10? The EaseUS Todo PCTrans Pro application provides a secure and reliable data transfer processing.

3. Want to migrate your current operating system from 32 bits to 64 bits or vice versa, Todo PC Trans will help you to move all your files and data smoothly without any loss of data.


Todo PCTrans Application is compatible with the following platforms:

1. Windows Vista/ 7/ 8/ 8.1/ 10

2. Windows XP

3. Windows Server 2003/ 2008/ 2010


This Application comes in the following variants:

1. EaseUS Todo PCTrans Free

The EaseUS Todo PCTrans Free version is an entirely free version of the Todo PCTrans application. It gives you a good idea about the application which will enable you with the primary work of transferring data. However, there are limitations on the features that this version offers to the users.

2. EaseUS Todo PCTrans Professional

The EaseUs Todo PCTrans Pro is a purchased version with a good number of features available. The best thing about it is that it offers a free trial version which will enable you to evaluate the application and then you can buy it. It is available for $49.95.

3. EaseUS Todo PCTrans Technician

The Technician version is again a premium version of the Todo PCTrans Technician Application, which provides you unlimited usage. Along with the Technician License, you get authority for unlimited usage within your company.

You can, therefore, use it within numerous systems. It is available with a trial version and the premium package comes for $399. Although it is costlier than EaseUs Todo PCTrans Pro version, it provides you added features comparatively.

The best part about EaseUS is its Technical Support Team. These guys are available 24 hours a day and 7 days a week. They are ready to help you with whatever your needs are!


EaseUs Mother’s Day Giveaway

They are organising a mother’s day giveaway from May 8 to March 9. Giveaway starts at UTC5, 00:00, May 8, 2016. They will giveaway four software, including EaseUS Todo PCTrans Pro, Auslogics Boost Speed, MacX Video Converter Pro, and Water mark Software.

Follow below link to participate.

http://www.partition-tool.com/giveaways/mothers-day.htm

The post EaseUS Todo PCTrans 9.0 – Best Data Transfer Software appeared first on The Crazy Programmer.

How to Copy One Array to Another in Java

$
0
0

Here you will learn how to copy one array to another in Java.

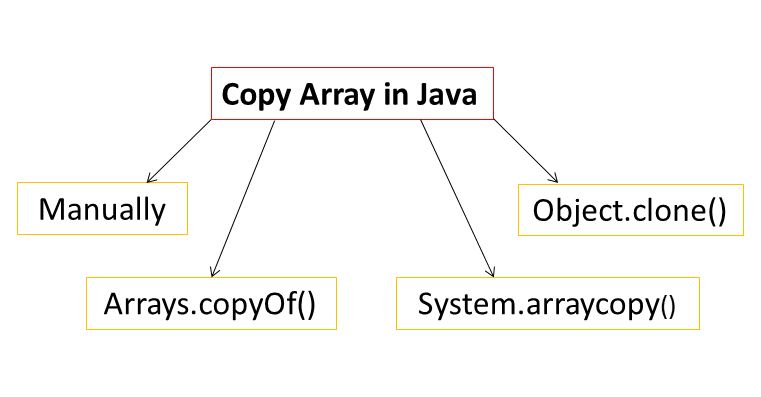
There are mainly four different ways to copy all elements of one array into another array in Java.

1. Manually
2. Arrays.copyOf()
3. System.arraycopy()
4. Object.clone()

Lets discuss each of them in brief.

How to Copy One Array to Another in Java

How to Copy One Array to Another in Java

1. Manually

In this method we manually copy elements one by one. It is not an efficient way. Below example shows how to do this.

Example:

package com;

public class CopyArrayExample {
	public static void main(String args[]){
		int a[]={10,20,30,40,50};
		int b[]=new int[a.length];
		
		//copying one array to another
		for(int i=0;i<a.length;++i){
			b[i]=a[i];
		}
		
		//printing array
		for(int i=0;i<b.length;++i){
			System.out.print(b[i]+" ");
		}
	}
}


2. Arrays.copyOf()

We can directly copy one array to another by using Arrays.copyOf() method. It has following syntax.

public static int[] copyOf(int[] original,int newLength)


Example:

package com;

import java.util.Arrays;

public class CopyArrayExample {
	public static void main(String args[]){
		int a[]={10,20,30,40,50};
		int b[]=new int[a.length];
		
		//copying one array to another
		b=Arrays.copyOf(a,a.length);
		
		//printing array
		for(int i=0;i<b.length;++i){
			System.out.print(b[i]+" ");
		}
	}
}


3. System.arraycopy()

It is another method that directly copies one array to another. It has following syntax.

public static void arraycopy(Object src, int srcPos, Object dest, int destPos, int length)


Example:

package com;

public class CopyArrayExample {
	public static void main(String args[]){
		int a[]={10,20,30,40,50};
		int b[]=new int[a.length];
		
		//copying one array to another
		System.arraycopy(a,0,b,0,a.length);
		
		//printing array
		for(int i=0;i<b.length;++i){
			System.out.print(b[i]+" ");
		}
	}
}


4. Object.clone()

We can also use clone() method of Object class to make a copy of an array.

Example:

package com;

public class CopyArrayExample {
	public static void main(String args[]){
		int a[]={10,20,30,40,50};
		int b[]=new int[a.length];
		
		//copying one array to another
		b=a.clone();
		
		//printing array
		for(int i=0;i<b.length;++i){
			System.out.print(b[i]+" ");
		}
	}
}


Comment below if you have any doubt related to above tutorial or you know about any other way to copy one array to another in Java.

The post How to Copy One Array to Another in Java appeared first on The Crazy Programmer.

JSP Pagination Example Using jQuery, AJAX, JSON and MySQL

$
0
0

In this tutorial you will learn how to implement pagination in JSP.

Pagination is a technique of dividing the content into several pages. Fetching all the data at a time is time consuming and it also results in poor user experience as the user has to scroll down to view data. So, pagination is used to speed up data fetching because only selected amount of data is fetched form server by user request.

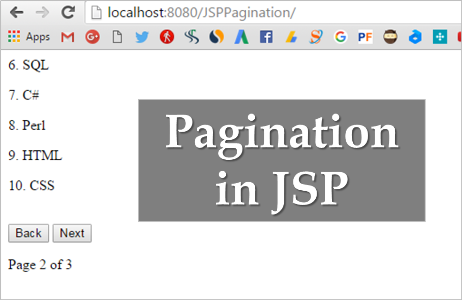
Below I have shared JSP pagination example. It is created using Eclipse IDE and the technologies I have used are JSP, jQuery, AJAX, JSON and MySQL.

JSP Pagination Example Using jQuery, AJAX, JSON and MySQL

JSP Pagination Example

Note: To use jQuery you have to add the jQuery library. You can download it from here. To use JSON here I have used json.simple library. You can download it from here. Make sure you include both of these libraries in your project.

Create a dynamic web project in Eclipse and add following code in respective files.

JSP Pagination Example Using jQuery, AJAX, JSON and MySQL

index.jsp

This page displays the data to user. All pagination logic is written here.

<html>
    <head>
        <title>JSP Pagination Example</title>
        <script src="jquery-1.11.3.js"></script>
    </head>
    
    <body>        
        <script type="text/javascript">
        $(document).ready(function(){
            var totalRecords;
            var recordsPerPage=5;
            var recordsToFetch=recordsPerPage;
            var totalPages;
            var currentPage=1;
            var currentIndex=0;
            
            $.get("processRequest.jsp?requestType=countRecords",function(data){
                var JSONData=JSON.parse(data);
                totalRecords=JSONData.count; 
                totalPages=Math.floor(totalRecords/recordsPerPage);
                
                if(totalRecords%recordsPerPage!=0){
                	totalPages++;
                }
                
                if(totalRecords<recordsPerPage){
                    recordsToFetch=totalRecords%recordsPerPage;
                }
                else{
                	recordsToFetch=recordsPerPage;
                }
                
                $("#page").html("Page "+currentPage+" of "+totalPages);
            });    
            
            $.get("processRequest.jsp?requestType=getRecords&currentIndex="+currentIndex+"&recordsToFetch="+recordsToFetch,function(data){
            	var JSONData=JSON.parse(data);
            	for(i=0;i<recordsToFetch;++i){
            		$("#div1").append("<p>"+(currentIndex+1)+". "+JSONData.record[i]+"</p>");
            		currentIndex++;
            	}
            	
                if(currentPage==totalPages){
                    $("#next").hide();
                }
                else{
                    $("#next").show();
                }
                
                if(currentPage==1){
                    $("#back").hide();
                }
                else{
                    $("#back").show();
                }

            });


            $("#next").click(function(){
            	$("#div1").html("");
            	currentPage++;

            	if(currentPage==totalPages){
            		$("#next").hide();
                    if(totalRecords%recordsPerPage!=0){
                    	recordsToFetch=totalRecords%recordsPerPage;
                    }
                    else{
                    	recordsToFetch=recordsPerPage;
                    }
                }
                else{
                    $("#next").show();
                    recordsToFetch=recordsPerPage;
                }
            	                
                if(currentPage==1){
                    $("#back").hide();
                }
                else{
                    $("#back").show();
                }

                $.get("processRequest.jsp?requestType=getRecords&currentIndex="+currentIndex+"&recordsToFetch="+recordsToFetch,function(data){
                    var JSONData=JSON.parse(data);
                    for(i=0;i<recordsToFetch;++i){
                        $("#div1").append("<p>"+(currentIndex+1)+". "+JSONData.record[i]+"</p>");
                        currentIndex++;
                    }
                });
                
                $("#page").html("Page "+currentPage+" of "+totalPages);

            });
            
            
            $("#back").click(function(){
                $("#div1").html("");
                currentPage--;
                currentIndex=currentIndex-recordsToFetch-recordsPerPage;

                if(currentPage==totalPages){
                    $("#next").hide();
                    recordsToFetch=totalRecords%recordsPerPage;
                }
                else{
                    $("#next").show();
                    recordsToFetch=recordsPerPage;
                }
                
                if(currentPage==1){
                    $("#back").hide();
                }
                else{
                    $("#back").show();
                }

                $.get("processRequest.jsp?requestType=getRecords&currentIndex="+currentIndex+"&recordsToFetch="+recordsToFetch,function(data){
                    var JSONData=JSON.parse(data);
                    for(i=0;i<recordsToFetch;++i){
                        $("#div1").append("<p>"+(currentIndex+1)+". "+JSONData.record[i]+"</p>");
                        currentIndex++;
                    }
                });
                
                $("#page").html("Page "+currentPage+" of "+totalPages);

            });

        });   
        </script>
        
        <div id="div1"></div><br/>
        <button id="back">Back</button>
        <button id="next">Next</button>
        
        <p id="page"></p>
    </body>
</html>


processRequest.jsp

This page process request by fetching data.

<%@page import="com.PaginationDAO"%>
<%
String req=request.getParameter("requestType");
String data="";

if(req.equals("countRecords")){
    data=PaginationDAO.countRecords();
}

if(req.equals("getRecords")){
	String start=request.getParameter("currentIndex");
	String total=request.getParameter("recordsToFetch");
	data=PaginationDAO.getRecords(start, total);
}

out.print(data);
%>


DBConnection.java

Contains code for database connection.

package com;

import java.sql.Connection;
import java.sql.DriverManager;

public class DBConnection {
	final static String URL="localhost:3306/";
	final static String DATABASE="pagination";
	final static String USER="root";
	final static String PASS="root";
	
	final static String DATA_TABLE="data";
	final static String ID_COL="id";
	final static String NAME_COL="name";
	
	public static Connection getCon(){
		Connection con=null;
		
		try{
			Class.forName("com.mysql.jdbc.Driver");
			con=DriverManager.getConnection("jdbc:mysql://"+URL+DATABASE,USER,PASS);
		}catch(Exception e){
			e.printStackTrace();
		}
		
		return con;
	}
}


PaginationDAO.java

Fetch data from database and convert it into JSON format.

package com;

import java.sql.Connection;
import java.sql.PreparedStatement;
import java.sql.ResultSet;

import org.json.simple.JSONArray;
import org.json.simple.JSONObject;

public class PaginationDAO {
	public static String countRecords(){
		String query="select count(*) from "+DBConnection.DATA_TABLE;
		int count=0;
		JSONObject obj=new JSONObject();
		
		try{
			Connection con=DBConnection.getCon();
			PreparedStatement ps=con.prepareStatement(query);
			ResultSet rs=ps.executeQuery();
			
			if(rs.next()){
				count=rs.getInt(1);
				obj.put("count",count);
			}
		}catch(Exception e){
			e.printStackTrace();
		}
		
		return obj.toString();
	}
	
	public static String getRecords(String start,String total){
		String query="select * from "+DBConnection.DATA_TABLE+" limit "+start+","+total;
		JSONObject obj=new JSONObject();
		JSONArray arr=new JSONArray();
		
		try{
			Connection con=DBConnection.getCon();
			PreparedStatement ps=con.prepareStatement(query);
			ResultSet rs=ps.executeQuery();
			
			while(rs.next()){
				arr.add(rs.getString(DBConnection.NAME_COL));
			}
			
			obj.put("record",arr);
		}catch(Exception e){
			e.printStackTrace();
		}
		
		return obj.toString();
	}
}


Database

The database table that I have used has following structure.

JSP Pagination Example Using jQuery, AJAX, JSON and MySQL

In this example I am fetching only 5 records at a time from the database and then displaying them. You can change the number of records per page according to you.

Download the project from below link. It also contains the database backup file.

Download Project

If you are facing any difficulty then feel free to ask it by commenting below.

The post JSP Pagination Example Using jQuery, AJAX, JSON and MySQL appeared first on The Crazy Programmer.

Difference Between Stack and Queue

$
0
0

In this article you will learn about difference between stack and queue.

Stack

A Stack data structure works on Last In First Out principle, also abbreviated as LIFO. A Stack requires only one reference variable, known as a top pointer. Stack data structures are normally represented as a vertical representation of data items.

A Stack Data Structure can be represented in static arrays as well as linked lists. In a stack, the data items can be inserted and deleted from the same end. The element to be inserted first is the last element to get deleted. Both the operations, insertion and deletion occur at the TOP reference pointer. A Stack doesn’t necessarily contain ordered collection of data items.

Stack Implementations:

Stack data structure is used in infix to postfix conversion, scheduling algorithms, evaluation of an expression and depth first search.

The condition to check if a stack is empty:

int isEmpty()
{
	if(top==-1)
		return 1;
	else
		return 0;
}


The condition to check if a stack is full:

int isFull()
{
	if(top==MAX-1)
		return 1;
	else
		return 0;
}


Queue

A Queue data structure works on First In First Out principle, also abbreviated as FIFO. A Queue requires two reference variables. Queue is normally represented as a horizontal representation of data items. The Queue data structure contains FRONT and REAR as its reference points for data processing.

A Queue can also be represented in by static arrays as well as linked lists. In a Queue, the data items can be inserted and deleted from different ends. The element to be inserted first is the first element to get deleted. The insertion operation is done at rear end whereas the deletion occurs at the front end. A Queue contains ordered collection of data items. A Queue can be divided into sub sections and it has the following extensions: Double Ended Queue, Simple Queue, Priority Queue and Circle Queue.

Queue Implementations:

A Queue offers services in operations research, transportation and computer science that involves persons, data, events and objects to be stored for later processing.

The condition to check if a queue is empty:

int isEmpty()
{
    if(front==-1 || front==rear+1)
        return 1;
    else
        return 0;
}


The condition to check if a queue is full:

int isFull()
{
    if(rear==MAX-1)
        return 1;
    else
        return 0;
}

Difference Between Stack and Queue

Image Source

Difference Between Stack and Queue

Stack Queue
A Stack Data Structure works on Last In First Out (LIFO) principle. A Queue Data Structure works on First In First Out (FIFO) principle.
A Stack requires only one reference pointer. A Queue requires two reference pointers.
A Stack is primarily a vertical representation of data items. A Queue is a horizontal representation of data items.
A Stack contains TOP as its reference for data processing. A Queue contains REAR and FRONT as its reference for data processing.
The data items are inserted and deleted from the same end. The data items in a queue are inserted and deleted from different ends.
The element to be inserted first is removed last. The element to be inserted first is removed first.
To check if a stack is empty, following condition is used:

TOP == -1

To check if a queue is empty, following condition is used:

FRONT == -1 || FRONT == REAR + 1

The insertion and deletion operations occur at the TOP end of a Stack. The insertion operation occurs at REAR end and the deletion operation occurs at FRONT end.
A Stack data structure is not necessarily an ordered collection of data items. A Queue data structure is an ordered collection of data.
To check if a stack is full, following condition is used:

TOP == MAX – 1

To check if a queue is full, following condition is used:

REAR == MAX – 1

A Stack cannot be divided into sub sections and it doesn’t have extensions. A Queue can be divided into sub sections and it has the following extensions: Double Ended Queue, Simple Queue, Priority Queue and Circle Queue.
Used in infix to postfix conversion, scheduling algorithms, depth first search and evaluation of an expression. A Queue offers services in operations research, transportation and computer science that involves persons, data, events and objects to be stored for later processing.


Comment below if you found anything incorrect or have doubts related to above difference between stack and queue tutorial.

The post Difference Between Stack and Queue appeared first on The Crazy Programmer.

Unix vs Linux – Difference between Unix and Linux

$
0
0

Here you will learn about difference between unix and linux i.e. unix vs linux.

Unix OS

Unix is a proprietary software and it is a complete operating system.

The Unix OS works primarily on Command Line Interface. Recently, there have been developments for GUI on Unix systems.

Unix is not as flexible as Linux. It has less compatibility with different types of hardware. Unix installation requires a strict and well-defined hardware machinery and works only on specific CPU machines.

The Unix OS is not a freeware and therefore its source code is not available. You cannot modify and sell your version of Unix therefore.

Unix installation is comparatively much costlier than Linux since it requires special hardware and can be run only on specific CPU processors.

Unix comparatively supports very fewer File systems. It supports the following File systems:

zfs, js, hfx, gps, xfs, gps, xfs, vxfs

The Unix Operating System is not portable.

There are comparatively less distributions or versions of Unix operating systems.

Different versions of Unix are as follows:

  1. AIS (IBM)
  2. BSD
  3. HP – UX
  4. Solaris
  5. Iris

Unix OS was created in the early 1970s at AT&T Bell Laboratories in the United States.

The Unix OS is mainly used on large server systems, mainframes, expensive and high-end computer systems at big MNCs and institutions.

Unix is being developed, maintained and updated by AT&T developers. They don’t encourage open source developments.


Unix vs Linux - Difference between Unix and Linux

Image Source


Linux OS

Linux is an open source operating system based on Unix. Linux is basically the name of the Kernel. The graphical user interface and the applications make it a complete operating system.

The Linux OS has both Graphical User Interface (GUI) as well as Command Line Interface (CLI). Linux comes with KDE and Gnome as its GUI environment. The Command Line Interface is optional in Linux.

Linux is a very flexible operating system and is compatible with most hardware systems. Linux OS can be installed and executed on most of the CPU machines.

Linux OS being an open source OS, its source code is available for free. You can, therefore, read, modify and implement it on your machine. However, you cannot sell it as it comes under the GNU GPL License.

Linux has a good scope of scalability and supports a really large set of file systems. Linux installation is generally very economical as compared to Unix since it does not require special hardware for it to run.

The File systems supported by Linux are as follows:

xfs, ramfs, nfs, vfat, cramfsm ext3, ext4, ext2, ext1, ufs, autofs, devpts, ntfs and many more.

There are comparatively more distributions or versions of Linux operating systems. The distributions available for Linux are as follows:

  1. Redhat
  2. Slackware
  3. Debian
  4. Solaris
  5. Ubuntu
  6. CentOS
  7. Fedora

The Linux Kernel was created by Linux Torvalds in 1990s. However, the complete OS with GNU GPL license also had a huge contribution by Richard Stallman.

The Linux OS mainly focused on home based PCs and laptops. However, due to its popularity and stability, it started being used in offices and high-end systems including mobile phones, servers and even embedded systems.

The developments in Linux are contributed by a community of developers worldwide without any cost. However, the authority to implement the development lies with the founder of Linux – Linus Torvalds.

Unix vs Linux – Difference between Unix and Linux

Linux Unix
Linux is an Open Source Operating System provided developed by Linus Torvalds. Unix is a Closed Source Operating System developed by AT&T.
The Source Code of Linux is freely available to its Users. The Source Code of Unix is not available for the general public.
Linux primarily uses Graphical User Interface with an optional Command Line Interface. Unix primarily uses Command Line Interface.
Linux OS is portable and can be executed in different Hard Drives. Unix is not portable.
Linux is very flexible and can be installed on most of the Home Based Pcs. Unix has a rigid requirement of the Hardware. Hence, cannot be installed on every other machine.
Linux is mainly used in Home Based PC, Mobile Phones, Desktops, etc. Unix is mainly used in Server Systems, Mainframes and High End Computers.
Different Versions of Linux are: Ubuntu, Debian, OpenSuse, Redhat, Solaris, etc. Different Versions of Unix are: AIS, HP-UX, BSD, Iris, etc.
Linux Installation is economical and doesn’t require much specific and high end hardware. Unix Installation is comparatively costlier as it requires more specific hardware circuitry.
The Filesystems supported by Linux are as follows: xfs, ramfs, nfs, vfat, cramfsm ext3, ext4, ext2, ext1, ufs, autofs, devpts, ntfs The Filesystems supported by Unix are as follows: zfs, js, hfx, gps, xfs, gps, xfs, vxfs.
Linux is development by an active Linux Community worldwide. Unix is developed by AT&T Developers.

Comment below if you found anything incorrect or have any doubts regarding above unix vs linux tutorial.

The post Unix vs Linux – Difference between Unix and Linux appeared first on The Crazy Programmer.


Linux Interview Questions and Answers

$
0
0

Here are some of the linux interview questions and answers that would help you to crack some of the most important and difficult interviews as a beginner.

1. What is the basic difference between Linux and Unix?

Linux is an open source operating system while Unix is a proprietary operating system. Linux is therefore, available for free to download but Unix is a paid OS (most of the versions).

Read more differences here: Difference between Unix and Linux

2. How can you find the active connections through terminal?

Using the netstat command, it is possible to find the active internet connections with the current machine. It is a command line network utility tool.

Linux Interview Questions and Answers

3. What is the minimum partition requirement in Linux and enlist them.

There should be minimum two partitions that every Linux distribution should have and these are as follows:

  1. Swap Partition
  2. Root Directory

4. What is the SU command used for in Linux?

The SU command in Linux is used to switch from one user account to another user account. You just need to type sudo su and enter the password to switch to another user account in your Linux system.

5. Tell the command to shut down the system.

The command to shutdown the OS is shutdown -h time. In place of time, you can add a number representing the seconds after which you need to shutdown the system.

 6. What is fork()?

fork() is a system call primarily. It is sued to create a new process from an already active process in the system memory. Therefore, the primary process is called the parent process and the newly created process is called the child process.

7. How many run levels modes are available in Linux operating system?

There are a total of seven run level modes available in linux operating system.

8. What do you mean by Open Source System Softwares?

Open Source Softwares are the ones that are freely available for use. They generally come under the GPL License which enables us to view the source code, manipulate it and use it. However, we cannot resell them.

9. How can you list all the running programs in your Linux system?

The TOP Command can be used to enlist all the running processes in your Linux system. You can types TOP in Linux terminal and you’ll get the details of the current processes in your system.

10. What is the difference between BASH and DOS?

BASH is a Unix shell and a command language. DOS is an abbreviated form for Disk Operating System. It is used in Microsoft systems for Command Line Interface. DOS commands are not case sensitive whereas BASH commands are case sensitive.

11. How can you view the current Swap and RAM memory in your Linux system?

There is a command that can be used in the terminal in Linux operating system. The command is FREE. It enables you to view the currently active RAM and Swap memory in the system.

12. Is it legally acceptable to edit the source code of Linux Ubuntu?

Definitely Yes. Linux Ubuntu currently has a large community who regularly edits the source code for modifications and send it to the Linux team. These changes are reviewed by the core team and implemented in the next version. So, it is possible to edit the source code as it comes under GNU GPL License.

13. Which command is used to enlist the files in a particular directory?

To view the existing files in the current directory, you can use the LS command. It is an abbreviated form for LIST.

14. What is Kernel in Linux?

A Kernel in Linux is an essential part of an OS. It is the core of Linux OS. The Kernel provides basic services and interacts with the User Commands. It is fetching your commands and then retrieving the results from the OS and again sending back to the User.

15. Enlist the types of Kernels.

There are various types of Kernels listed as follows:

  1. Monolithic Kernel
  2. Micro Kernel
  3. Hybrid Kernel

16. Which Program is used to securely login in Linux Operating System?

Secure Shell is used to remotely login in Linux OS. It is also known as SSH. SSH is an encrypted or cyrtographic network protocol. SSH is a good replacement of Telnet, which was previously used in Linux OS for Login purpose.

17. Name the Partition that stores the system configuration files in Linux system.

The partition that stores the system configuration files in Linux OS is /etc.

18. Who is the creator of Linux Operating System?

Linus Torvalds has created the Linux Operating System.

19. Enlist the distributions of Linux.

The different types of Linux distributions are listed as follows:

  1. Linux Mint
  2. Ubuntu
  3. Mandriva
  4. Arch
  5. Slackware
  6. Debian
  7. Fedora

20. Where is the user password stored in Linux Operating System?

The User passwords are stored in the directory /etc/passwd

21. In Linux OS, which Daemon controls the Printer Spooling process.

The Line Printing Daemon, also known as LPD controls the Printer Spooling Process.

22. Enlist the filesystems supported in Linux OS.

The filesystems supported by Linux are as follows:

  1. XFS
  2. EXT3
  3. NFS
  4. RAMFS
  5. EXT4
  6. AUTOFS
  7. NTFS

23. What is GNU GPL License?

The GNU General Public License is a Free Software License. This License enables the Users to share, copy, manipulate the code of the software. Therefore, the software code is available for free.

24. Which command is used to delete the files in Linux through command line?

The command used to delete the files in linux is rm.

25. Name the command used to remove the directory.

The command used to remove the directory is rmdir.

26. What should be the size of Swap memory in Linux?

Usually, the size of the Swap memory in Linux Systems should be equal or more two times that of RAM.

27. Explain SE-Linux.

SE – Linux is an abbreviated form for Security Enhanced – Linux. It has been developed to prevent Illegal Daemons and Server Misconfigurations. It provides access control implementation. It implements access authorities to daemons, programs for the files that they can access. The Security Enhanced – Linux provides Security Policy formation.

28. Who is the inventor of Unix Operating System?

The Unix Operating System is created by Dennis Ritchie and Ken Thompson at Bell Labs in 1969.

29. What is the default text editor for Linux?

The default editor for text files in Linux operating system is VI Editor. It can be used to edit any ASCII Text.

30. Name the argument to extract the files from archives using Linux Terminal.

To extract the files from archives, there can be a combination of multiple commands. If you’re trying to extract using TAR Command, then you have to use -x argument with it.

31. What is a Package Manager?

A Package Manager in Linux is a collection of softwares which provides Upgradation, Modification, Removal, Installation and Deletion of programs from the Linux Operating System. It is also known as Package Management System. It is especially developed to automatically install and update the system softwares.

32. What is the name of the Boot Loader in Linux Ubuntu Operating System?

The Boot Loader in Linux Ubuntu OS is called as GRUB Boot Loader.

33. How do you move from one directory to another directory in Linux Operating System?

By using the CD command in Linux Terminal, the user can move from one directory to another one. CD is an abbreviated form of Change Directory.

34. What is Sudo Command?

Sudo command is used to provide highest level access authority to the users. If you use a command in the Linux terminal, you may get an Access Denied output. If you want to make the terminal process a command, you can use the prefix SUDO to get administrator rights for the same.

35. What is Shell?

The Shell is basically an interface between the User Commands and the Operating System. Whatever the user types in is interpreted by the Shell and is then sent to the Operating System Kernel for fetching the results. It converts them to the System Calls.

36. Enlist boot files in Linux Operating System.

The files that are loaded a boot time in Linux OS are as follows:

/etc/fstab

/etc/init.d/rc.d/rcN.d

/boot/grub/grub.conf

/etc/initab                       

37. How can you find the Run – Level of Linux Operating System?

By using the runlevel command from the Linux Terminal, you can find the Run Level of your Linux  system.

38. Enlist the command to install any software in Linux Ubuntu OS.

The command to install any software in Linux OS is as follows:

sudo apt install application-name

39. How can you terminate a currently executing process in Ubuntu terminal?

The key combination Ctrl + Z allows you to terminate a currently executing process in the Linux Ubuntu Terminal.

40. Which command can be used to monitor Linux ports?

The Nmap localhost command is used to monitor ports in Linux Operating Systems.

41. Enlist the Run Level Modes in Linux.

The Run Level Modes in Linux are as follows:

  1. Halt
  2. Reboot
  3. Single User Mode
  4. Undefined
  5. Multi – User Mode
  6. X11
  7. Multi User Mode with Networking

42. What is the core of Linux OS?

The Linux Kernel is the core of Linux Operating System.

Comment below if you found any information mission or incorrect in above linux interview questions and answers.

The post Linux Interview Questions and Answers appeared first on The Crazy Programmer.
AMCAT Sample Papers Pdf Download

$
0
0

Here you will get AMCAT sample papers for all subjects and download them in pdf format.

AMCAT stands for Aspiring Minds Computer Adaptive Test. It is an employability assessment test for students to test their aptitude, reasoning and technical skills. The AMCAT was founded by Varun Aggarwal and Himanshu Aggarwal in the year 2007 which is organized by Aspiring Minds. It has offices in different cities of India. Every month more than 70,000 job seekers appear in this exam. You can find various job opportunities and apply for them by visiting official AMCAT website at www.myamcat.com.

AMCAT Sample Papers Pdf Download

AMCAT Sample Papers

Compulsory

English

Quantitative Ability

Logical Ability

Aspiring Minds Personality Inventory (AMPI)

Attention To Detail (compulsory only for General Graduates)

Excel (compulsory only for Management Graduates)


General

Excel

Computer Programming

Physics

Chemistry

Basic Biology

Marketing

Finance and Accounting

Banking & Financial Services

Human Resources (HR)

Operations

Pharmaceutical Sciences

Front Office

Housekeeping

Food Production

Food and Beverage Service


Engineering

Computer Programming

Computer Science

Electronics and Semiconductors

Telecommunication

Electrical Engineering

Mechanical Engineering

Civil Engineering

Instrumentation Engineering

Industrial Engineering

Production Engineering

Metallurgical Engineering

Chemical Engineering

Automotive Engineering

Paint Technology

Polymer Technology

Chemistry


Management

Banking & Financial Services

Marketing

Human Resources (HR)

Operations

Basic Statistics


Comment below if you are facing any difficulty to download AMCAT sample papers.

Best of Luck!

The post AMCAT Sample Papers Pdf Download appeared first on The Crazy Programmer.

How to Download Website for Offline Access

$
0
0

In this tutorial I will teach you how to download website for offline access.

There are various reasons for which you want to access a website in offline mode. Like if you are a web designer then you may need to download any website’s template and use it in some of your projects. Or if you are learning something from tutorials on a website and you want to save it locally on your system to read them anytime without internet access.

There is an awesome tool named as HTTrack which is used to download any website. There are some other softwares in the market but HTTrack is most popular and best among them.

How to Download Website for Offline Access

1. First of all go to HTTrack official website to download it. It is available for windows, linux and mac.

https://www.httrack.com/

2. Now install and open it. After that click on Next button.

How to Download Website for Offline Access

3. Give a name to the project and choose the location where you want to save the website in your system. Then click Next button.

How to Download Website for Offline Access

4. Enter the URL of the website that you want to download. After that click Next and then click Finish button.

How to Download Website for Offline Access

5. Now the downloading of the files will start. The time required to download will depend upon the size of the website.

How to Download Website for Offline Access

This was the simple guide on how to download website for offline access. If you are getting any difficulty then comment below, I will try to help you.

The post How to Download Website for Offline Access appeared first on The Crazy Programmer.
Fix Java was started but returned exit code=13 Error in Eclipse

$
0
0

Eclipse is one of the best IDEs for Java and Android developers. There are many issues with Eclipse if it is not configured properly. One of the most common errors with Eclipse IDE is of the java exit code 13. It is common to get an error like Java was started but returned exit code=13.

This Eclipse error is one of the most frustrating bugs to solve if you don’t know the correct method. Here I have enlisted some possible solutions for this error. You have to try all of them one by one.

How to Fix Java was started but returned exit code=13 Error

Method 1:

You may get this error if the versions of java and eclipse do not match. If you have installed 64 bit java jdk on your machine and 32 bit Eclipse IDE or vice versa, then you may get this error.

So, ensure that you have installed both the softwares with their correct versions. If you installed different versions, you will have to uninstall the softwares and install them again with the same version.


Method 2:

There are cases when you want to keep both the 32 bit version and the 64 bit version installed in your machine due to compatibility issue.

When this is the scenario, you need to correctly mention the path of the system variables in the Environment Variable Settings. You have to select either 32 bit or 64 bit in both the softwares i.e., Eclipse and Java JDK.

Suppose you select 32 bit versions, you need to go to the C drive in the JDK Folder of 32 bit version. Once you do that, you can copy the path and set it in the Environment Variable section. You won’t get the same error again.


Method 3:

Another solution to this error is by copying the Eclipse folder in the C:/Program Files folder. For some this may work. However, if it does not work, you should try putting the Eclipse Folder in the C:/Program Files (x86) folder.

We hope that at least one of the above methods will work in your system. You may have to try all the three methods. One of them will surely solve your error message “java was started but returned exit code 13”.


Method 4:

There are a lot of compatibility issues with Java 1.8 and higher versions. So, if you are not able to solve the error with the above methods, you can degrade to java 1.7 or lower version and check if the error is solved or not.


Method 5:

If you have 32 bit and 64 bit versions installed at the same time, you need to set the Eclipse to one version of Java JDK. It should be explicitly set by the user, otherwise the default version of Java will be used which may cause this Error Code 13.

The solution to this the manipulation of the eclipse.ini file. The eclipse.ini is located in the Eclipse folder. Open that file with notepad editor in windows.

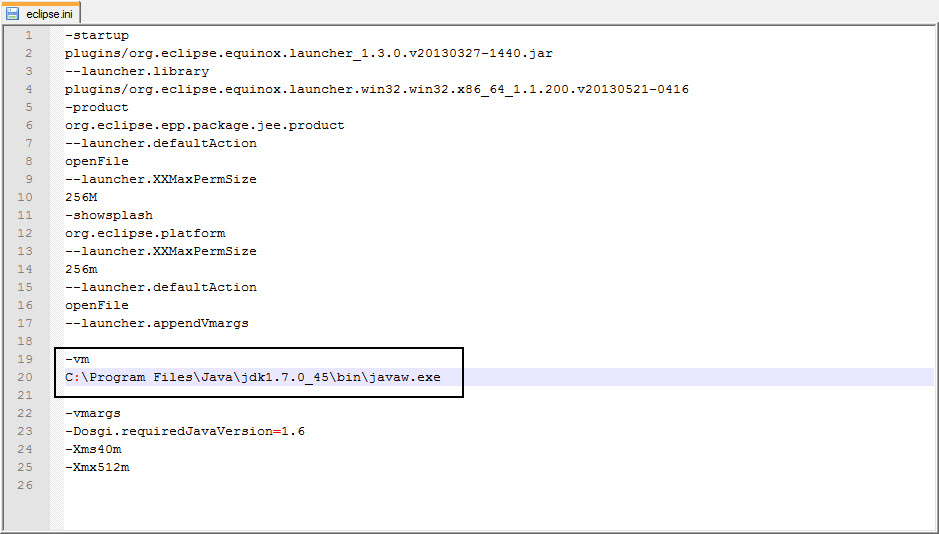
You need to add the following code before the line that includes -vmargs in the eclipse.ini file.

-vm

C:\Program Files\Java\jdk1.7.0_40-64\bin\javaw.exe

The second line may be different depending upon version of the java jdk installed in your machine. If you have a 32 bit JDK version, it may be found in Program Files(x86).

Few important points to remember while configuring eclipse.ini file:

1. The Java File’s Path must be Relative Path or Absolute Path. It should not just point to the Java Home Folder.

2. The -vm option and its path should be on a separate line.

3. The -vm option should be before -vmargs option.

Here is the screenshot of an eclipse.ini file.

Fix Java was started but returned exit code=13 Error in Eclipse


Comment below if you are getting any difficulty to solve Java was started but returned exit code=13 error in eclipse. I will try to help you.

The post Fix Java was started but returned exit code=13 Error in Eclipse appeared first on The Crazy Programmer.

5 Best Java Web Hosting Companies in India

$
0
0

If you are looking for best java web hosting providers in India then you are landed at the right place.

As a developer it is really hard to choose best hosting provider. I also faced this problem when want to host my first java web application. Then I had done lot of research and found some reliable and cost effective java hosting companies that I am sharing in this article. You can host your JSP, Servlet, JSF or any other Java based web application.

The good thing is that some of them are also providing free java hosting trail for 15 days or 30 days. So you can try them first without spending money.

5 Best Java Web Hosting Companies in India


5 Best Java Web Hosting Companies in India

1. Hosting Raja

hosting raja

It is one of the most popular hosting provider among others.

Available Plans

Gold Plan

Price: Rs. 499/month

Space: Unlimited

Bandwidth: Unlimited

RAM: 2 GB

Heap Memory: 512 MB


Unlimited Plan

Price: Rs. 699/month

Space: Unlimited

Bandwidth: Unlimited

RAM: 4 GB

Heap Memory: 1 GB


Visit their website to know more about plans.


2. Net4

net4

Available Plans

Advance Hosting Pack

Price: Rs. 58/month

Space: 500 MB

Bandwidth: Unlimited


Visit their website to know more about plans.


3. HIOX India

hiox india

Available Plans

Dedicated JVM – Starts with Rs. 208.25/month

JSP Web Hosting – Starts with Rs. 116/month


Visit their website to know more about plans.


4. Everdata

everdata

It is good and reliable hosting because I have personally used it to host my JSP application.

Available Plans

Cloud Hosting

Cloudlets [128mb Ram 200mhz CPU] Rs. 0.15/- (upto)

Cloud Storage Per GB Initial 10 GB Free Further Rs. 0.0068/-

Shared SSL Free

Bandwidth Per GB Rs. 0.0095/-


Visit their website to know more about plans.


5. Web5

web5

It is another great and cheap java web hosting option.

Available Plans

Java Starter

Price: Rs. 199/month

Space: Unlimited

Bandwidth: Unlimited

Heap Memory: 64 MB


Java Advance

Price: Rs. 369/month

Space: Unlimited

Bandwidth: Unlimited

Heap Memory: 128 MB


Visit their website to know more about plans.


So these are some best java web hosting companies in India. Comment below if you know about any other good and reliable java hosting provider in India. I will really love to add it to this list.

The post 5 Best Java Web Hosting Companies in India appeared first on The Crazy Programmer.
Create Simple Java RESTful Web Services Using Jersey

$
0
0

In this tutorial you will learn how to create simple Java RESTful web services using Jersey framework.

JAX-RS is the Java API used for creating RESTful web services. There are mainly two types of implementation of JAX-RS that are Jersey and RESTeasy. In this tutorial we will see Jersey implementation.

We will use eclipse to create our web service. Make sure it contains apache tomcat server. You can follow below link to know how to download and configure tomcat.

Read: Configure Apache Tomcat Server in Eclipse IDE

Create Simple Java RESTful Web Services Using Jersey 1

Also Read: Create Java SOAP Web Service Using Eclipse

How to Create Java RESTful Web Services Using Jersey Framework

1. First of all download the Jersey jars from below link.

https://jersey.java.net/download.html

2. Open eclipse and go to File -> New -> Dynamic Web Project to create a dynamic web project with name JavaRESTfullWS.

3. Now we have to import jersey jars in our project. The file that you have downloaded in previous step is compressed file. After extracting it you will get several folders. Just import all the jars present in those folders. You can follow below link if you don’t know how to import jars in eclipse.

http://stackoverflow.com/questions/4440479/how-can-i-add-jar-files-to-the-web-inf-lib-folder-in-eclipse

4. Create a package with name example under src folder in your project. Under this package create a source file with name DemoService and add following code inside it.

DemoService.java

package example;

import javax.ws.rs.GET;
import javax.ws.rs.Path;
import javax.ws.rs.PathParam;
import javax.ws.rs.Produces;
import javax.ws.rs.core.MediaType;

@Path("/DemoService")
public class DemoService {
		
	@GET
	@Path("/{msg}")
	@Produces(MediaType.TEXT_HTML)
	public String printMsg(@PathParam("msg") String msg){
		return "<h1>Your message: "+msg+"</h1>";
	}	
}


5. Enter following code in web.xml file. You can find it under Web-Content -> WEB-INF folder. If it is not there then create one.

Web.xml

<?xml version="1.0" encoding="UTF-8"?>  
<web-app xmlns:xsi="http://www.w3.org/2001/XMLSchema-instance"   
xmlns="http://java.sun.com/xml/ns/javaee"   
xsi:schemaLocation="http://java.sun.com/xml/ns/javaee   
http://java.sun.com/xml/ns/javaee/web-app_3_0.xsd"   
id="WebApp_ID" version="3.0">  

 <servlet>  
    <servlet-name>Jersey REST Service</servlet-name>  
    <servlet-class>org.glassfish.jersey.servlet.ServletContainer</servlet-class>  
    <init-param>  
        <param-name>jersey.config.server.provider.packages</param-name>  
        <param-value>example</param-value>  
    </init-param>  
    <load-on-startup>1</load-on-startup>  
  </servlet>  
  <servlet-mapping>  
    <servlet-name>Jersey REST Service</servlet-name>  
    <url-pattern>/rest/*</url-pattern>  
  </servlet-mapping>  
</web-app>


The project has following structure.

Create Simple Java RESTful Web Services Using Jersey 2
6. Right click on your project folder and then select Run As -> Run on Server.

7. For testing the web service open following url in browser.

http://localhost:8080/JavaRESTfullWS/rest/DemoService/Hello

Create Simple Java RESTful Web Services Using Jersey 3

You can change Hello at the end of the url to pass some other message as parameter.

Video Tutorial

You can watch below video. Everything is explained in it step by step.

Comment below if you are facing any difficulty to create Java RESTful web services.

Happy Coding!! :) :)

The post Create Simple Java RESTful Web Services Using Jersey appeared first on The Crazy Programmer.
Difference between SOAP and REST Web Services

$
0
0

Here you will learn about the difference between SOAP and REST web services.

Web services are used to communicate between applications that are developed in different languages and running on different platforms. Like a Java application running on linux platform can communicate with a PHP application running on windows platform. There are two types of web services, SOAP and REST. Let us discuss some main differences between them.

Also Read: Create Java SOAP Web Service Using Eclipse
Also Read: Create Simple Java RESTful Web Services Using Jersey


Difference between SOAP and REST Web Services

Image Source

SOAP vs REST – Difference between SOAP and REST Web Services

S.No SOAP REST
1. SOAP stands for Simple Object Access Protocol. REST stands for Representational State Transfer.
2. SOAP is a protocol. It defines some standards that should be followed strictly. REST is an architectural style. It doesn’t define so many standards like SOAP.
3. SOAP is highly secure as it defines its own security. REST inherits security measures from the underlying transport.
4. SOAP message request is processed slower as compared to REST. REST message request is processed faster as compared to SOAP.
5. SOAP supports only XML data format. REST supports data formats like plain text, XML, HTML, JSON, etc.
6. SOAP is not very easy to implement so it is preferred less. REST is easier to implement so it is preferred more.
7. SOAP requires more bandwidth and resources. REST requires less bandwidth and resources.
8. In java SOAP web services are implemented using JAX-WS API. In java RESTful web services are implemented using JAX-RS API.
9. It does not use web caching mechanism. It uses web caching mechanism.
10. SOAP is commonly used in payment gateways, financial and telecommunication services. REST is commonly used in social media, web chat and mobile services.


SOAP or REST?

If the security is a major concern and the resources are not limited then we should use SOAP web services. Like if we are creating a web service for banking related work then we should go with SOAP as here high security is needed.

On the other hand if security is not a major concern and we have limited resources. Or we want to create an API that will be easily used by other developers publicly then we should go with REST web services.

I tried my best to clear the difference between SOAP and REST web services. If you have any doubt or you found any information incorrect then feel free to mention it in the comment section.

The post Difference between SOAP and REST Web Services appeared first on The Crazy Programmer.


Top Database Technologies for PHP Web Applications

$
0
0

Undoubtedly PHP is the most prominent platform for web development at the moment. Apart from websites, enterprise applications such as ERP, web based open source CRMs for SMEs and e-Commerce solutions are hugely prominent at the moment. There are a lot of people who believe that mySQL is the only database connecting with PHP while others are known to the fact that PHP is supporting other databases as well but they are unaware of the ones. What happens most of the times is that customers are picky as it comes to the database they are keen to have for the implementation. So here we are to help out the PHP developers, web development companies and others making them understand the databases that PHP supports.

Also Read: PHP Frameworks and Libraries That Every Web Developer Must Know About

Top Database Technologies for PHP Web Applications

Top Database Technologies for PHP Web Applications

Here we have endeavored to present the databases as decreasing order of use cases with PHP. Thus the most prominent databases feature on the top while the less popular ones are listed further down.

MySQL

Certainly the most popular database out there for PHP applications is MySQL. It’s prominent open-source database all around the world besides there is the enterprise version of the database also available and it’s the paid one. A lot of popular applications such as SugarCRM, Magento, WordPress and Drupal are using MySQl while it has its customers in Wikipedia, Facebook and Google. With MySQL workbench you get a web based user interface useful in managing the database.

PostGreSQL

Launched in 1995, PostGreSQL emphasize on compliance and standards. Comparatively to MySQL, PostGreSQL is feature rich while the database at present is under its release 9.3 compared to release 5.6 of MySQL. With advanced optimization and compression attribute, PostGrey is in the league of Oracle. Most prominent applications that use PostGreSQL are OpenBravo and PostERP among others. Meanwhile, as compared to MySQL, PostGreSQL is a fraction slower.

In case you mostly use Windows and having related infrastructure already, then it’d be advised using MS-SQL. However web developments that use .NET and .ASP technology are going to cost more. This is the reason some customers use PHP getting it connected to MS-SQL. At the same time also keep in mind that it works just for PHP version 5+ only.

SYBASE

SYBASE was founded in Berkley in 1984 and it’s now in the team of SAP AG. Mostly used by enterprise database management, this solution has proved to be useful in performing under extreme load and suits best when an organization requires a big database. It connects with PHP using sasql_connect() command similar to MySQL.

IBM-DB2

Established in 1983, IBM-DB2 was highly used in combination with mainframe systems. As of now this database is used in a number of large scale ERP and e-Commerce implementations. In order to connect it with PHP, you require PECL extension.

Oracle Database

Well-established databases of the present times, Oracle database is quite prominent for Windows and Linux based servers. You can’t easily come across enterprises not using this database. In order to connect with PHP applications, you require OCI8 extension. When you have oci_connect function it can be used to connect to the database whereas Function oci_close () is useful in disconnecting the connection.

Other supported databases

Here we present the other databases that you can connect with PHP. Some are open source while others are proprietary. Gather more information about them on to the homepage. Find below:

  • Cubrid
  • DB++
  • dBase
  • filePro
  • FireBird/InterBase
  • FrontBase
  • Informix
  • Ingres
  • MaxDB
  • Mongo
  • mSQL
  • Ovrimos SQL
  • Paradox
  • SQLite
  • SQLite3
  • SQLSRV
  • Tokyo Tyrant

PHP programming ideas

The best attribute of the adept PHP develops is that they treat database as an external entity ensuring effective working for their application. Here are the best practices to follow:

  • Lessen the amount of selects written in your PHP program an choose data in single shot and filter with the use of arrays.
  • Use the fields defining the keys as you select the data.
  • No use of joining more than 3 tables.
  • Only go for fields required for processing rather than using SELECT *.
  • Don’t go for aggregate functions such as SUM, AVERAGE, and MAX. Use them only in case of no alternate and when database is small.

Conclusion:

So now as you very well know the number of database options offered by PHP, it’s time to take an informed decision regarding which database you would like to use in your case. We hope this write-up proves to be of great help for you enabling you attain performance optimized deliverables for your client.

Author Bio:

Jitendra Jain is Marketing and Sales manager at Octal Info Solution, a leading web & mobile app development company, offering platform to hire php developers for your web development project.

The post Top Database Technologies for PHP Web Applications appeared first on The Crazy Programmer.

Decompile APK to Source Code in Single Click

$
0
0

In this tutorial I will guide you how to decompile apk to source code in just one click.

APK file is compressed form of java classes, XML and several other files. As an android developer you may require to decompile apk file to get actual source code. Like if you saw an app with awesome design and you want to know how to implement that design in your project. We use reverse engineering process to get the source code.

There are several tools available on the internet like dex2jar, apktool, etc. that will help you to convert apk to soruce code. But for that you have to run several commands and follow lengthy process.

Also Read: 5 Best Java Decompilers

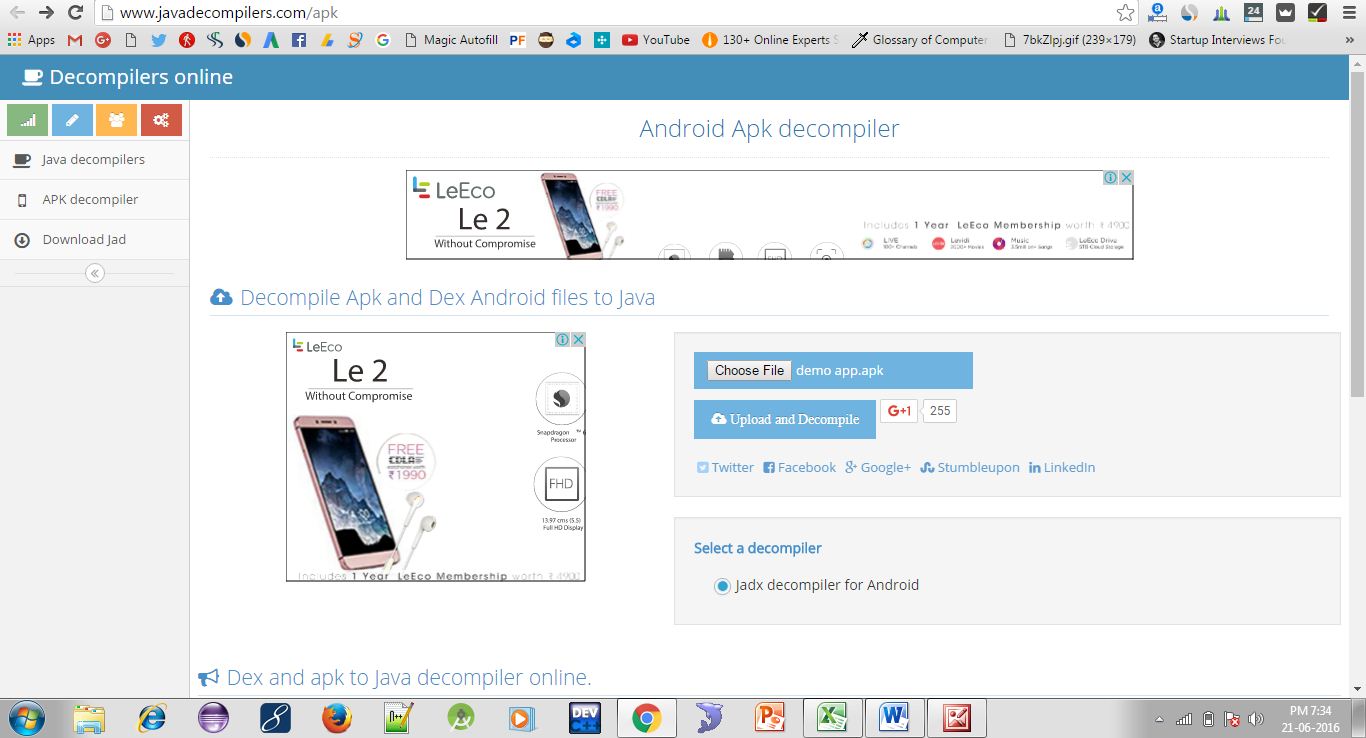
Luckily I found a great online apk decompiler tool www.javadecompilers.com. This tool uses an open sources APK and DEX decompiler known as jadx. It will help you to obtain source code from apk file in just one click.

Decompile APK to Source Code in Single Click

How to Decompile APK to Source Code

1. First of all go the below link.

http://www.javadecompilers.com/apk


2. Now select the apk file by Choose File option and then click on Upload and Decompile button.

Decompile APK to Source Code in Single Click


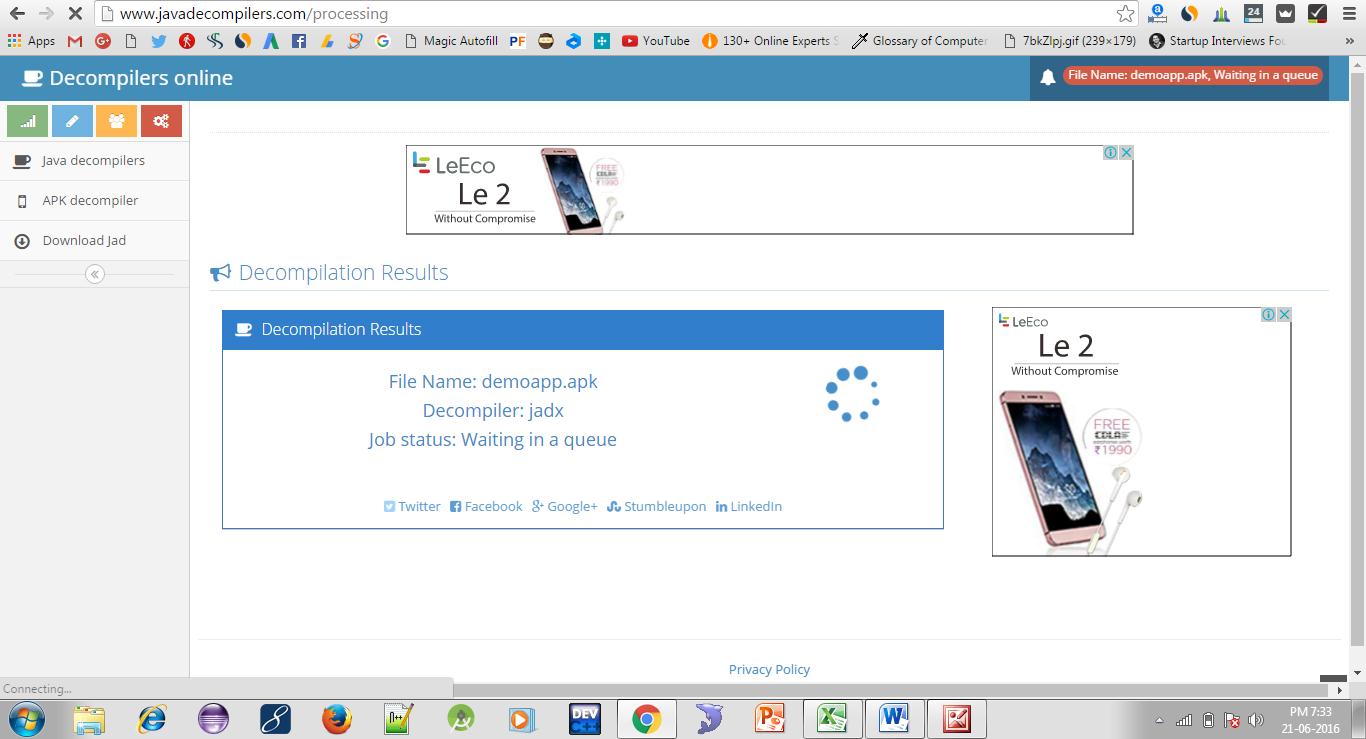
3. It will take time to decompile depending upon the size of the file.

Decompile APK to Source Code in Single Click


4. After decompilation process finished, click on Save button to download the source code.

You can also watch below video tutorial.

Isn’t it very simple? Yes off course. This tool will let you decompile any apk file, if still you are facing any issue then you can find the general long method at below link.

http://stackoverflow.com/questions/3593420/is-there-a-way-to-get-the-source-code-from-an-apk-file


Comment below if you are facing any problem. If you found this tutorial useful then please take your few seconds to share it.

The post Decompile APK to Source Code in Single Click appeared first on The Crazy Programmer.

Android SQLite Database Tutorial

$
0
0

This article is about android sqlite database tutorial.

There are several storage options available in android like shared preferences, internal and external storage, sqlite, etc. Here we will see how to use sqlite database as a storage system in android to perform CRUD operations.

SQLite is light weight open source database that stores data in text files. Android already comes with built in sqlite database.

Also Read: Java SQLite Tutorial

Android SQLite Database Tutorial


Android SQLite Database Tutorial

The database table that I will use in this tutorial has following structure.

Table Name: record

Field Type
id integer, primary key, autoincrement
name text


  • The android.database.sqlite package contains sqlite specific classes.
  • The SQLiteOpenHelper class provides all the functionality for sqlite database.
  • The SQLiteDatabase class provides various methods to perform create, read, update and delete operations.


Create Database

Before working with SQLite database we have to first extend SQLiteOpenHelper class. The example that I have used here contains DBHelper class that extends SQLiteOpenHelper class and perform all database related operations.

For creating the database we will call constructor of SQLiteOpenHelper class using super().

public DBHandler(Context context) {
        super(context, DB_NAME, null, DB_VERSION);
}


onCreate() and onUpgrade()

We have to override two methods onCreate() and onUpgrade().

The code required to create table will be written inside onCreate() method.

public void onCreate(SQLiteDatabase db) {
        String query="CREATE TABLE "+TABLE_NAME+" ("+ID_COL+" INTEGER PRIMARY KEY AUTOINCREMENT,"+NAME_COL+" TEXT)";
        db.execSQL(query);
}


onUpgrade() method contains the code required to update the database.

public void onUpgrade(SQLiteDatabase db, int oldVersion, int newVersion) {
        // Drop older table if existed
        db.execSQL("DROP TABLE IF EXISTS " + TABLE_NAME);

        // Create table again
        onCreate(db);
}


Insert

In this example the insert operation is handled by insertRecord() method. It takes name as a string argument and insert it into table. We have to first add all the values in ContentValues object and then finally insert into table using insert() method of SQLiteDatabase class.

public void insertRecord(String name){
        SQLiteDatabase db=this.getWritableDatabase();
        ContentValues values=new ContentValues();

        values.put(NAME_COL,name);
        db.insert(TABLE_NAME,null,values);
        db.close();
}


Read

For reading from table we just execute our select query using rawQuery() method of SQLiteDatabase class. This method returns Cursor object that will be used to fetch the records one by one.

public String getRecords(){
        String query="SELECT * FROM "+TABLE_NAME;
        String result="";
        SQLiteDatabase db=this.getReadableDatabase();
        Cursor cursor=db.rawQuery(query,null);

        cursor.moveToFirst();
        while(cursor.isAfterLast()==false){
            result+=cursor.getString(0)+" "+cursor.getString(1)+"\n";
            cursor.moveToNext();
        }

        db.close();
        return result;
}


Update

The update() method of SQLiteDatabase class is used to perform update operation according to a primary key. In this example id column is the primary key.

public void updateRecord(String id,String name){
        SQLiteDatabase db=this.getWritableDatabase();
        ContentValues values=new ContentValues();
        values.put(NAME_COL,name);

        db.update(TABLE_NAME,values,"id=?",new String[]{id});
        db.close();
}


Delete

The delete operation is performed by delete() method of SQLiteDatabase class according to primary key.

public void deleteRecord(String id){
        SQLiteDatabase db=this.getWritableDatabase();
        db.delete(TABLE_NAME,"id=?",new String[]{id});

        db.close();
}


Android SQLite Database Example

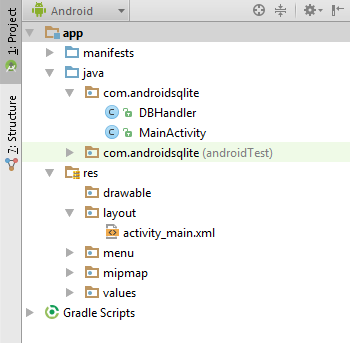
First create a new project with name AndroidSQLite and package name com.androidsqlite.

Add following code in respective files and run the project.

Android SQLite Database Tutorial

MainActivity.java

package com.androidsqlite;

import android.app.Activity;
import android.os.Bundle;
import android.view.View;
import android.widget.Button;
import android.widget.EditText;
import android.widget.TextView;
import android.widget.Toast;


public class MainActivity extends Activity {
    EditText id,name;
    Button insert,view,update,delete;
    TextView text;
    DBHandler db;

    @Override
    protected void onCreate(Bundle savedInstanceState) {
        super.onCreate(savedInstanceState);
        setContentView(R.layout.activity_main);

        id=(EditText)findViewById(R.id.id);
        name=(EditText)findViewById((R.id.name));
        insert=(Button)findViewById(R.id.insert);
        view=(Button)findViewById(R.id.view);
        update=(Button)findViewById(R.id.update);
        delete=(Button)findViewById(R.id.delete);
        text=(TextView)findViewById(R.id.text);

        db=new DBHandler(getApplicationContext());
    }

    public void buttonAction(View view){
        switch (view.getId()){
            case R.id.insert:
                db.insertRecord(name.getText().toString());
                Toast.makeText(getApplicationContext(),"record inserted",Toast.LENGTH_LONG).show();
                break;
            case R.id.view:
                text.setText(db.getRecords());
                break;
            case R.id.update:
                db.updateRecord(id.getText().toString(),name.getText().toString());
                Toast.makeText(getApplicationContext(),"record updated",Toast.LENGTH_LONG).show();
                break;
            case R.id.delete:
                db.deleteRecord(id.getText().toString());
                Toast.makeText(getApplicationContext(),"record deleted",Toast.LENGTH_LONG).show();
                break;
        }
    }
}


DBHandler.java

package com.androidsqlite;

import android.content.ContentValues;
import android.content.Context;
import android.database.Cursor;
import android.database.sqlite.SQLiteDatabase;
import android.database.sqlite.SQLiteOpenHelper;

import java.util.ArrayList;

public class DBHandler extends SQLiteOpenHelper{
    private static final String DB_NAME="demodb";
    private static final int DB_VERSION=1;
    private static final String TABLE_NAME="record";
    private static final String ID_COL="id";
    private static final String NAME_COL="name";

    public DBHandler(Context context) {
        super(context, DB_NAME, null, DB_VERSION);
    }

    @Override
    public void onCreate(SQLiteDatabase db) {
        String query="CREATE TABLE "+TABLE_NAME+" ("+ID_COL+" INTEGER PRIMARY KEY AUTOINCREMENT,"+NAME_COL+" TEXT)";
        db.execSQL(query);
    }

    @Override
    public void onUpgrade(SQLiteDatabase db, int oldVersion, int newVersion) {
        // Drop older table if existed
        db.execSQL("DROP TABLE IF EXISTS " + TABLE_NAME);

        // Create table again
        onCreate(db);
    }

    public void insertRecord(String name){
        SQLiteDatabase db=this.getWritableDatabase();
        ContentValues values=new ContentValues();

        values.put(NAME_COL,name);
        db.insert(TABLE_NAME,null,values);
        db.close();
    }

    public String getRecords(){
        String query="SELECT * FROM "+TABLE_NAME;
        String result="";
        SQLiteDatabase db=this.getReadableDatabase();
        Cursor cursor=db.rawQuery(query,null);

        cursor.moveToFirst();
        while(cursor.isAfterLast()==false){
            result+=cursor.getString(0)+" "+cursor.getString(1)+"\n";
            cursor.moveToNext();
        }

        db.close();
        return result;
    }

    public void updateRecord(String id,String name){
        SQLiteDatabase db=this.getWritableDatabase();
        ContentValues values=new ContentValues();
        values.put(NAME_COL,name);

        db.update(TABLE_NAME,values,"id=?",new String[]{id});
        db.close();
    }

    public void deleteRecord(String id){
        SQLiteDatabase db=this.getWritableDatabase();
        db.delete(TABLE_NAME,"id=?",new String[]{id});

        db.close();
    }
}


activity_main.xml

<RelativeLayout xmlns:android="http://schemas.android.com/apk/res/android"
    xmlns:tools="http://schemas.android.com/tools" android:layout_width="match_parent"
    android:layout_height="match_parent" android:paddingLeft="15dp"
    android:paddingRight="15dp"
    android:paddingTop="15dp"
    android:paddingBottom="15dp" tools:context=".MainActivity">

    <EditText
        android:layout_width="match_parent"
        android:layout_height="wrap_content"
        android:hint="Enter id to update or delete"
        android:id="@+id/id"
        android:onClick="buttonAction"/>

    <EditText
        android:layout_width="match_parent"
        android:layout_height="wrap_content"
        android:hint="Enter name to insert or update"
        android:id="@+id/name"
        android:layout_below="@+id/id"
        android:layout_marginTop="10dp"/>

    <LinearLayout
        android:layout_width="match_parent"
        android:layout_height="wrap_content"
        android:layout_below="@+id/name"
        android:id="@+id/layout1"
        android:orientation="vertical">
        <Button
            android:layout_width="match_parent"
            android:layout_height="wrap_content"
            android:id="@+id/insert"
            android:text="Insert"
            android:onClick="buttonAction"/>

        <Button
            android:layout_width="match_parent"
            android:layout_height="wrap_content"
            android:id="@+id/view"
            android:text="View"
            android:onClick="buttonAction"
            android:layout_below="@+id/name"/>

        <Button
            android:layout_width="match_parent"
            android:layout_height="wrap_content"
            android:text="Update"
            android:onClick="buttonAction"
            android:id="@+id/update"
            android:layout_below="@+id/name"/>

        <Button
            android:layout_width="match_parent"
            android:layout_height="wrap_content"
            android:text="Delete"
            android:onClick="buttonAction"
            android:id="@+id/delete" />

    </LinearLayout>

    <TextView
        android:layout_width="match_parent"
        android:layout_height="wrap_content"
        android:layout_below="@+id/layout1"
        android:layout_marginTop="10dp"
        android:id="@+id/text"/>
</RelativeLayout>


Output

Android SQLite Database Tutorial


If you are facing any problem related to above android sqlite database tutorial then feel free to comment below. I will try my best to solve your problem.

The post Android SQLite Database Tutorial appeared first on The Crazy Programmer.

Top 10 IT Companies in India 2016

$
0
0

Here you will get list of top 10 IT companies in India in the year 2016.

In last few years the Indian IT industry has shown a tremendous growth. If we consider top IT countries in world then India comes at second position. This shows that there is huge number of opportunities for those who want to build their future in IT field in India.

If you are looking for good IT companies to get your dream job then this article will surely help you.

Top 10 IT Companies in India 2016

Image Source

Top 10 IT Companies in India 2016

1. Tata Consultancy Services

TCS is the multinational information technology company which is running in 46 countries. It is ranked at top among all other IT companies in India. Apart from this it is ranked at 10th position in the list of top IT companies in World. Its total market capitalization is $80 billion.


2. Infosys

Infosys was established in the year 1981. It is the second largest IT industry in India. It provides various services like information technology, outsourcing and business consulting. Its total market capitalization is $42.51 billion.


3. Wipro

Wipro comes at 3rd position in the list of top 10 IT companies in India. It was founded in the year 1945 and offers various IT related services. Its total market capitalization is $45 billion.


4. HCL Technologies

HCL is a multinational IT services company which has offices in 34 countries. It offers various services like remote infrastructure management, IT consulting, business process outsourcing (BPO), enterprise transformation, engineering and R&D. Its total market capitalization is $22 billion.


5. Tech Mahindra

Tech Mahindra is a multinational IT industry which was funded in the year 1986 by Anand Mahindra. It provides IT, Business Consulting and Outsourcing services. Its total market capitalization is Rs 50, 299 Crore.


6. Oracle Financial Services Software

Oracle Financial Services Software is a subsidiary of Oracle Corporation. It was founded in the year 1990. It provides IT solution to banking industry. Its total market capitalization is Rs 30,589 Crore.


7. Mphasis

Mphasis is a Bangalore based IT company which was founded in the year 2000. It comes at 7th position among all other IT companies in India. Its total market capitalization is Rs 9,659 Crore.


8. Mindtree

Mindtree Limited is a multination IT company which provides various IT services across the globe. It was founded in the year 1999. Its total market capitalization is Rs 12,910 Crore.


9. Hexaware Technologies

Hexaware Technologies was founded in the year 1990. It provided information technology and business process outsourcing services.  Its total market capitalization is Rs 6,682 Crore.


10. Cyient

Cyient is at position 10 in the list of top 10 IT companies in India. It is mainly focused on engineering, networks and operations. The company was founded in the year 1991. Its total market capitalization is Rs 5725.92 Crore.

If you liked this article then please take your few seconds to share it.

The post Top 10 IT Companies in India 2016 appeared first on The Crazy Programmer.

Top 5 Famous Bugs in Computer Science World

$
0
0

It is very common to have bugs in softwares. Even if we develop software with very much care still it will have some error.

These bugs seem small and annoying for us. But sometimes these small bugs can cause disaster and result in loss of huge money and even human life.

In this article I have shared some serious and famous bugs in computer world.

Top 5 Famous Bugs in Computer Science World


Top 5 Famous Bugs in Computer Science World

1. Ariane 5 Crash

Ariane 5 was a rocket used to launch spacecrafts. It was exploded only about 40 seconds after its launch. The crush was due to very common bug known as Integer Overflow. It happens when we try to store a number greater than the maximum number that can be stored in a memory. This incident resulted in the loss of $370 million.


2.Y2K Bug

During 1960s the computer engineers used 2 digits to represent years. So 1970 would be represented as 70. They used only 2 digits to reduce the size to store the data. This method worked fine till 31 Dec, 1999. But on 1 January, 2000 many computers would have read the year as 1900. To fix this little bug the engineers have to do lot of extra work.


3. PayPal Error

Chris Reynolds from Pennsylvania became world’s richest man when PayPal erroneously credit about $92 quadrillion in his account.


4. Patriot Missile Software Failure

28 American soldiers were killed and 98 were injured when an Iraqi missile hit their barracks. The patriot missile system failed to track and intercept an incoming missile due bug in patriot’s radar and tracking software.


5. Gangnam Style broke YouTube

When YouTube was developed a 32 bit signed integer was used to store the video’s view count. At that time nobody thought that a video would get views more than maximum size of 32 bit singed integer. But Gangnam Style video got views more than this limit. After the limit was exceeded the view count started showing some negative value. Google fixed the bug by changing the view count to a 64 bit signed integer.

gangnam style bug

If you liked this article then take your few seconds to share it.

Source: https://www.quora.com/What-are-some-famous-bugs-in-the-computer-science-world

The post Top 5 Famous Bugs in Computer Science World appeared first on The Crazy Programmer.

Viewing all 761 articles
Browse latest View live