Quantcast
Channel: The Crazy Programmer
Viewing all 761 articles
Browse latest View live

How to Get the Most Out of Your eCommerce Experience

$
0
0

Most people start their eCommerce sites with the hopes of being a success. Part of that comes with being able to offer a unique experience. Some of the best online shopping carts will offer customization in varying degrees to help deliver this unique presence. It’s what you do with it that will change how the site performs in terms of functionality and generating sales.

How to Get the Most Out of Your eCommerce Experience

Image Source

Using Customized Templates

Templates offered by shopping cart software are great to get you started. However, it may be in your best interest to come up with something that hasn’t been seen before. After all, you don’t want to copy a site that is using the same layout and color scheme as yourself. It could create confusion and may lead to visitors believing one site is the same as another.

Appearance also plays a strong role in the reputation of the brand. For instances, studies show people are more likely to trust an online store if the appearance is well-designed and attractive. This trust is what dictates future sales. Remember, first impressions are very important.

Using the Editor Software

Most online carts will come with the ability to use advanced HTML, CSS and Javascript customization. This can help you create a site that has never been seen before. Modifying the layout, fonts, background colors and even the general layout itself may be monumental when attracting consumers. Something as simple as changing the header dimensions may offer that sense of individuality.

One of the highlights to the right shopping cart software is the what-you-see-is-what-you-get, or WYSIWIG, editor. This can help you fine-tune coding while allowing you to see the results in real-time. By going beyond simple text, you can offer a greater appearance through advanced coding techniques.

Optimizing Your Images

Images can weigh heavily on the performance of an eCommerce site. Large files may take too long to load on slower systems or Internet connections. As a result, customers may abandon the cart. According to statistics, consumers are more likely to leave a site if it takes longer than three seconds to load. Since eCommerce platforms often use the most images than any other service on the Internet, optimization is vital.

Search engines may also rank these pages lower in results because they are too slow. This means your competition may take your customers because your images are simply too large. This is especially true for mobile consumers as it may take a long time to render graphics, banners and pictures.

Text or HTML Email Messages

Using text emails may get the point across, but adding HTML into the format has potential to further engage potential shoppers. Although not everyone allows HTML messages to be viewed, it’s still a valid method to offer a unique experience. However, you don’t want to overload the message with too much coding. It may result in a poor experience by the recipient.

You don’t have to rely on default settings and graphics when you use eCommerce platforms. Most systems will offer methods in which to customize the experience on the code level. Give your visitors a unique way to shop and take advantage of these methods.

The post How to Get the Most Out of Your eCommerce Experience appeared first on The Crazy Programmer.


Android Custom Toast Example

$
0
0

Here you will learn how to create custom toast in android with some text and image.

Toast is used to show some information for specific time period. In android we use android.widget.Toast class to make toast message.

A normal toast message with some text can be created by following code.

//toast message for short time period
Toast.makeText(getApplicationContext(), "Simple Toast example.", Toast.LENGTH_SHORT).show();

//toast message for long time period
Toast.makeText(getApplicationContext(), "Simple Toast example.", Toast.LENGTH_LONG).show();

Android provide facility to customize toast message. Like if we want a toast message with some text and image. It can be done in following way.


Android Custom Toast Example

1. Create an android project with package name thecrazyprogrammer.androidexample

2. Add an image in res/drawable folder. In this example I have used logo.png.

The project has following structure.

Android Custom Toast Example 1

Add following code in respective files.

activity_main.xml

<?xml version="1.0" encoding="utf-8"?>
<LinearLayout xmlns:android="http://schemas.android.com/apk/res/android"
    android:layout_width="match_parent" android:layout_height="match_parent"
    android:orientation="vertical">

    <Button
        android:layout_width="match_parent"
        android:layout_height="wrap_content"
        android:text="Click Here To Open Custom Toast"
        android:onClick="clickAction"
        android:id="@+id/btn"/>
</LinearLayout>


custom_toast.xml

It is layout file that contains the code for custom toast.

<?xml version="1.0" encoding="utf-8"?>
<LinearLayout xmlns:android="http://schemas.android.com/apk/res/android"
    android:layout_width="match_parent" android:layout_height="match_parent"
    android:orientation="vertical">

    <ImageView
        android:layout_width="200dp"
        android:layout_height="100dp"
        android:src="@drawable/logo"
        android:layout_gravity="center"/>

    <TextView
        android:layout_width="match_parent"
        android:layout_height="wrap_content"
        android:text="The Crazy Programmer"
        android:gravity="center"/>

</LinearLayout>


MainActivity.java

package thecrazyprogrammer.androidexample;

import android.app.Activity;
import android.os.Bundle;
import android.view.Gravity;
import android.view.LayoutInflater;
import android.view.View;
import android.widget.Button;
import android.widget.Toast;

public class MainActivity extends Activity {
    Button btn;
    
    @Override
    protected void onCreate(Bundle savedInstanceState) {
        super.onCreate(savedInstanceState);
        setContentView(R.layout.activity_main);

        btn = (Button)findViewById(R.id.btn);
    }

    public void clickAction(View view){
        LayoutInflater layoutInflater = getLayoutInflater();
        View view1 = layoutInflater.inflate(R.layout.custom_toast,null);
        Toast toast = new Toast(getApplicationContext());
        
        toast.setView(view1);
        toast.setGravity(Gravity.CENTER_VERTICAL,0,0);
        toast.setDuration(Toast.LENGTH_LONG);
        toast.show();
    }
}

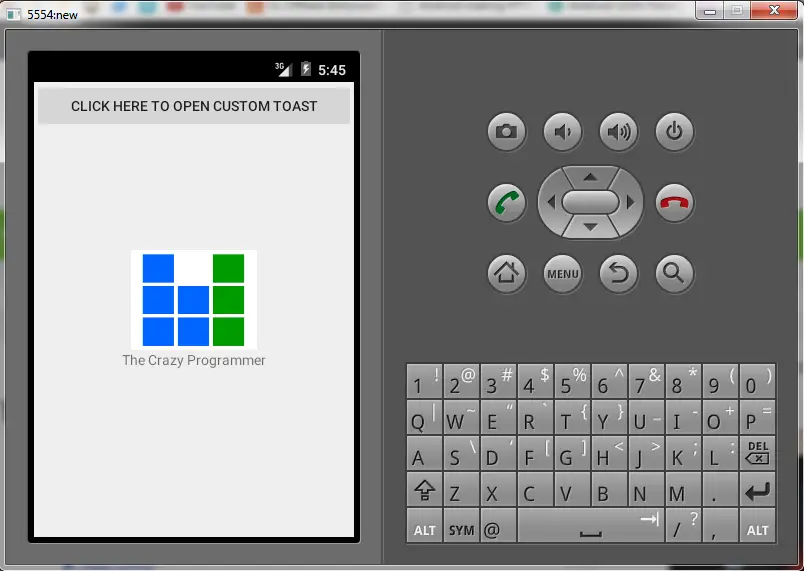
Here we are simply inflating the custom toast xml into Toast view. When you click on button a custom toast with text and image will pop up for some time. You can also do further customization like changing the text size, color, background, etc.

Output

Android Custom Toast Example 2

If you are facing any difficulty then you can ask it in comment section.

The post Android Custom Toast Example appeared first on The Crazy Programmer.

Banker’s Algorithm in C

$
0
0

Here you will get program for banker’s algorithm in C.

The banker’s algorithm  which is also known as avoidance algorithm is a deadlock detection algorithm. It was developed by Edsger Dijkstra. It is designed to check the safe state whenever a resource is requested. It takes analogy of bank, where customer request to withdraw cash. Based on some data the cash is lent to the customer. The banker can’t give more cash than what the customer has requested for, and the total available cash.  As this algorithm uses bank analogy so named as banker’s algorithm

Banker’s Algorithm in C

The basic data structures used to implement this algorithm are given below.

Let n be the total number of processes and m be the total number of resource types in the system.

Available: A vector of length m. It shows number of available resources of each type. If Available[i] = k, then k instances of resource Ri are available.

Max: An n×m matrix that contain maximum demand of each process. If Max[i,j] = k, then process Pi can request maximum k instances of resource type Rj.

Allocation: An n×m matrix that contain number of resources of each type currently allocated to each process. If Allocation[i,j] = k, then Pi is currently allocated k instances of resource type Rj.

Need: An n×m matrix that shows the remaining resource need of each process. If Need[i,j] = k, then process Pi may need k more instances of resource type Rj to complete the task.

Program for Banker’s Algorithm in C

#include <stdio.h>

int current[5][5], maximum_claim[5][5], available[5];
int allocation[5] = {0, 0, 0, 0, 0};
int maxres[5], running[5], safe = 0;
int counter = 0, i, j, exec, resources, processes, k = 1;

int main()
{
	printf("\nEnter number of processes: ");
    	scanf("%d", &processes);

    	for (i = 0; i < processes; i++) 
	{
        	running[i] = 1;
        	counter++;
    	}

    	printf("\nEnter number of resources: ");
    	scanf("%d", &resources);

    	printf("\nEnter Claim Vector:");
    	for (i = 0; i < resources; i++) 
	{ 
	        scanf("%d", &maxres[i]);
    	}

   	printf("\nEnter Allocated Resource Table:\n");
    	for (i = 0; i < processes; i++) 
	{
	        for(j = 0; j < resources; j++) 
		{
  			scanf("%d", &current[i][j]);
        	}
    	}

    	printf("\nEnter Maximum Claim Table:\n");
    	for (i = 0; i < processes; i++) 
	{
        	for(j = 0; j < resources; j++) 
		{
            		scanf("%d", &maximum_claim[i][j]);
        	}
    	}

	printf("\nThe Claim Vector is: ");
    	for (i = 0; i < resources; i++) 
	{
	        printf("\t%d", maxres[i]);
	}

    	printf("\nThe Allocated Resource Table:\n");
    	for (i = 0; i < processes; i++) 
	{
	        for (j = 0; j < resources; j++) 
		{
            		printf("\t%d", current[i][j]);
        	}
		printf("\n");
    	}

    	printf("\nThe Maximum Claim Table:\n");
    	for (i = 0; i < processes; i++) 
	{
        	for (j = 0; j < resources; j++) 
		{
		        printf("\t%d", maximum_claim[i][j]);
        	}
        	printf("\n");
    	}

    	for (i = 0; i < processes; i++) 
	{
        	for (j = 0; j < resources; j++) 
		{
            		allocation[j] += current[i][j];
        	}
    	}

    	printf("\nAllocated resources:");
    	for (i = 0; i < resources; i++) 
	{
        	printf("\t%d", allocation[i]);
    	}

    	for (i = 0; i < resources; i++) 
	{
	        available[i] = maxres[i] - allocation[i];
	}

    	printf("\nAvailable resources:");
    	for (i = 0; i < resources; i++) 
	{
        	printf("\t%d", available[i]);
    	}
    	printf("\n");

    	while (counter != 0) 
	{
        	safe = 0;
        	for (i = 0; i < processes; i++) 
		{
            		if (running[i]) 
			{
                		exec = 1;
                		for (j = 0; j < resources; j++) 
				{
                    			if (maximum_claim[i][j] - current[i][j] > available[j]) 
					{
                        			exec = 0;
                        			break;
                    			}
                		}
                		if (exec) 
				{
                    			printf("\nProcess%d is executing\n", i + 1);
                    			running[i] = 0;
                    			counter--;
                    			safe = 1;

                    			for (j = 0; j < resources; j++) 
					{
                        			available[j] += current[i][j];
                    			}
			                break;
                		}
            		}
        	}
        	if (!safe) 
		{
            		printf("\nThe processes are in unsafe state.\n");
            		break;
        	} 
		else 
		{
            		printf("\nThe process is in safe state");
            		printf("\nAvailable vector:");

            		for (i = 0; i < resources; i++) 
			{
                		printf("\t%d", available[i]);
            		}

		        printf("\n");
        	}
    	}
    	return 0;
}

If you found anything incorrect in above program for banker’s algorithm in C then comment below.

Source: https://en.wikipedia.org/wiki/Banker%27s_algorithm

The post Banker’s Algorithm in C appeared first on The Crazy Programmer.

Android GridView Example

$
0
0

In this android tutorial you will learn about android simple and custom gridview example.

In Android, GridView is a ViewGroup that is used to display items in a two dimensional scrollable grid form. You might have seen image gallery in Android mobiles, it is created using GridView layout.

Here we will see two examples, one is simple GridView layout with some text and another is custom GridView layout with image and text.

Android GridView Example

Android Simple GridView Example

Make an android project with package name com.gridviewexample and add following code in respective files.

activity_main.xml

<?xml version="1.0" encoding="utf-8"?>
<GridView xmlns:android="http://schemas.android.com/apk/res/android"
    android:id="@+id/simpleGrid"
    android:layout_width="match_parent"
    android:layout_height="match_parent"
    android:columnWidth="100dp"
    android:numColumns="auto_fit"
    android:verticalSpacing="10dp"
    android:horizontalSpacing="10dp"
    android:stretchMode="columnWidth"
    android:gravity="center"
/>


MainActivity.java

package com.gridviewexample;

import android.app.Activity;
import android.os.Bundle;
import android.view.View;
import android.widget.AdapterView;
import android.widget.ArrayAdapter;
import android.widget.GridView;
import android.widget.Toast;


public class MainActivity extends Activity {
    GridView grid;
    String items[]={"Apple","Banana","Orange","Mango","Papaya","Watermelon","Grapes","Muskmelon","Pineapple"};

    @Override
    protected void onCreate(Bundle savedInstanceState) {
        super.onCreate(savedInstanceState);
        setContentView(R.layout.activity_main);

        grid = (GridView)findViewById(R.id.simpleGrid);
        ArrayAdapter adapter = new ArrayAdapter(this,android.R.layout.simple_list_item_1,items);
        grid.setAdapter(adapter);

        grid.setOnItemClickListener(new AdapterView.OnItemClickListener() {
            @Override
            public void onItemClick(AdapterView<?> parent, View view, int position, long id) {
                Toast.makeText(getApplicationContext(),items[position],Toast.LENGTH_LONG).show();
            }
        });
    }
}


Output

Android Simple GridView Example


Android Custom GridView Example

Make an android project with package name com.gridviewexample and add following code in respective files.

activity_main.xml

<?xml version="1.0" encoding="utf-8"?>
<GridView xmlns:android="http://schemas.android.com/apk/res/android"
    android:id="@+id/simpleGrid"
    android:layout_width="match_parent"
    android:layout_height="match_parent"
    android:columnWidth="100dp"
    android:numColumns="auto_fit"
    android:verticalSpacing="10dp"
    android:horizontalSpacing="10dp"
    android:stretchMode="columnWidth"
    android:gravity="center"
/>


custom_gridview.xml

<?xml version="1.0" encoding="utf-8"?>
<LinearLayout xmlns:android="http://schemas.android.com/apk/res/android"
    android:layout_width="wrap_content"
    android:layout_height="wrap_content"
    android:padding="10dp"
    android:orientation="vertical">

    <ImageView
        android:id="@+id/item_image"
        android:layout_width="100px"
        android:layout_height="100px"/>

    <TextView
        android:id="@+id/item_text"
        android:layout_width="wrap_content"
        android:layout_height="wrap_content"
        android:layout_marginTop="5px"
        android:textSize="15px" >
    </TextView>

</LinearLayout>


MainActivity.java

package com.gridviewexample;

import android.app.Activity;
import android.os.Bundle;
import android.view.View;
import android.widget.AdapterView;
import android.widget.GridView;
import android.widget.Toast;


public class MainActivity extends Activity {
    GridView grid;
    String text[] = {"Apple","Banana","Orange","Mango","Papaya","Watermelon","Grapes","Muskmelon","Pineapple"};
    int image[] = {R.drawable.apple,R.drawable.banana,R.drawable.orange,R.drawable.mango,R.drawable.papaya,R.drawable.watermelon,R.drawable.grapes,R.drawable.muskmelon,R.drawable.pineapple};

    @Override
    protected void onCreate(Bundle savedInstanceState) {
        super.onCreate(savedInstanceState);
        setContentView(R.layout.activity_main);

        grid = (GridView)findViewById(R.id.simpleGrid);
        grid.setAdapter(new ImageAdapter(this,image,text));

        grid.setOnItemClickListener(new AdapterView.OnItemClickListener() {
            @Override
            public void onItemClick(AdapterView<?> parent, View view, int position, long id) {
                Toast.makeText(getApplicationContext(),text[position],Toast.LENGTH_LONG).show();
            }
        });
    }
}


ImageAdapter.java

package com.gridviewexample;

import android.content.Context;
import android.view.LayoutInflater;
import android.view.View;
import android.view.ViewGroup;
import android.widget.BaseAdapter;
import android.widget.ImageView;
import android.widget.TextView;

public class ImageAdapter extends BaseAdapter {
    private Context context;
    private final int item_image[];
    private final String item_text[];

    public ImageAdapter(Context context, int item_image[], String[] item_text) {
        this.context = context;
        this.item_image = item_image;
        this.item_text = item_text;
    }

    public View getView(int position, View convertView, ViewGroup parent) {

        LayoutInflater inflater = (LayoutInflater) context.getSystemService(Context.LAYOUT_INFLATER_SERVICE);

        View gridView;

        if (convertView == null) {
            gridView = new View(context);

            // get layout from custom_gridview.xml
            gridView = inflater.inflate(R.layout.custom_gridview, null);

            // set value into imageview
            ImageView image = (ImageView) gridView.findViewById(R.id.item_image);
            image.setImageResource(item_image[position]);

            // set value into textview
            TextView text = (TextView) gridView.findViewById(R.id.item_text);
            text.setText(item_text[position]);
        } else {
            gridView = (View) convertView;
        }

        return gridView;
    }

    @Override
    public int getCount() {
        return item_text.length;
    }

    @Override
    public Object getItem(int position) {
        return null;
    }

    @Override
    public long getItemId(int position) {
        return 0;
    }
}


Output

Android Custom GridView Example

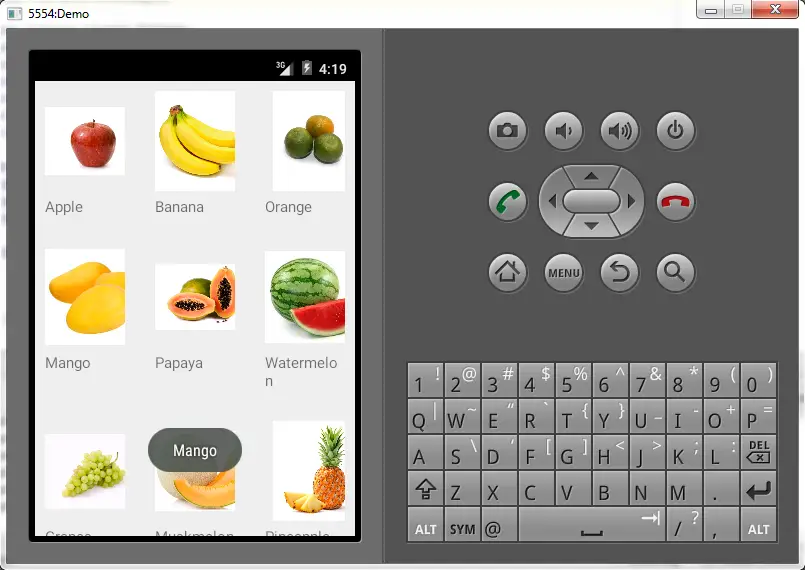
When you will click on any item, its name will be displayed in a toast.

Comment below if you have any queries related to above android gridview example.

The post Android GridView Example appeared first on The Crazy Programmer.

Android WebView Example

$
0
0

Here you will get android webview example.

Android WebView is a UI component used to open web url or show html data inside the activity.

Below I have given two examples, one is for opening a web url and another is for showing some html data in an activity.

Also Read: Android Load Image from URL (Internet) Example


Android WebView Example

Open Web URL

For opening a url we use loadURL() method of WebView class. By default the url is opened in android browser. As we have to open it inside the activity so we have to provide our own WebViewClient.

In this example the activity consists of three UI components namely EditText, Button and WebView. When user will enter url of a website in the edittext and click on button then the website will open in webview.

Create an android project with package name thecrazyprogrammer.androidexample and add following code in respective files.

activity_main.xml

<?xml version="1.0" encoding="utf-8"?>
<LinearLayout xmlns:android="http://schemas.android.com/apk/res/android"
    android:layout_width="match_parent" android:layout_height="match_parent"
    android:orientation="vertical">

    <EditText
        android:layout_width="match_parent"
        android:layout_height="wrap_content"
        android:id="@+id/url"
        android:hint="Enter the url to open..."/>

    <Button
        android:layout_width="match_parent"
        android:layout_height="wrap_content"
        android:text="Open"
        android:id="@+id/openBtn"/>

    <WebView
        android:layout_width="match_parent"
        android:layout_height="match_parent"
        android:id="@+id/webView"/>
</LinearLayout>


MainActivity.java

package thecrazyprogrammer.androidexample;

import android.app.Activity;
import android.os.Bundle;
import android.view.View;
import android.webkit.WebView;
import android.webkit.WebViewClient;
import android.widget.Button;
import android.widget.EditText;

public class MainActivity extends Activity {
    WebView webView;
    Button openBtn;
    EditText url;

    @Override
    protected void onCreate(Bundle savedInstanceState) {
        super.onCreate(savedInstanceState);
        setContentView(R.layout.activity_main);

        webView = (WebView)findViewById(R.id.webView);
        openBtn = (Button)findViewById(R.id.openBtn);
        url = (EditText)findViewById(R.id.url);

        openBtn.setOnClickListener(new View.OnClickListener() {
            @Override
            public void onClick(View v) {
                webView.setWebViewClient(new CustomWebClient());
                webView.loadUrl(url.getText().toString());
            }
        });
    }

    public class CustomWebClient extends WebViewClient
    {
        @Override
        public boolean shouldOverrideUrlLoading(WebView view, String url) {
            view.loadUrl(url);
            return true;
        }
    }
}


Note: As we are fetching data from internet so we have to provide internet access permission. Just add following line in AndroidManifest.xml file.

<uses-permission android:name="android.permission.INTERNET"/>


Output

Android WebView Example 1


Show HTML Data

The loadData() method of WebView class is used to show html data. It can be done in following way.

Create an android project with package name thecrazyprogrammer.androidexample and add following code in respective files.

activity_main.xml

<?xml version="1.0" encoding="utf-8"?>
<LinearLayout xmlns:android="http://schemas.android.com/apk/res/android"
    android:layout_width="match_parent" android:layout_height="match_parent"
    android:orientation="vertical">

    <WebView
        android:layout_width="match_parent"
        android:layout_height="match_parent"
        android:id="@+id/webView"/>
</LinearLayout>


MainActivity.java

package thecrazyprogrammer.androidexample;

import android.app.Activity;
import android.os.Bundle;
import android.webkit.WebView;

public class MainActivity extends Activity {
    WebView webView;

    @Override
    protected void onCreate(Bundle savedInstanceState) {
        super.onCreate(savedInstanceState);
        setContentView(R.layout.activity_main);

        webView = (WebView)findViewById(R.id.webView);
        webView.loadData("<h1>Android WebView Example</h1>","text/html","UTF-8");
    }
}


Output

Android WebView Example 2

Comment below if you found anything incorrect or have doubts related to above android webview example.

The post Android WebView Example appeared first on The Crazy Programmer.

How to Make Simple Browser in Android

$
0
0

In this tutorial I will guide you to make simple web browser in android.

Android provides an awesome UI widget known as WebView. It is used to load web pages and view HTML data. We will use WebView class to make a simple browser with some functionality.

If you don’t know about WebView then I would recommend you to read my previous tutorial on it.

Read: Android WebView Example


How to Make Simple Browser in Android

I used some methods of WebView class that perform following functions.

loadUrl(): It loads a web page from url

canGoBack(): It checks if previous page history is available

goBack(): Go to previous page

canGoForward(): It checks if next page history is available

goForward(): Go to next page

reload(): Reload current page

stopLoading(): stop loading of current page


This browser will allow you to do following things.

  • Open a web page url.
  • Cancel loading of a web page.
  • Go to previous or next web page.
  • Reload a web page.
  • See the progress of loading of web page in progress bar.


Create an android project with package name com.androidbrowser and add following code in respective files.

activity_main.xml

<RelativeLayout xmlns:android="http://schemas.android.com/apk/res/android"
    xmlns:tools="http://schemas.android.com/tools" android:layout_width="match_parent"
    android:layout_height="match_parent" android:paddingLeft="5dp"
    android:paddingRight="5dp"
    android:paddingTop="5dp"
    android:paddingBottom="5dp" tools:context=".MainActivity"
    android:orientation="vertical">

    <ProgressBar
        android:layout_width="match_parent"
        android:layout_height="wrap_content"
        android:progress="1"
        style="?android:attr/progressBarStyleHorizontal"
        android:id="@+id/progress"
        android:max="100"
        android:layout_alignParentTop="true"
        android:indeterminate="false"
        android:visibility="gone"/>

    <RelativeLayout
        android:layout_width="match_parent"
        android:layout_height="35dp"
        android:layout_below="@+id/progress"
        android:id="@+id/topBar">

    <EditText
        android:layout_width="match_parent"
        android:layout_height="wrap_content"
        android:hint="Type URL and Press Enter..."
        android:id="@+id/urlBox"
        android:singleLine="true"
        android:imeOptions="actionSearch"
        android:paddingLeft="5dp"/>

    <Button
        android:layout_width="35dp"
        android:layout_height="wrap_content"
        android:id="@+id/cancel"
        android:text="x"
        android:visibility="visible"
        android:layout_alignParentRight="true"/>
    </RelativeLayout>

    <WebView
        android:layout_width="match_parent"
        android:layout_height="match_parent"
        android:id="@+id/webView"
        android:layout_below="@+id/topBar"
        android:layout_above="@+id/bottomBar"/>

    <RelativeLayout
        android:layout_width="match_parent"
        android:layout_height="50dp"
        android:layout_alignParentBottom="true"
        android:id="@+id/bottomBar"
        android:gravity="center">

        <Button
            android:layout_width="wrap_content"
            android:layout_height="match_parent"
            android:text="Back"
            android:id="@+id/back"
            android:layout_marginRight="5dp"/>

        <Button
            android:layout_width="wrap_content"
            android:layout_height="match_parent"
            android:text="Forward"
            android:id="@+id/forward"
            android:layout_toRightOf="@+id/back"
            android:layout_marginRight="5dp"/>

        <Button
            android:layout_width="wrap_content"
            android:layout_height="match_parent"
            android:id="@+id/refresh"
            android:text="Reload"
            android:layout_toRightOf="@id/forward"/>
    </RelativeLayout>
</RelativeLayout>


MainActivity.java

package com.androidbrowser;

import android.app.Activity;
import android.os.Bundle;
import android.view.KeyEvent;
import android.view.View;
import android.webkit.WebChromeClient;
import android.webkit.WebView;
import android.webkit.WebViewClient;
import android.widget.Button;
import android.widget.EditText;
import android.widget.ProgressBar;


public class MainActivity extends Activity {
    EditText urlBox;
    WebView webView;
    Button back,forward,refresh,cancel;
    ProgressBar progress;

    @Override
    protected void onCreate(Bundle savedInstanceState) {
        super.onCreate(savedInstanceState);
        setContentView(R.layout.activity_main);

        urlBox = (EditText)findViewById(R.id.urlBox);
        webView = (WebView)findViewById(R.id.webView);
        back = (Button)findViewById(R.id.back);
        forward = (Button)findViewById(R.id.forward);
        refresh = (Button)findViewById(R.id.refresh);
        cancel = (Button)findViewById(R.id.cancel);
        progress = (ProgressBar)findViewById(R.id.progress);

        webView.setWebViewClient(new CustomWebViewClient());
        webView.setWebChromeClient(new CustomWebChromeClient());

        urlBox.setOnKeyListener(new View.OnKeyListener() {
            @Override
            public boolean onKey(View v, int keyCode, KeyEvent event) {
                //when enter is pressed in edittext, start loading the page
                if (keyCode == KeyEvent.KEYCODE_ENTER) {
                        webView.loadUrl(urlBox.getText().toString());
                    return true;
                }
                return false;
            }
        });

        //go to previous page
        back.setOnClickListener(new View.OnClickListener() {
            @Override
            public void onClick(View v) {
                if(webView.canGoBack()){
                    webView.goBack();
                }
            }
        });

        //go to next page
        forward.setOnClickListener(new View.OnClickListener() {
            @Override
            public void onClick(View v) {
                if(webView.canGoForward()){
                    webView.goForward();
                }
            }
        });

        //reload page
        refresh.setOnClickListener(new View.OnClickListener() {
            @Override
            public void onClick(View v) {
                webView.reload();
            }
        });

        //cancel loading page
        cancel.setOnClickListener(new View.OnClickListener() {
            @Override
            public void onClick(View v) {
                webView.stopLoading();
            }
        });
    }


    public class CustomWebViewClient extends WebViewClient
    {
        @Override
        public boolean shouldOverrideUrlLoading(WebView view, String url) {
            view.loadUrl(url);
            return true;
        }
    }

    public class CustomWebChromeClient extends WebChromeClient{
        @Override
        public void onProgressChanged(WebView view, int newProgress) {
            progress.setProgress(newProgress);
            urlBox.setText(view.getUrl());

            if (newProgress == 100) {
                cancel.setVisibility(View.GONE);
                progress.setVisibility(View.GONE);


            } else {
                cancel.setVisibility(View.VISIBLE);
                progress.setVisibility(View.VISIBLE);

            }
        }
    }
}

Note: Make sure you add internet access permission. Just add following line in AndroidManifest.xml file.

<uses-permission android:name="android.permission.INTERNET"/>


That’s it, you have done. Just run the project and enjoy browsing internet.


Output

How to Make Simple Browser in Android


Watch Demo

Comment below if you have any doubts related to above tutorial. If you liked it then take your few seconds to share with others.

Happy Coding!! 🙂 🙂

The post How to Make Simple Browser in Android appeared first on The Crazy Programmer.

Android Volley Tutorial With Example

$
0
0

This is android volley tutorial. Here you will learn about android volley library and how to use it.

What is Volley?

Volley is a network library that helps in doing network related operations like fetching image or data.

Here are some features of this library.

  • Supports request queuing and prioritization
  • Effective cache management
  • Multiple concurrent network connections can be established
  • Supports request cancelling
  • No need to use asynctask as it performs all network operations asynchronously.

Android Volley Tutorial 1

Android Volley Tutorial

Using volley we can fetch simple string, image or json data. Below I have given example for each of them.

First we create a request; it can be string, image or json. Then create a request queue and finally add the request in the request queue.


Pre-requisites

1. Add volley support in build.gradle by adding following line under dependencies section.  After adding just sync the project.

compile 'com.android.volley:volley:1.0.0'

2. Add internet access permission in AndroidManifest.xml file.

<uses-permission android:name="android.permission.INTERNET"/>


Fetching String Data

StringRequest class is used to create a string request. We specify the URL and then receive the string in response. Below example shows how to do this.

Create an android project with package name com.androidvolleyexample and add following code in respective files.

activity_main.xml

<LinearLayout xmlns:android="http://schemas.android.com/apk/res/android"
    xmlns:tools="http://schemas.android.com/tools" android:layout_width="match_parent"
    android:layout_height="match_parent" android:paddingLeft="@dimen/activity_horizontal_margin"
    android:paddingRight="@dimen/activity_horizontal_margin"
    android:paddingTop="@dimen/activity_vertical_margin"
    android:paddingBottom="@dimen/activity_vertical_margin" tools:context=".MainActivity"
    android:orientation="vertical">

    <TextView
        android:layout_width="match_parent"
        android:layout_height="wrap_content"
        android:layout_marginBottom="10dp"
        android:id="@+id/txt"/>

    <Button
        android:layout_width="match_parent"
        android:layout_height="wrap_content"
        android:id="@+id/btn"
        android:text="Fetch Data"/>

</LinearLayout>


MainActivity.xml

package com.androidvolleyexample;

import android.app.Activity;
import android.os.Bundle;
import android.view.View;
import android.widget.Button;
import android.widget.TextView;

import com.android.volley.Request;
import com.android.volley.RequestQueue;
import com.android.volley.Response;
import com.android.volley.VolleyError;
import com.android.volley.toolbox.StringRequest;
import com.android.volley.toolbox.Volley;


public class MainActivity extends Activity {
    TextView txt;
    Button btn;
    String url ="http://www.thecrazyprogrammer.com/wp-content/uploads/demo.txt";

    @Override
    protected void onCreate(Bundle savedInstanceState) {
        super.onCreate(savedInstanceState);
        setContentView(R.layout.activity_main);

        txt = (TextView)findViewById(R.id.txt);
        btn = (Button)findViewById(R.id.btn);

        btn.setOnClickListener(new View.OnClickListener() {
            @Override
            public void onClick(View v) {
                StringRequest request = new StringRequest(Request.Method.GET, url, new Response.Listener<String>(){
                    @Override
                    public void onResponse(String s) {
                        txt.setText(s);
                    }
                },new Response.ErrorListener(){
                    @Override
                    public void onErrorResponse(VolleyError volleyError) {
                        txt.setText("Some error occurred!!");
                    }
                });

                RequestQueue rQueue = Volley.newRequestQueue(MainActivity.this);
                rQueue.add(request);
            }
        });
    }
}


Screenshot

Android Volley Tutorial 3


Fetching Image

ImageRequest class is used to create an image request. We specify the URL and then receive the bitmap in response. Below example shows how to do this.

Create an android project with package name com.androidvolleyexample and add following code in respective files.

activity_main.xml

<LinearLayout xmlns:android="http://schemas.android.com/apk/res/android"
    xmlns:tools="http://schemas.android.com/tools" android:layout_width="match_parent"
    android:layout_height="match_parent" android:paddingLeft="@dimen/activity_horizontal_margin"
    android:paddingRight="@dimen/activity_horizontal_margin"
    android:paddingTop="@dimen/activity_vertical_margin"
    android:paddingBottom="@dimen/activity_vertical_margin" tools:context=".MainActivity"
    android:orientation="vertical">

    <ImageView
        android:layout_width="match_parent"
        android:layout_height="wrap_content"
        android:layout_marginBottom="10dp"
        android:id="@+id/img"/>

    <Button
        android:layout_width="match_parent"
        android:layout_height="wrap_content"
        android:id="@+id/btn"
        android:text="Fetch Data"/>

</LinearLayout>


MainActivity.xml

package com.androidvolleyexample;

import android.app.Activity;
import android.graphics.Bitmap;
import android.os.Bundle;
import android.view.View;
import android.widget.Button;
import android.widget.ImageView;
import android.widget.Toast;

import com.android.volley.RequestQueue;
import com.android.volley.Response;
import com.android.volley.VolleyError;
import com.android.volley.toolbox.ImageRequest;
import com.android.volley.toolbox.Volley;


public class MainActivity extends Activity {
    ImageView img;
    Button btn;
    String url ="http://www.thecrazyprogrammer.com/wp-content/uploads/2015/07/The-Crazy-Programmer.png";

    @Override
    protected void onCreate(Bundle savedInstanceState) {
        super.onCreate(savedInstanceState);
        setContentView(R.layout.activity_main);

        img = (ImageView)findViewById(R.id.img);
        btn = (Button)findViewById(R.id.btn);

        btn.setOnClickListener(new View.OnClickListener() {
            @Override
            public void onClick(View v) {
                ImageRequest request = new ImageRequest(url, new Response.Listener<Bitmap>(){
                    @Override
                    public void onResponse(Bitmap b) {
                        img.setImageBitmap(b);
                    }
                }, 0, 0, null,

                new Response.ErrorListener(){
                    @Override
                    public void onErrorResponse(VolleyError volleyError) {
                        Toast.makeText(MainActivity.this, "Some error occurred!!", Toast.LENGTH_LONG).show();
                    }
                });

                RequestQueue rQueue = Volley.newRequestQueue(MainActivity.this);
                rQueue.add(request);
            }
        });
    }
}


Screenshot

Android Volley Tutorial 2


Fetching JSON Data

JsonObjectRequest and JsonArrayRequest class is used to create a json request. We specify the URL and then receive the json data in response. Same as string and image fetched above, we can fetch json data. So I am not giving its example as you can easily do yourself.

Comment below if you found anything incorrect or have doubts related to above android volley tutorial.

The post Android Volley Tutorial With Example appeared first on The Crazy Programmer.

Android Button Example

$
0
0

In this tutorial you will get android button example.

Button is a very basic and commonly used UI widget of Android. It can be pressed or clicked and we can perform some action on its click event.

We can define a button in XML layout by using <Button> tag. In this tutorial I have given an example in which if the user presses the button then a message is displayed in Toast.

We can handle the click event on button in two ways.

  1. Using OnClickListener
  2. Using android:onClick


Android Button Example

OnClickListener

We can handle button click event by using OnClickListener in following way.

Create a new project with package name thecrazyprogrammer.androidexample and add following code in respective files.

activity_main.xml

<?xml version="1.0" encoding="utf-8"?>
<LinearLayout xmlns:android="http://schemas.android.com/apk/res/android"
    android:layout_width="match_parent" android:layout_height="match_parent"
    android:orientation="vertical"
    android:gravity="center">

    <Button
        android:layout_width="match_parent"
        android:layout_height="wrap_content"
        android:id="@+id/btn"
        android:text="Click Here"/>
</LinearLayout>


MainActivity.java

package thecrazyprogrammer.androidexample;

import android.app.Activity;
import android.os.Bundle;
import android.view.View;
import android.widget.Button;
import android.widget.Toast;

public class MainActivity extends Activity {
    Button btn;

    @Override
    protected void onCreate(Bundle savedInstanceState) {
        super.onCreate(savedInstanceState);
        setContentView(R.layout.activity_main);

        btn = (Button)findViewById(R.id.btn);

        btn.setOnClickListener(new View.OnClickListener() {
            @Override
            public void onClick(View v) {
                Toast.makeText(MainActivity.this,"You Clicked Me :)",Toast.LENGTH_LONG).show();
            }
        });
    }
}


Screenshot

Android Button Example


In case you use more than one button in Activity then you have to apply OnClickListener separately on each button as shown below.

button1.setOnClickListener(new View.OnClickListener() {
	@Override
	public void onClick(View v) {
		//code for work to perform on button1 click comes here
	}
});

button2.setOnClickListener(new View.OnClickListener() {
	@Override
	public void onClick(View v) {
		//code for work to perform on button2 click comes here
	}
});


android:onClick

We can also handle click event by assigning a method to button in XML layout by using android:onClick attribute. When button is clicked, the associated method is called. Make sure the method is public void and accept View as a parameter. See below example to learn how to implement this.

Create a new project with package name thecrazyprogrammer.androidexample and add following code in respective files.

activity_main.xml

<?xml version="1.0" encoding="utf-8"?>
<LinearLayout xmlns:android="http://schemas.android.com/apk/res/android"
    android:layout_width="match_parent" android:layout_height="match_parent"
    android:orientation="vertical"
    android:gravity="center">

    <Button
        android:layout_width="match_parent"
        android:layout_height="wrap_content"
        android:id="@+id/btn"
        android:text="Click Here"
        android:onClick="btnAction"/>
</LinearLayout>


MainActivity.java

package thecrazyprogrammer.androidexample;

import android.app.Activity;
import android.os.Bundle;
import android.view.View;
import android.widget.Button;
import android.widget.Toast;

public class MainActivity extends Activity {
    Button btn;

    @Override
    protected void onCreate(Bundle savedInstanceState) {
        super.onCreate(savedInstanceState);
        setContentView(R.layout.activity_main);

        btn = (Button)findViewById(R.id.btn);
    }

    public void btnAction(View view){
        Toast.makeText(MainActivity.this,"You Clicked Me :)",Toast.LENGTH_LONG).show();
    }
}


In above example I have used method name as btnAction. You can give its name according to you. 

In case you use more than one button in Activity then click event for each button can be handled in following way.

public void btnAction(View view){
        if(view.getId()==R.id.button1){
            //code for work to perform on button1 click comes here    
        }

        if(view.getId()==R.id.button2){
            //code for work to perform on button2 click comes here    
        }        
}


Comment below if you have any queries related to above android button example.

The post Android Button Example appeared first on The Crazy Programmer.


Android Switch Button Example

$
0
0

Here you will get android switch button example.

Switch is a button which has two states, on or off. The user can on or off by just dragging or tapping finger on the button. This UI widget is supported on android version 4.0 and higher.

We can define switch button in XML layout by using <Switch> tag.

The OnCheckedChangeListener is applied on button to get notified whenever its state is changed.

The isChecked() method is used to check the current state of switch. It returns true if state is ON else returns false.

You can set the initial state of switch by setChecked() method in following way.

//set switch button to ON
sButton.setChecked(true);

//set switch button to OFF
sButton.setChecked(false);


Android Switch Button Example

activity_main.xml

<?xml version="1.0" encoding="utf-8"?>
<LinearLayout xmlns:android="http://schemas.android.com/apk/res/android"
    android:layout_width="match_parent" android:layout_height="match_parent"
    android:orientation="vertical"
    android:gravity="center">

    <TextView
        android:layout_width="match_parent"
        android:layout_height="wrap_content"
        android:gravity="center"
        android:id="@+id/text1"
        android:layout_marginBottom="10dp"
        android:text="Play With Me..."/>

    <Switch
        android:layout_width="wrap_content"
        android:layout_height="wrap_content"
        android:id="@+id/sButton"/>

    <TextView
        android:layout_width="match_parent"
        android:layout_height="wrap_content"
        android:gravity="center"
        android:id="@+id/text2"
        android:layout_marginTop="10dp"/>
</LinearLayout>


MainActivity.java

package thecrazyprogrammer.androidexample;

import android.app.Activity;
import android.os.Bundle;
import android.widget.CompoundButton;
import android.widget.Switch;
import android.widget.TextView;
import android.widget.Toast;

public class MainActivity extends Activity {
    Switch sButton;
    TextView text2;

    @Override
    protected void onCreate(Bundle savedInstanceState) {
        super.onCreate(savedInstanceState);
        setContentView(R.layout.activity_main);

        sButton = (Switch)findViewById(R.id.sButton);
        text2 = (TextView)findViewById(R.id.text2);

        if(sButton.isChecked()){
            text2.setText("Switch Button is On");
        }
        else{
            text2.setText("Switch Button is Off");
        }

        sButton.setOnCheckedChangeListener(new CompoundButton.OnCheckedChangeListener() {
            @Override
            public void onCheckedChanged(CompoundButton buttonView, boolean isChecked) {
                if(isChecked == true){
                    Toast.makeText(MainActivity.this,"On",Toast.LENGTH_SHORT).show();
                    text2.setText("Switch Button is On");
                }
                else{
                    Toast.makeText(MainActivity.this,"Off",Toast.LENGTH_SHORT).show();
                    text2.setText("Switch Button is Off");
                }
            }
        });
    }
}


Screenshot

Android Switch Button Example


Comment below if you have any queries related to above android switch button example.

The post Android Switch Button Example appeared first on The Crazy Programmer.

8 Tips to Choose the Perfect Domain Name

$
0
0

Any website needs a domain name. Without one, your site or blog can not exist. This element can make or break your business. Thus, you need to choose a domain name that is easy to find and promote, fits your niche, and reflects your brand.

Currently, there are over 150 million domain names in use. If you want to stand out, you need one that is unique and catchy.

How to Choose the Perfect Domain Name

Image Source

Tips to Choose the Perfect Domain Name

Follow these steps to choose the perfect domain name for your website or blog:

Make It Relevant

Think of your domain name as a marketing tool. It needs to be short, concise, and easy to remember. The right domain name can help you create buzz and promote your brand to the target audience. Ideally, choose one that includes your company’s name or other meaningful words with mass appeal. Branded domains aid in word of mouth marketing and help build credibility.

Choose the Right Extension

Even though you can use any extension, it’s recommended to go for a dot-com domain name. Many clients see this as an indicator of the credibility of your business. The dot-com extension is the most popular and inspires trust. Depending on your niche, you can also opt for dot-co, dot-info, dot-net, dot-org, or dot-biz extensions.

Keep It Short and Simple

The perfect domain name should be short, concise, and memorable. If you pick one that is too long, you risk customers misspelling or mistyping it. This can also make it harder for prospects to find your site on search results. As a rule of thumb, look for domains that contain one to three words. Shorter is always better.

Use Keywords

If possible, use keywords that describe your brand and the services you offer. For instance, you provide SEO services online, you may want to register onlineseoservices.com or bestseoservice.com. Although keyword-targeted domains are not as important as they used to be, they still help. Try to find a memorable, brand-related domain name that clients can easily associate with your business.

Target Your Area

Local business owners should include their city or state in the domain name. This will make it easier to local clients to find your company online. For example, if you run a SEO agency in Phoenix, you can use Phoenixseoservices.com.

Avoid Hyphens and Numbers

Most customers forget the dash when typing a domain name. If your website has a hyphened domain, this can affect sales. The same goes for numbers. Stay away from them at all costs.

Think Long-Term

Do not include years or trends in your domain unless you’re planning to use it only for a short time. Keep searching until you find a classic name that is not tied down to a trend. Avoid obscure terms, slang, and niche-specific words that customers might not be familiar with.

Consider the Price

Compare prices online before you register a new domain name. Most companies offer service for $10 to $12. Some web hosting plans include one or more free domains, so it’s worth shopping around.

The post 8 Tips to Choose the Perfect Domain Name appeared first on The Crazy Programmer.

Picasso Android Tutorial – Load Image from URL

$
0
0

In this tutorial you will learn how to use Picasso android library to load image from url.

Picasso is an open source android library which is developed and maintained by Square. Below are some features that make this library the best option for loading image from internet.

Features

  • Easy to use and reduces the code very much
  • Automatic memory and cache management
  • Allows image transformation

You can also use Volley library, which is a great alternative of Picasso.

Also Read: Android Volley Tutorial

Picasso Android Tutorial – Load Image from URL

Picasso Android Tutorial

Before using Picasso we have to add its dependency in build.gradle file.

compile 'com.squareup.picasso:picasso:2.5.2'


Also add internet access permission in AndroidMainfest.xml file.

<uses-permission android:name="android.permission.INTERNET"/>


Loading Image

We can load image by just typing one line of code. It can be done in following way.

Picasso.with(context).load(image_url).into(imageview);


Place Holder and Error Handler

We can specify an image as a place holder until the image is being loaded. We can also give an image as an error handler if any error occurs while loading the image.

Picasso.with(context).load(image_url).placeholder(placeholder_image).error(error_image)into(imageview);


Image Transformation

As I already told that this library also supports image transformation. So we can change image dimensions to fit layouts and reduce memory size.

Picasso.with(context).load(image_url).resize(width, height).rotate(degree).into(imageview);


Don’t you thing that it reduces the code very much?


Picasso Android Example

In this example I am loading image from url on button click.

Create a project with package name com.picassoandroid and add following code in respective files

activity_main.xml

<LinearLayout xmlns:android="http://schemas.android.com/apk/res/android"
    xmlns:tools="http://schemas.android.com/tools" android:layout_width="match_parent"
    android:layout_height="match_parent" android:paddingLeft="@dimen/activity_horizontal_margin"
    android:paddingRight="@dimen/activity_horizontal_margin"
    android:paddingTop="@dimen/activity_vertical_margin"
    android:paddingBottom="@dimen/activity_vertical_margin" tools:context=".MainActivity"
    android:orientation="vertical">

    <ImageView
        android:layout_width="match_parent"
        android:layout_height="wrap_content"
        android:layout_marginBottom="10dp"
        android:id="@+id/img"/>

    <Button
        android:layout_width="match_parent"
        android:layout_height="wrap_content"
        android:id="@+id/btn"
        android:text="Load Image"/>

</LinearLayout>


MainActivity.java

package com.picassoandroid;

import android.app.Activity;
import android.os.Bundle;
import android.view.View;
import android.widget.Button;
import android.widget.ImageView;
import com.squareup.picasso.Picasso;


public class MainActivity extends Activity {
    ImageView img;
    Button btn;
    String url ="http://www.thecrazyprogrammer.com/wp-content/uploads/2015/07/The-Crazy-Programmer.png";

    @Override
    protected void onCreate(Bundle savedInstanceState) {
        super.onCreate(savedInstanceState);
        setContentView(R.layout.activity_main);

        img = (ImageView)findViewById(R.id.img);
        btn = (Button)findViewById(R.id.btn);

        btn.setOnClickListener(new View.OnClickListener() {
            @Override
            public void onClick(View v) {
                Picasso.with(MainActivity.this).load(url).into(img);
           }
        });
    }
}


The code is self explanatory, if still you are facing any difficulty in above Picasso android tutorial then feel free to ask it by commenting below.

Happy Coding!! 🙂 🙂

The post Picasso Android Tutorial – Load Image from URL appeared first on The Crazy Programmer.

How JavaScript and WordPress Interact with Each Other?

$
0
0

Matt Mullenweg, co-founder of WordPress, stated in December’s WordCamp US “learn JavaScript, deeply”. But what does it actually mean and what is the connection between learning JavaScript and using WordPress?

JavaScript is an ever-growing and well-established front-end language that has been conventionally used to add effects and create animations for different web pages. However, if you are using WordPress as well as its plugins, chances are, more than half of WordPress plugins use JavaScript including responsive navigation menu, social media links, sliders and more to create the effects on your website.

Also Read: 7 Best Tools to Make JavaScript Testing Easier

If you are a WordPress developer who has worked with PHP, you might not have used JavaScript or written a single line of code and might be feeling terrified by the idea of learning it to use it with WordPress.

How JavaScript and WordPress Interact with Each Other

But the good news is that JavaScript and PHP are pretty similar in terms of syntax and structure. They certainly work in different contexts and ways, but the code written is not always different.
In today’s post, we are going to discuss how JavaScript and WordPress interact with each other as well as the simplest way to start learning this front-end scripting language.
There are basically certain possible pitfalls when using WordPress and JavaScript together. Few of these pitfalls are:

  • Security issues when passing data between WordPress database and JavaScript
  • JavaScript files conflictions when loaded by the theme on a website or other plugin.
  • Website performance may slow down


JavaScript and WordPress

Being a WordPress developer, you do not need to learn how to write code in JavaScript. All you need to know is the relevancy of JavaScript while working with WordPress.

Here are some of the uses of JavaScript with WordPress and how these two communicate.

WordPress Admin dashboard is powered by JavaScript

JavaScript is increasingly becoming an important part of WordPress, which can be clearly identified from its co-founder Matt Mullenweg. If you have been using WordPress for quite some time, you’d probably know that it has launched a new desktop application namely Calypso. It is an entirely JavaScript-powered version of the WordPress admin.

Instead of connecting directly to the MySQL database of the WordPress website, the application controls content over the internet with the help of a special language called REST API. This enables Calypso to be installed anywhere and to connect to any WordPress powered website or even multi sites.

In fact, you will do everything you probably do in the admin screen that leads to instant changes using JavaScript such as

  • Using the customizer
  • Updating plugins and themes
  • Creating and editing widgets
  • Creating and editing menus

PHP only comes into action when you click on the save changes, update, or publish button. The admin screen refreshes and permanent saves are done to the database, making it important to click those buttons.

JavaScript and the WP-REST API

This is the best example of explaining to you how JavaScript interacts with WordPress. The WP-REST API is written in PHP since it requires a server-side language to communicate with the database. But the only difference lies is that you will use JavaScript (specifically JSON objects) to communicate with it.

JavaScript in WordPress themes and plugins

If you are using WordPress, you definitely have a theme and few plugins installed on your website. These plugins use JavaScript to create animations and effects, or perhaps insert content or manage content dynamically. JavaScript is also present in themes too, either to make your communication with the theme more dynamic or power effects on the front-end.

A good example would be a theme that comes integrated with the various different design effects like mega sliders, responsive video and parallax scrolling effect.

If you are planning to learn JavaScript to start working with it, examining the integrated plugins and themes that already use JavaScript would be a good start.

JavaScript is a part of WordPress

WordPress already comes integrated with JavaScript in the form of various JavaScript libraries like Underscore.js, Backbone.js, JSON, jQuery, Bootstrap, AngularJS, and React. Do find the list intimidating? Well, you may find it difficult to go through all these libraries and learn them. But don’t worry, you don’t have to learn all of them at once. Begin with jQuery which is a vast library and makes JavaScript programming a lot easier and convenient.

Also, if you are planning to add effects and animations to your website through a plugin or a theme, jQuery would be the right tool to do so.

Once you get your hands on jQuery and understands how things work with JavaScript, you’ll be ready to move ahead with JSON and WP-REST API.

jQuery Methods

The library itself comprises a variety of methods that one can utilize to create effects and animations. For example, making few elements move and changing size for a full list, deploying and hiding elements, dynamically changing CSS, and adding content.

jQuery utilizes certain simple concepts including the following:

  • selectors: selectors, as the name suggests, are used to selecting a particular element or multiple elements on the web page to let you do something with them.
  • filters: it allows you to filter your selection, in order to select certain elements (such as odd numbered elements).
  • events: There are specific events used in jQuery. The library reacts to these events such as keyboard press or mouse click. The events can be combined with the selectors to create an effect on the web page.
  • variables: you can define variables based on values you put, inputs or selections, and then work on those variables.
  • effects: Upon triggering an event or selecting something, you can add an effect to the selected element. For example toggling between elements, sliding elements up and down, fading in and out and more.
  • Animations: Just like effects, you can also create animations with the help of an animate() property. It allows you to animate any CSS property that accepts numeric values.

The final words:

The thought of keeping your hard learned skills and knowledge of PHP on the back seat and learning a completely new language may be scary. But trust me, it’s worth it especially if you are a big fan of WordPress and uses it for almost your every project.

JavaScript is a flexible language just like PHP and thus can be used to create powerful application apart from just adding animations and effects on your WordPress website.

So what are your thoughts on learning JavaScript? Have you taken a step ahead to become a better WordPress developer? Share your views in the comment section below.

Author Bio:

Jason is an expert WordPress developer having years of experience in working with various web development technologies. Currently, he is working for a leading custom WordPress theme development company – WordSuccor Ltd.. He is always trying to share his intangible knowledge with others on the web.

The post How JavaScript and WordPress Interact with Each Other? appeared first on The Crazy Programmer.

Difference between OOP and POP

$
0
0

Here you will learn about difference between OOP and POP.

Object Oriented Programming and Procedure Oriented Programming are two most popular programming paradigms. In this tutorial we will discuss the key differences between these two approaches.

Also Read: Difference between C++ and Java

Difference between OOP and POP

Image Source

Difference between OOP and POP

Object Oriented Programming (OOP) Procedure Oriented Programming (POP)
Problem Solving To solve a problem it is divided into smaller parts known as functions or procedures. Importance is given to functions or procedures. To solve a problem, it is divided into smaller parts known as objects. Importance is given to objects.
Approach It follows bottom up approach. It follows top down approach.
Code Reusability The existing code can be reused by the feature called inheritance. There is no such feature.
Data Hiding The data is kept secure in class using access specifiers private and protected.   The data is less secure as this paradigm doesn’t provide any way to hide it.
Modification Modification and addition of new feature is really easier. Modification and addition of new feature is difficult.
Problem Size It is suitable for solving big problems. It is not suitable for solving big problems.
Example C++, Java and Python are some examples of OOP languages. C, Fortran and Pascal are some examples of POP languages.

Comment below if you have any doubts or found any mistake in above tutorial.

The post Difference between OOP and POP appeared first on The Crazy Programmer.
Android Snackbar Example

$
0
0

In this tutorial you will learn about android snackbar example.

Snackbar is a new UI widget introduced in material design. It is an advance version or we can say replacement of Toast widget. Snackbar is used to display a short message at the bottom of screen. The message can be dismissed by swiping it.

Also Read: Android Custom Toast Example

Toast vs Snackbar

  • Toast can be placed anywhere on the screen while Snackbar can be placed at bottom only.
  • Toast can’t have a button while Snackbar can have at most one action button.
  • Toast message can’t be dismissed before its time period. Snackbar message can be dismissed by just swiping it.


Simple Snackbar

We can make a Snackbar by writing following line of code:

Snackbar.make(coordinatorLayout, "Simple Snackbar", Snackbar.LENGTH_LONG).show();


The make() method takes 3 arguments.

First Argument: It is the root layout for activity. Here we have used CoordinatorLayout because it gives some extra functionality to Snackbar like if we have used floating button then when Snackbar is displayed the floating button automatically goes up to provide space for Snackbar. By using CoordinatorLayout we can also dismiss the Snackbar by swiping.

Second Argument: It is the message that you want to display in Snackbar.

Third Argument: Time period for which Snackbar should be displayed.

  • Snackbar.LENGTH_SHORT: Display for short time period
  • Snackbar.LENGTH_LONG: Display for long time period
  • Snackbar.LENGTH_INDEFINITE: Displayed until you close it.


Snackbar with Action Button

You can also add an action button in Snackbar by using setAction() method. It can be done in following way.

Snackbar.make(coordinatorLayout,"Snackbar with Action",Snackbar.LENGTH_LONG).setAction ("OK", new View.OnClickListener() {
	@Override
	public void onClick(View v) {
        	Snackbar.make(coordinatorLayout,"You clicked on action button",Snackbar.LENGTH_SHORT).show();
	}
}).show();


You can’t add more than one button.


Customizing Snackbar

We can change color of text of message and action button in following way.

//set color of action button text
snackbar.setActionTextColor(Color.YELLOW);

//set color of snackbar text
TextView view = (TextView) snackbar.getView().findViewById(android.support.design.R.id.snackbar_text);
view.setTextColor(Color.GREEN);


Android Snackbar Example

Below example shows how to make different types of Snackbar in android.

Create a new project with package name com.snackbarexample.


Note: Make sure you add dependency for android design support library in build.gradle (Module:app) file. Just add following line under dependency section and sync the project.

compile 'com.android.support:design:23.4.0'

The library version may vary depending upon your SDK version.


Now add following code in respective files.

activity_main.xml

<?xml version="1.0" encoding="utf-8"?>
<android.support.design.widget.CoordinatorLayout
    xmlns:android="http://schemas.android.com/apk/res/android"
    xmlns:tools="http://schemas.android.com/tools"
    android:layout_width="match_parent"
    android:layout_height="match_parent"
    android:fitsSystemWindows="true"
    tools:context="com.snackbarexample.MainActivity"
    android:id="@+id/coordinatorLayout">

    <include layout="@layout/content_main"/>

    <android.support.design.widget.FloatingActionButton
        android:id="@+id/fab"
        android:layout_width="wrap_content"
        android:layout_height="wrap_content"
        android:layout_gravity="bottom|end"
        android:layout_margin="@dimen/fab_margin"
        android:src="@android:drawable/ic_dialog_email" />

</android.support.design.widget.CoordinatorLayout>


content_main.xml

<?xml version="1.0" encoding="utf-8"?>
<LinearLayout
    xmlns:android="http://schemas.android.com/apk/res/android"
    xmlns:tools="http://schemas.android.com/tools"
    xmlns:app="http://schemas.android.com/apk/res-auto"
    android:layout_width="match_parent"
    android:layout_height="match_parent"
    tools:context="com.snackbarexample.MainActivity"
    android:orientation="vertical"
    android:gravity="center">

    <Button
        android:layout_width="match_parent"
        android:layout_height="wrap_content"
        android:text="Simple"
        android:id="@+id/btn1"/>

    <Button
        android:layout_width="match_parent"
        android:layout_height="wrap_content"
        android:text="With Action"
        android:id="@+id/btn2"/>

    <Button
        android:layout_width="match_parent"
        android:layout_height="wrap_content"
        android:text="Custom"
        android:id="@+id/btn3"/>

</LinearLayout>


MainActivity.java

package com.snackbarexample;

import android.app.Activity;
import android.graphics.Color;
import android.os.Bundle;
import android.support.design.widget.CoordinatorLayout;
import android.support.design.widget.Snackbar;
import android.view.View;
import android.widget.Button;
import android.widget.TextView;

public class MainActivity extends Activity {
    Button btn1, btn2, btn3;
    CoordinatorLayout coordinatorLayout;

    @Override
    protected void onCreate(Bundle savedInstanceState) {
        super.onCreate(savedInstanceState);
        setContentView(R.layout.activity_main);

        btn1 = (Button) findViewById(R.id.btn1);
        btn2 = (Button) findViewById(R.id.btn2);
        btn3 = (Button) findViewById(R.id.btn3);

        coordinatorLayout = (CoordinatorLayout) findViewById(R.id.coordinatorLayout);

        btn1.setOnClickListener(new View.OnClickListener() {
            @Override
            public void onClick(View v) {
                Snackbar.make(coordinatorLayout,"Simple Snackbar",Snackbar.LENGTH_LONG).show();
            }
        });

        btn2.setOnClickListener(new View.OnClickListener() {
            @Override
            public void onClick(View v) {
                Snackbar.make(coordinatorLayout,"Snackbar with Action",Snackbar.LENGTH_LONG).setAction("OK", new View.OnClickListener() {
                    @Override
                    public void onClick(View v) {
                        Snackbar.make(coordinatorLayout,"You clicked on action button",Snackbar.LENGTH_SHORT).show();
                    }
                }).show();
            }
        });

        btn3.setOnClickListener(new View.OnClickListener() {
            @Override
            public void onClick(View v) {
                Snackbar snackbar = Snackbar.make(coordinatorLayout,"Custom Snackbar",Snackbar.LENGTH_LONG).setAction("OK", new View.OnClickListener() {
                    @Override
                    public void onClick(View v) {
                        Snackbar.make(coordinatorLayout,"You clicked on action button",Snackbar.LENGTH_SHORT).show();
                    }
                });

                //set color of action button text
                snackbar.setActionTextColor(Color.YELLOW);

                //set color of snackbar text
                TextView view = (TextView) snackbar.getView().findViewById(android.support.design.R.id.snackbar_text);
                view.setTextColor(Color.GREEN);

                snackbar.show();
            }
        });
    }
}


Now save and run your project.


Screenshot

Android Snackbar Example


Comment below if you are facing any problem related to above android snackbar example.

The post Android Snackbar Example appeared first on The Crazy Programmer.

How to Solve Intel HAXM Error in Android Studio

$
0
0

Here you will get all possible reasons and solution for intel haxm error in android studio.

It is the most common problem faced by android developers. We can’t run Android Virtual Device (AVD) without intel haxm. As I am also an android developer so I face this problem each time I install a new copy of android studio in my laptop. I decided to share the solution for this problem so that it can help other developers.

Also Read: Installing Android Studio and Environment Setup


How to Solve Intel HAXM Error in Android Studio

Below are some possible reasons and solution for intel haxm error. Try all of them one by one, may be any of them will work for you.


Intel HAXM Not Installed Properly

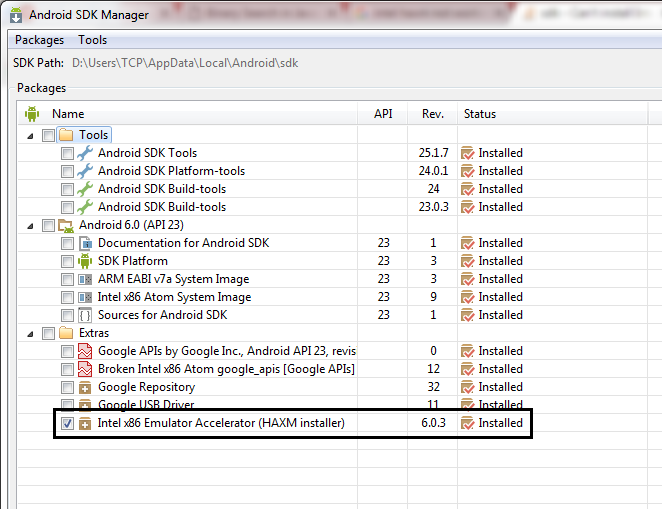
First of all check intel haxm is installed on your system or not. For this open android sdk manager and check it is installed or not.

How to Solve Intel HAXM Error in Android Studio 1

In case it is installed then maybe there was some error while its installation that’s why it is not working properly.

Just uninstall intel haxm from control panel and download it separately from below link and then install. Make sure to restart your system.

Download: https://software.intel.com/en-us/android/articles/intel-hardware-accelerated-execution-manager

If you are getting error like this “Failed to configure driver: unknown error. Failed to open driver” while installing haxm then you can try this solution.


Virtualization is Not Enabled

In some cases intel haxm not work when virtualization technology is not enabled. You can just enable it by going to BIOS settings.


Virtualization is Not Supported

It may be possible that your pc or laptop doesn’t support virtualization technology. In this case you can try following two solutions.

  • You can use third party android emulators like Genymotion, Bluestacks, Nox Player, etc to run and test your app.
  • You can also use your real android device by connecting it to your system using USB cable. But make sure the USB Debugging option is enabled in your mobile device.


Use ARM Image

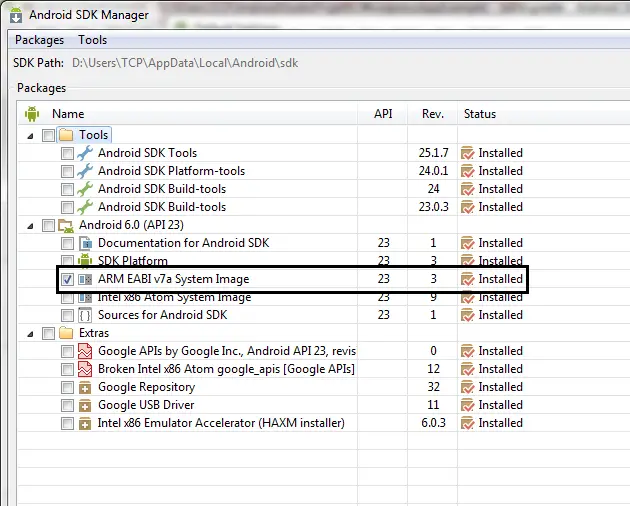
You can use ARM image instead of Intel image to make your AVD. Make sure following package is installed. You can install it by going to SDK manager.

How to Solve Intel HAXM Error in Android Studio 2

Note: AVD made with ARM image works 10 times slower than made with Intel image. Use this option only when above solutions doesn’t work. That’s why I have given this solution at last. If you are using ARM image AVD then make sure your system have at least 8 GB ram and good processor as it will run really slow.

I am sure at least one solution will work for you. Let me know which solution worked for you. If still you are facing any problem then comment below, I will try to solve it.

Happy Coding!! 🙂 🙂

The post How to Solve Intel HAXM Error in Android Studio appeared first on The Crazy Programmer.


Pointer to Pointer or Double Pointer in C

$
0
0

In this tutorial you will learn about pointer to pointer or double pointer in C.

Pointer is used to store memory address of variable. Double pointer is used to store memory address of any other pointer.

Let’s try to understand this by one example.

Also Read: void pointer in C
Also Read: C Function Pointer


Pointer to Pointer or Double Pointer in C

Pointer to Pointer or Double Pointer in C

As you can see in above example that p1 is a pointer as it holds memory address of variable a and p2 is double pointer or pointer to pointer as it holds memory address of pointer p1.

What will be the output if we try to print the values of these 3 variables?

printf(“%d”, p1): 5000 (address of a)

printf(“%d”, *p1): 65 (value of a)

printf(“%d”, p2): 6000 (address of p1)

printf(“%d”, *p2): 5000 (address of a)

printf(“%d”, **p2): 65 (value of a)


Below program will show you how to use double pointer in C language.

#include<stdio.h>

int main()
{
    int a, *p1, **p2;
    a=65;
    p1=&a;
    p2=&p1;

    printf("a = %d\n", a);
    printf("address of a = %d\n", &a);
    printf("p1 = %d\n", p1);
    printf("address p1 = %d\n", &p1);
    printf("*p1 = %d\n", *p1);
    printf("p2 = %d\n", p2);
    printf("*p2 = %d\n", *p2);
    printf("**p2 = %d\n", **p2);

    return 0;
}


Output

a = 65
address of a = 2686744
p1 = 2686744
address p1 = 2686740
*p1 = 65
p2 = 2686740
*p2 = 2686744
**p2 = 65


Comment below if you found anything incorrect or have doubts related to above tutorial.

The post Pointer to Pointer or Double Pointer in C appeared first on The Crazy Programmer.
C/C++ Program for Union of Two Arrays

$
0
0

Here you will get C/C++ program to find union of two arrays.

For example:

First array: {1, 3, 7, 9}

Second array: {1, 4, 6}

Union: {1, 3, 4, 7, 6, 9}


C/C++ Program for Union of Two Arrays

Union of Two Sorted Arrays

If two arrays are sorted then their union can be found in following way.

C Program

#include<stdio.h>

int main()
{
	int a1[20],a2[20],u[40],i,j,k,n,m;
	
	printf("Enter size of first array:");
	scanf("%d",&n);
	printf("Enter elements of first array in ascending order:\n");
	for(i=0;i<n;++i){
		scanf("%d",&a1[i]);
	}
	
	printf("\nEnter size of second array:");
	scanf("%d",&m);
	printf("Enter elements of second array in ascending order:\n");
	for(i=0;i<m;++i){
		scanf("%d",&a2[i]);
	}
	
	for(i=0,j=0,k=0;i<n&&j<m;){
		if(a1[i]<a2[j]){
			u[k]=a1[i];
			i++;
			k++;
		}
		else if(a1[i]>a2[j]){
			u[k]=a2[j];
			j++;
			k++;
		}
		else{
			u[k]=a1[i];
			i++;
			j++;
			k++;
		}
	}
	
	if(i<n){
		for(;i<n;++i){
			u[k]=a1[i];
			k++;
		}
	}
	else if(j<m){
		for(;j<m;++j){
			u[k]=a2[j];
			k++;
		}
	}
	
	printf("\nUnion of two arrays is:\n");
	for(i=0;i<k;++i){
		printf("%d ",u[i]);
	}

    return 0;
}


Output

Enter size of first array:4
Enter elements of first array in ascending order:
1 2 3 5

Enter size of second array:5
Enter elements of second array in ascending order:
1 3 5 7 9

Union of two arrays is:
1 2 3 5 7 9


C++ Program

#include<iostream>

using namespace std;

int main()
{
	int a1[20],a2[20],u[40],i,j,k,n,m;
	
	cout<<"Enter size of first array:";
	cin>>n;
	cout<<"Enter elements of first array in ascending order:\n";
	for(i=0;i<n;++i){
		cin>>a1[i];
	}
	
	cout<<"\nEnter size of second array:";
	cin>>m;
	cout<<"Enter elements of second array in ascending order:\n";
	for(i=0;i<m;++i){
		cin>>a2[i];
	}
	
	for(i=0,j=0,k=0;i<n&&j<m;){
		if(a1[i]<a2[j]){
			u[k]=a1[i];
			i++;
			k++;
		}
		else if(a1[i]>a2[j]){
			u[k]=a2[j];
			j++;
			k++;
		}
		else{
			u[k]=a1[i];
			i++;
			j++;
			k++;
		}
	}
	
	if(i<n){
		for(;i<n;++i){
			u[k]=a1[i];
			k++;
		}
	}
	else if(j<m){
		for(;j<m;++j){
			u[k]=a2[j];
			k++;
		}
	}
	
	cout<<"\nUnion of two arrays is:\n";
	for(i=0;i<k;++i){
		cout<<u[i]<<" ";
	}

    return 0;
}


Union of Two Unsorted Arrays

If two arrays are unsorted then their union can be found in following way.

C Program

#include<stdio.h>

int main()
{
	int a1[20],a2[20],u[40],i,j,k,n,m,flag;
	
	printf("Enter size of first array:");
	scanf("%d",&n);
	printf("Enter elements of first array:\n");
	for(i=0;i<n;++i){
		scanf("%d",&a1[i]);
	}
	
	printf("\nEnter size of second array:");
	scanf("%d",&m);
	printf("Enter elements of second array:\n");
	for(i=0;i<m;++i){
		scanf("%d",&a2[i]);
	}
	
	k=0;
	for(i=0;i<n;++i){
		u[k]=a1[i];
		k++;
	}
	
	for(i=0;i<m;++i){
		flag=1;
		for(j=0;j<n;++j){
			if(a2[i]==a1[j]){
				flag=0;
				break;
			}
		}
		
		if(flag){
			u[k]=a2[i];
			k++;
		}
	}
	
	printf("\nUnion of two arrays is:\n");
	for(i=0;i<k;++i){
		printf("%d ",u[i]);
	}

    return 0;
}


Output

Enter size of first array:3
Enter elements of first array:
1 3 5

Enter size of second array:4
Enter elements of second array:
1 2 3 6

Union of two arrays is:
1 3 5 2 6


C++ Program

#include<iostream>

using namespace std;

int main()
{
	int a1[20],a2[20],u[40],i,j,k,n,m,flag;
	
	cout<<"Enter size of first array:";
	cin>>n;
	cout<<"Enter elements of first array in ascending order:\n";
	for(i=0;i<n;++i){
		cin>>a1[i];
	}
	
	cout<<"\nEnter size of second array:";
	cin>>m;
	cout<<"Enter elements of second array in ascending order:\n";
	for(i=0;i<m;++i){
		cin>>a2[i];
	}
	
		k=0;
	for(i=0;i<n;++i){
		u[k]=a1[i];
		k++;
	}
	
	for(i=0;i<m;++i){
		flag=1;
		for(j=0;j<n;++j){
			if(a2[i]==a1[j]){
				flag=0;
				break;
			}
		}
		
		if(flag){
			u[k]=a2[i];
			k++;
		}
	}

	cout<<"\nUnion of two arrays is:\n";
	for(i=0;i<k;++i){
		cout<<u[i]<<" ";
	}

    return 0;
}

The post C/C++ Program for Union of Two Arrays appeared first on The Crazy Programmer.
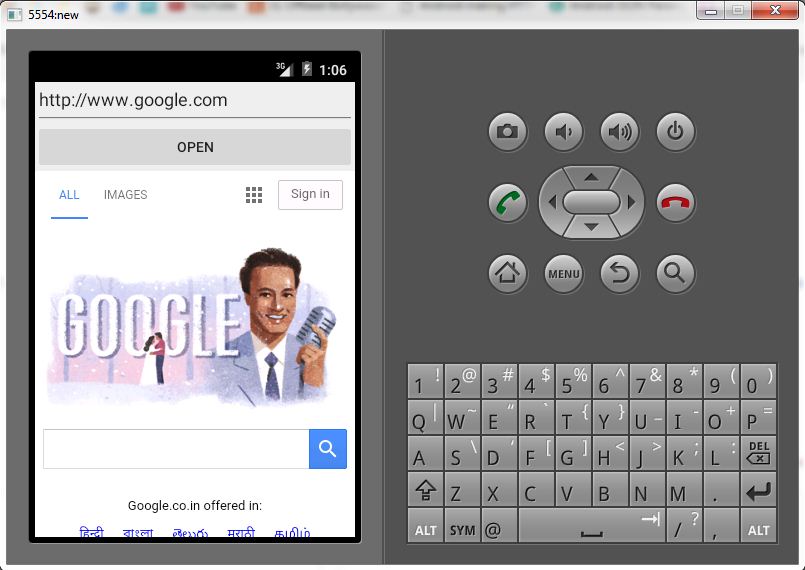
PL/SQL Program for Prime Number

$
0
0

Here you will get a pl/sql program for prime number.

A number is a prime number if it is divisible by 1 or itself. For example 2, 3, 5, 7, etc are prime numbers.

While numbers like 4, 6, 8, etc are not prime.


PL/SQL Program for Prime Number

declare
	n integer;
	i integer;
	flag integer;

begin
	i:=2;
	flag:=1;
	n:=&n;

	for i in 2..n/2
	loop
		if mod(n,i)=0
		then
			flag:=0;
			exit;
		end if;
	end loop;

	if flag=1
	then
		dbms_output.put_line('prime');
	else
		dbms_output.put_line('not prime');
	end if;
end;


Output

Enter value for n: 12
old 9: n:=&n;
new 9: n:=12;
not prime

The post PL/SQL Program for Prime Number appeared first on The Crazy Programmer.
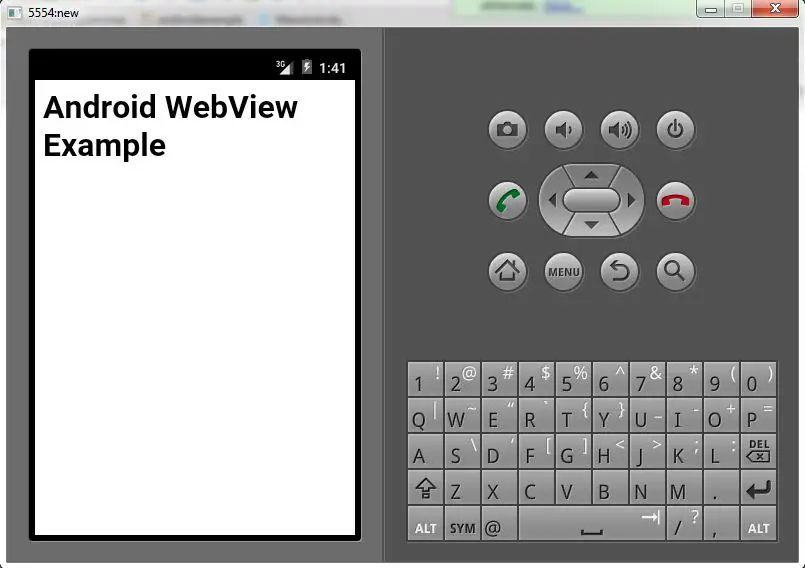
PL/SQL Program to Find Factorial of a Number

$
0
0

Here you will get pl/sql program to find factorial of a number.

We can calculate factorial of a number by multiplying it with all the numbers below it.

For example factorial of 5 = 5 x 4 x 3 x 2 x 1 = 120.


PL/SQL Program to Find Factorial of a Number

declare
	n integer;
	fac integer:=1;
	i integer;

begin
	n:=&n;

	for i in 1..n
	loop
		fac:=fac*i;
	end loop;

	dbms_output.put_line('factorial='||fac);
end;


Output

Enter value for n: 10
old 7: n:=&n;
new 7: n:=10;
factorial=3628800

The post PL/SQL Program to Find Factorial of a Number appeared first on The Crazy Programmer.

PL/SQL Program to Print Table of a Number

$
0
0

Here you will get pl/sql program to print table of a given number.

You can ask your queries in comment section.

declare
	n number;
	i number;

begin
	n:=&n;
	
	for i in 1..10
	loop
		dbms_output.put_line(n||' x '||i||' = '||n*i);
	end loop;
end;
/


Output

Enter value for n: 5
old 6: n:=&n;
new 6: n:=5;
5 x 1 = 5
5 x 2 = 10
5 x 3 = 15
5 x 4 = 20
5 x 5 = 25
5 x 6 = 30
5 x 7 = 35
5 x 8 = 40
5 x 9 = 45
5 x 10 = 50

The post PL/SQL Program to Print Table of a Number appeared first on The Crazy Programmer.

Viewing all 761 articles
Browse latest View live